
Sweet Potato Au Gratin
I have to admit. I have a problem. I happen to be a “gadget girl”. There! I said it. It’s out now and I can’t take it back.
Whenever I’m in a homestore or go to a home party where these things are sold, I have to practice self control.
My palms start to get sweaty (nice, huh?) , my pupils begin to dilate, and I have even been know to twitch a little. I know! I am painting a very pretty picture for you.
One of the little gadgets I have always craved, but have to be honest, have been scared of is the Mandoline. No, not the one you play.
The one you SLICE with!
So, while in the store the other day, a Sweaty Palmed girl broke down and bought one.
BEHOLD!

This is the one I got. I paid only $24.99 for it at my local Sam’s Club. These can run pretty high. That is the reason it has taken me so long to purchase one. They can go upwards of $100. I didn’t want to pay a lot, only to find out I wouldn’t use it. This is the only reason I bought this, because I was so excited it wasn’t $100!
Well, let me just tell you………… I LOVE IT! By the way, since purchasing this, I have seen them even cheaper than what I paid for mine. Even as low as $11.99 online!!!
I have always shied away from recipes that call for thinly sliced ingredients. If I couldn’t buy them already that way, I probably wouldn’t fix it.
Ladies and Gentlemen, I am proud to announce that GONE ARE THE DAYS where I do this anymore!
I had some Sweet Potatoes lying around that I wanted to use up and so I decided to make Sweet Potato Au Gratin for dinner last night. Before you go, “Esther! I don’t like Sweet Potatoes…..” You can definitely do this recipe by substituting them for regular Russett Potatoes. If you do that, you can also either use the Thyme I used in my recipe along with the Gruyere OR you could also substitute those for maybe Chives and White Cheddar Cheese.

So, without further adieu, this is what I did:

I peeled and sliced (with the Mandoline) 4 or 5 Sweet Potatoes (it depends on size) and put the setting to “3/16” of an inch.

I buttered a 13 x 9 in. baking dish.

Quick Tip from my MOM: Don’t throw away those empty butter wrappers! Save them for something like this where you need to butter a dish. It makes it much easier to do it and your hands get less messy! 🙂

I made a layer the Sweet Potatoes in a slightly overlapping pattern on the bottom of the baking dish.

Then I sprinkled with a little Salt, Pepper, and Thyme. Then I sprinkled a thin layer (about 1/2 cup) of Smoked Apple Gruyere Cheese on top. YUM! Is all I can say!
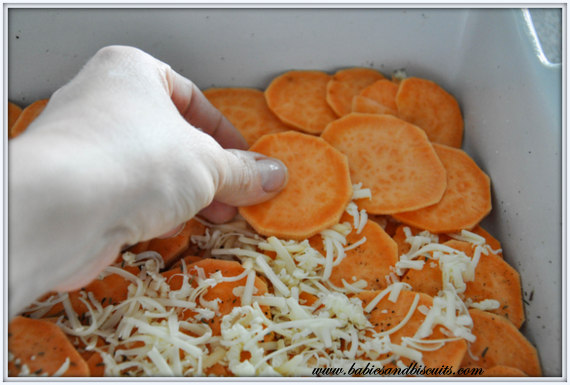
Next, I repeated the layers 2 more times.

After that, I put 1 more layer of Sweet Potatoes on top. (By now, I had 4 layers of Sweet Potatoes total)

Then, I simmered 2 cups of Skim Milk and 2 cloves of Minced Garlic for 2 to 3 minutes.

Then I poured it over the Sweet Potatoes. I made sure I touched every potatoe on the top layer so that none would be dry during the baking process.

Em wanted to help me, so I let her sprinkle the last layer of cheese on top. Then, I covered it with foil and baked it for 30 minutes on 400 degrees. Then, I removed the foil and baked it for another 30 minutes. Be careful when you remove the foil because steam will escape and that may cause you to get burned.

This is what it looks like when you pull it out. Not sure if you can tell, but the milk will still be visible and almost appear like it isn’t finished because of so much being in the pan. NO WORRIES! I let mine cool for 30 minutes, allowing all the potatoes to absorb the milk. BY THE WAY: The brown around the edges is from the milk and steam. I showed this in the picture so you would know to expect it. 😉
After that, right before we were ready to eat, I popped it back in the oven for a few minutes on broil so that the cheese could get a little more browned. Make sure you watch it though! Cheese can burn VERY quickly if you aren’t watching it.

This is what it looked like when finished. Unfortunately, the picture doesn’t do it justice because it was later and there wasn’t as much light outside. (BUMMER!)
This was AMAZING with the Pork Tenderloin we had with it.

Lucky for me, I had just enough leftover for lunch today! Burp!
Recipe: Scalloped Sweet Potatoes
Ingredients:
2 cups Skim Milk
2 cloves of Garlic, minced
2 pounds Sweet Potatoes (about 4 or 5) , peeled and sliced about 1/8-inch thick *OR you could use Russet
Kosher Salt
Ground Black Pepper
1½ teaspoons Dried Thyme *OR you could use Chives
2 cups shredded Gruyère cheese (I used Apple Smoked) *OR you could use White Cheddar Cheese
Directions:
– Preheat oven to 400 degrees.
– Peel and Slice your Potatoes, if you haven’t already.
– Butter a 13 x 9 in. baking dish.
– Layer Sweet Potatoes in an overlapping pattern. Sprinkle with a little Salt, Pepper, and Thyme.
– Sprinkle with about a 1/2 cup of Gruyere cheese.
– Repeat layers 2 more times, ending with the cheese.
– Layer a final layer of Sweet Potatoes, set aside.
– In a small pot bring Skim Milk and Garlic just to a simmer for about 2 minutes. Remove from heat and pour on top of Sweet Potatoes, making sure you touch each potatoe on top layer. Milk will settle to bottom.
– Cover with Aluminum Foil and bake for 30 minutes.
– Remove Foil (BE CAREFUL) and bake an additional 30 minutes.
– Remove from oven and allow to cool for 30 minutes. Potatoes will soak up any milk during this time.
– Stick back in the oven for a few minutes on Broil and allow top to brown a little more.
– Serve immediately.

1 Comment
Spring Style
Having a conversation this morning with a friend made me think of High School.
I remember it was always a game of who spent MORE and the MOST on their look. Be it shoes, pants, tops……
As a parent and adult, I now see how stupid and crazy we all were. LOL! As a parent and adult, it literally scares the hibigeebees out of my wallet that I have 2 girls who will one day very soon (sooner than I would like) be entering that same type of High School where I hope that same game is no longer played. (One can dream, right?)
As adults, instead of bragging about who spent the most for stuff, we are (first of all) embarrassed if we had to, and now only boast about who got the best deal! I like this game much better.
That’s right you crazy kids! It is COOL to get things on the cheap!
So, I thought in honor of Spring and in honor of the fact that I knew there was a reason I didn’t care for High School (LOL!) , I thought I would share some of my favorite clothing deals going on right now!


Cute Jersey Top from Old Navy on sale right now for only $7.00.
Fun Boyfriend Shorts also at Old Navy for $24.94.
Pair it with a fun pair of Converse in Beach Glass for only $29.99 plus free shipping at the Website, 6pm. *Sale ends tomorrow night at 11:59pm, so hurry!


Love this Ruffled Tank from Forever 21 for only $14.80.
Pair it with this pair of Striped Khakis from Gap for $49.95.

I know this may seem like I am trying to give free advertising to Old Navy, but trust me on this top. I had a version of this when I was pregnant and I loved it! After I had my babies, I did the whole “I’m going to just wear my maternity clothes forever thing” , but even though it was considered maternity, it still looked good! I searched high and low for a regular non pregnant version of this and didn’t have any luck.
This top is SOOOOOO forgiving and flattering. Let’s be honest, we all want a top like that, right? It has ruching on the bust area that always works for a great look! Wanna know the best part???? HuH? It’s only $10! Some colors are even as low as $7! Check it out here, but please leave some for me! : )


Even if you don’t shop at Forever 21, they have some really cute jewelry and hair accessories you should check out for CHEAP prices!
This Pearled Headband and Hair Bow are only $2.80. FYI: I get a lot of my little girl’s hairbows from here and we even share them.
I hope this gives you a few ideas to get you started on your Spring look ideas!
Let me know what you think and if you see any more deals, share them with me!
XOXO,
Esther
No Comments
Turkey Tenderloin w/ Blueberry Sauce
I am always looking for something different to cook for dinner. Don’t get me wrong. Sometimes, I just want to fix spaghetti or order out a pizza, but I think we can all agree that we tend to get into a “dinner rut” from time to time.
Well, the other night, I had a Turkey Tenderloin that I had been wanting to cook. I new I wanted to do something different, so I started searching Eating Well’s website. I heart that site by the way. They have plenty of healthy recipes and the ingredients are not foreign sounding names that you look at and go , “HUH???”
Anyway, I searched Turkey Tenderloin recipes and this one came up: Turkey with Blueberry Pan Sauce
Now, before you go “HUH???” again, trust me on this one. It was REALLY good!!! Normally, I would put something like this in front of my kids and they would look at it…… sniff it…. and walk around it like a curious animal before pushing it with their nose over to the side, then eating the stuff they really wanted. *Did I just refer to my kids as dogs?
But NO! They ate it up. Even the little one!
It has the most subtle sweetness to it and let’s be honest. Cranberry Sauce goes just fine with Turkey at Thanksgiving, right?…….Cranberry haters, don’t answer that!
I liked this recipe so much, that I think I may just switch out the traditional Cranberry Sauce next Thanksgiving for something like this instead.

I did notice that the longer the sauce had time to sit in the pan, the sweeter it became. To tell you the truth, I preferred it that way.
I used frozen wild blueberries in mine because I didn’t have fresh on hand. I think either would work just fine. The recipe didn’t state whether or not they needed to be fresh or frozen.

If you want to look up the nutritional info, I have put a link to the recipe here. However, if that kind of thing doesn’t interest you, you could also just look below for the recipe. Notice the *’s . This is used wherever I substituted ingredients for the things I had 😉
Turkey Tenderloin w/ Blueberry Sauce
Ingredients:
- 1/4 cup all-purpose flour
- 3/4 teaspoon salt, divided
- 1/2 teaspoon freshly ground pepper
- 1 pound turkey tenderloin
- 1 tablespoon extra-virgin olive oil
- 1/4 cup chopped shallots (*I used regular onions)
- 1 tablespoon chopped fresh thyme (*I used what I had, which was dried ground)
- 2 cups blueberries (*I used frozen)
- 3 tablespoons balsamic vinegar
Directions:
- Preheat oven to 450°F. Whisk flour, 1/2 teaspoon salt and pepper in a shallow dish. Dredge turkey in the mixture. (Discard any leftover flour.)
- Heat oil in a large ovenproof skillet over high heat. Add the turkey; cook until golden brown on one side, 3 to 5 minutes. Turn the turkey over and transfer the pan to the oven. Roast until the turkey is just cooked through and no longer pink in the middle, 15 to 20 minutes. Transfer the turkey to a plate and tent with foil to keep warm.
- Place the skillet over medium heat. (Take care, the handle will still be very hot.) Add shallots and thyme and cook, stirring constantly, until the shallots begin to brown, 30 seconds to 1 minute. Add blueberries, vinegar and the remaining 1/4 teaspoon salt; continue cooking, stirring occasionally and scraping up any brown bits, until the blueberries burst and release their juices and the mixture becomes thick and syrupy, 4 to 5 minutes. Slice the turkey and serve with the blueberry pan sauce.
Enjoy! and let me know what you think!
XOXO,
Esther
No Comments
Raised Vegetable Garden
Eeeeeek! Spring has Sprung and I am just tickled about it!
You know you are too! How could you not be?
The air is warming up and once in a while you get that perfect day that allows you to dream of those beautiful flowers and veggies you have wanted to plant and grow forever.
Then you grab your car keys……….. run out the door without hesitation………… and then RUN back in once you realize you have forgotten your children (don’t judge me) …………..
then you RUN back out the door and drive to your nearest Home Improvement Store and go WILD!
Right?
NO?
Well, I didn’t do that exactly, but I WANTED TO SOOOOOOOO BAD!
Instead, I was very patient ( which is completely UNLIKE me) and I waited and planned and built a Raised Vegetable Garden Bed with the hubster.
We did it without a plan and SO CAN YOU! Very easy. We were first time DIYers with this and it turned out great!
I have to say I am very Proud of us.
Here is what we did:

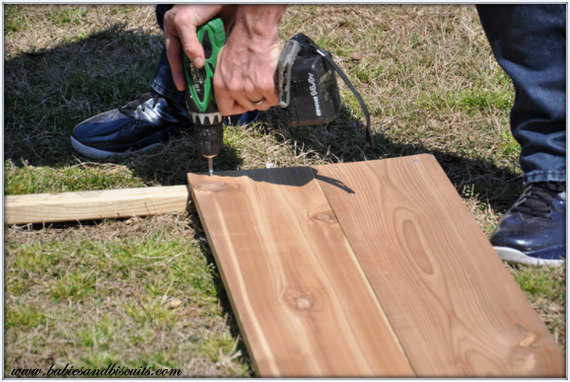
We knew that we wanted the garden bed to be 4ft. x 12ft., so we bought 12 ft. pieces of cedar. We figured for the sides, we could just cut them to 4 ft.
We also bought short 4 ft. pieces of wood that would act as support boards and also an area that the screws could adhere to, in order to stack the boards. We had a few pieces of cedar siding that we improvised with and used so that we wouldn’t have to buy as much cedar.
Don’t mind the ladder. It’s just there for moral support. 😉

We attached the first 12 ft. piece of cedar to the sticks. This top piece split a little on the car ride home, but it wasn’t a concern.

This is what it looked like afterwards.
Then we attached the second piece using the same method. We just lined it up under the top one.

Now, we had (2) 12 ft. pieces of cedar attached to the 2 wood sticks at each end.

We had 4 screws on each side.

We knew we would need more support, so we added an additional board in the middle and attached the boards to it.

Afterwards, we trimmed the length on the support sticks.

This is what they looked like after being trimmed.

We repeated those steps with the boards for the other side. Then, instead of doing it again for the shorter 4ft. pieces, we decided to just attach them to the ends.

This is the 4ft end piece. We attached the two screws for it to the support stick that we had also attached the adjoining side to .

Z even let me get in on the action. Then, he went behind me, removed the crooked screw I attached, and reattached it correctly. Oh well….

Here is a shot of the bed after one board.

Now the finished side.

Then, to keep burrowing pests out, we attached a heavy duty plastic chicken net to the bottom with “U” shaped nails. We didn’t use wire netting b/c I have before and it toar up our hands during the process. I know you could just use gloves, but I’m lazy and I looked it up and the pests shouldn’t be able to chew through the heavy plastic. I might be updating this later if I find that not to be true.

We made sure that it was secure by nailing every ft. or so along the wood.

Since the netting wasn’t wide enough, we had to overlap some of it and then we just trimmed it off at the end with a razor blade.

Buster kept a watchful eye out just in case any rabbits tried to eat our veggies. How do I know I have rabbits? By the piles of “unpleasantries” I found left for me in my yard. (Is that a word?)

The great thing about gardening in general is it seems to awaken something within children. All 3 of my kids love to go out with their Nana and help her with the garden.
Heck! They will even help her pick up Doggie Poopoo at her house. I haven’t mastered that art here yet, but I’m working on it.
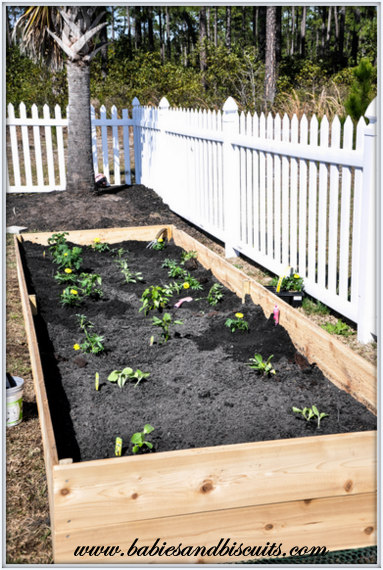
My oldest was beggin me to let her plant the veggies. I wanted to make sure they were done correctly the first time, so instead, I let her plant the marigolds around them.

I CANNOT wait to see how these turn out. I have wanted to plant Heirloom Tomatoes for a while. Z asked me if I thought we would get our money back out of the beds? As soon as I went to the grocery store and saw that tomatoes were $1.99 / lb. , I quickly answered , “Ummmmmm Errrrrrrrrrr Yup! ”

We planted 3 Crookneck Squash , 1 Zucchini, 2 Cherry Tomatoes, 4 Homestead Heirloom Tomatoe, 4 Marion Tomatoes, 2 Cayenne Peppers, and we will be making a seperate 4 x 4 ft. bed for our Cucumbers.
We also planted the Marigolds throughout the bed and will be doing the same thing with the Cucumber bed. Marigolds help keep the bugs off the plants. That is why we plant them. Plus, they look Purrrrrrrrty in there!
I should add that we used to have a garden back where we are from. We were so excited the first year we did it. We had a pretty big backyard, so we planted just about a 1/4 acre of it with all sorts of things. Well, I really had no idea how much it was going to yield and let me tell you , when it started ……….. it didn’t stop!
I couldn’t give it away fast enough before it started to go bad. I think this smaller modest raised bed is much better for us, though my friends might wish we had the larger garden so that we can share. 🙂

Happy Gardening!!!
*I’ll update as we go and show the progress of the plants, as well as give helpful tips on vegetable growing.
No Comments
 |
 |
|
 |

You must be logged in to post a comment.