
Side Dishes
Thanksgiving Stuffing

That’s right, y’all!
Thanksgiving is NEXT WEEK!
Do you know what you are going to fix yet?
Did I just give you a mini heart attack?
If I did……..
I’m sorry!
Well, there is one thing that I know I am going to fix and it is good ole Stuffing!
I have a question though.
Do you fix Traditional Stuffing or do you fix Southern Dressing?
Well, I grew up with the Traditional style, while my husband grew up with the Southern Dressing. Though, I am not partial to either because I love both…….
You see, my mom would fix it the Traditional way and my Grandma would fix it the Dressing way.
So, I decided to fix each one and share the recipe!

First up is the Traditional Way. Rustic, large chunky bread and sausage, with celery and onions and LOTS of butter! 😉
I’m breaking the recipes up into two posts, but because I love you so much, I made a video. Make sure to check it out below and give it a “thumbs up” if you like it!
For the full written recipe, check it out below the video!
XOXO,
Esther

Recipe: Traditional Thanksgiving Stuffing
Ingredients:
• 8 Cups Cubed Bread (* 9 if omitting the Sausage)
• 16 oz. Sage Sausage (Regular is fine) * I used this to enhance the Sage flavor.
• 3/4 Cup Onion, Finely Chopped
• 1 1/2 Cup Celery, Chopped (with leaves)
• 1 3/4 Sticks Butter
• 1 1/2 Tsp. Dried Sage
• 1 Tsp. Dried Thyme
• 1/2 – 3/4 Cup Vegetable Stock , Unsalted (Use according to how dry you like)
• Salt and Pepper to taste
Directions:
• Preheat oven to 350 degrees.
• In a large skillet , melt butter on medium heat. Add celery and onions and saute’ until just softened.
• Stir in 1/3 of cubed bread and toss for a minute. Transfer mixture to a large bowl and set aside.
• In same skillet, add sausage and cook until completely brown.
• Add cooked sausage to vegetable and bread mixture.
• Add remaining bread and ingredients to bowl and toss until well combined.
• Add salt and pepper to your taste.
• Spray a 9 x 13 casserole dish with non-stick spray and transfer stuffing mixture to pan.
• Bake 30-40 minutes or until mixture is completely warmed through and top is golden brown and crispy.
NOTE: * Tossing mixture in the middle of cooking time, may help keep bread underneath from becoming too moist.

End of Summer Risotto

Do you love Risotto? Do you love Summer?
Well friends, let me tell you…… if the answer was yes to either one of those questions, you WILL LOVE this recipe!
For some reason, I have always loved veggies. That’s not to say that I eat them all the time, or I’m a vegetarian (I tried to be a couple of times and FAILED MISERABLY!………….BOTH ………TIMES!)
I just haven’t met a vegetable I didn’t like. I have asked my mother what she did differently during her pregnancy with me, but she wouldn’t give me the secret, so alas, I have not been able to recreate this my own kiddos.
I have to say that while this wasn’t a hit with all 3 of the kids, it WAS with one and Mom and Dad. (*So maybe I got the pregnancy secret down with one of the kids and not the others, right? LOL!)
For some who aren’t familiar with risotto, it is basically rice that you cook slowly and add liquid and other ingredients too that in the end, becomes a rich, creamy, thick rice dish. In other words, YUMMY!
I cannot claim this recipe for my own. I got it from one of my go to Cookbooks, Cooking Light: Good Mood Food.
I always seem to tweak my recipes just a little, so it never ends up exactly like the original, but that’s ok with me. 😉

I really think you are going to love this!
Here you go!
Recipe: End of Summer Risotto
• 6 cups of water
• 1 pound asparagus, trimmed and cut into 3/4 in. pieces
• 1 3/4 cups fat-free, lower-sodium chicken broth
• 2 tbsp. olive oil
• 1 1/2 cups chopped onion
• 2 garlic cloves, minced
• 1 cup uncooked Arborio Rice
• 1 cup Frozen Shelled Edamame
• 1/2 Kosher Salt
• 1/2 Teaspoon Kosher Salt
• 2 oz. (1/3 – less- fat cream cheese (about 1/4 cup)
• 1/2 Teaspoon freshly ground black pepper
• 1 oz. Shredded Parmesan (about 1/4 cup) * You can find this in the pre-shredded packaged cheese in your grocery store.
• 2 Tbsp. chopped fresh thyme or * Dried Thyme works just fine! Just remember to reduce the amount. Dried is stronger than fresh.
Directions:
– Bring 4 cups water to a boil in a saucepan. Add asparagus, and cook 2 minutes. Drain. Bring 2 cups water and chicken broth to a simmer in a saucepan.
– Heat a large saucepan over medium heat. Add olive oil, and swirl to coat. Add onions; cook 4 minutes. Add garlic, and cook 2 minutes, stirring constantly. Stir in rice, edamame, and salt; cook 1 minute. Stir in 1 cup broth mixture,; cook 4 minutes or until liquid is nearly absorbed, stirring constantly. Add remaining broth mixture, 1/2 cup at a time, stirring constantly until liquid is absorbed before adding more ( about 20 minutes total.)
– Stir in asparagus, cream cheese, and pepper; cook 1 minute.
– Spoon risotto into a large serving bowl, OR * 4 individual bowls if main dish. Top the large bowl with 1/4 cup of parmesan cheese or 1 Tbsp. of the parmesan if you are serving in individual bowls.
– Sprinkle with Thyme.
SERVES: 4 if serving as main dish, and much more if serving as side.
SIDE NOTE:
I loved this so much, I had it the next day with left overs! For dinner the night before, we served it with Grilled Chicken. So for left overs, I made it a single bowl full of yumminess!

I ended up with left over Risotto, Grilled Chicken, and added Wilted Kale over top. I love pepper too so I got a little heavy handed on that end, but oh my word!
So So Good!
Hope you enjoy!
XoXo,
Esther

Sweet Potato Au Gratin
I have to admit. I have a problem. I happen to be a “gadget girl”. There! I said it. It’s out now and I can’t take it back.
Whenever I’m in a homestore or go to a home party where these things are sold, I have to practice self control.
My palms start to get sweaty (nice, huh?) , my pupils begin to dilate, and I have even been know to twitch a little. I know! I am painting a very pretty picture for you.
One of the little gadgets I have always craved, but have to be honest, have been scared of is the Mandoline. No, not the one you play.
The one you SLICE with!
So, while in the store the other day, a Sweaty Palmed girl broke down and bought one.
BEHOLD!

This is the one I got. I paid only $24.99 for it at my local Sam’s Club. These can run pretty high. That is the reason it has taken me so long to purchase one. They can go upwards of $100. I didn’t want to pay a lot, only to find out I wouldn’t use it. This is the only reason I bought this, because I was so excited it wasn’t $100!
Well, let me just tell you………… I LOVE IT! By the way, since purchasing this, I have seen them even cheaper than what I paid for mine. Even as low as $11.99 online!!!
I have always shied away from recipes that call for thinly sliced ingredients. If I couldn’t buy them already that way, I probably wouldn’t fix it.
Ladies and Gentlemen, I am proud to announce that GONE ARE THE DAYS where I do this anymore!
I had some Sweet Potatoes lying around that I wanted to use up and so I decided to make Sweet Potato Au Gratin for dinner last night. Before you go, “Esther! I don’t like Sweet Potatoes…..” You can definitely do this recipe by substituting them for regular Russett Potatoes. If you do that, you can also either use the Thyme I used in my recipe along with the Gruyere OR you could also substitute those for maybe Chives and White Cheddar Cheese.

So, without further adieu, this is what I did:

I peeled and sliced (with the Mandoline) 4 or 5 Sweet Potatoes (it depends on size) and put the setting to “3/16” of an inch.

I buttered a 13 x 9 in. baking dish.

Quick Tip from my MOM: Don’t throw away those empty butter wrappers! Save them for something like this where you need to butter a dish. It makes it much easier to do it and your hands get less messy! 🙂

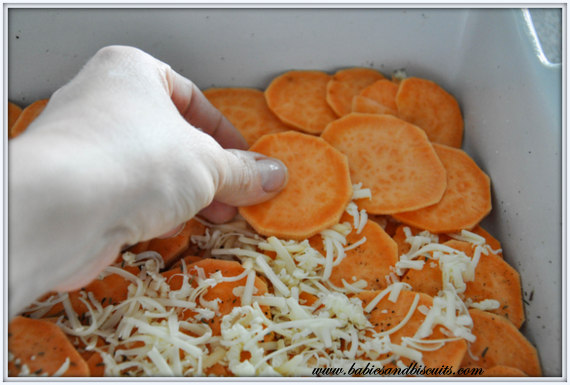
I made a layer the Sweet Potatoes in a slightly overlapping pattern on the bottom of the baking dish.

Then I sprinkled with a little Salt, Pepper, and Thyme. Then I sprinkled a thin layer (about 1/2 cup) of Smoked Apple Gruyere Cheese on top. YUM! Is all I can say!
Next, I repeated the layers 2 more times.

After that, I put 1 more layer of Sweet Potatoes on top. (By now, I had 4 layers of Sweet Potatoes total)

Then, I simmered 2 cups of Skim Milk and 2 cloves of Minced Garlic for 2 to 3 minutes.

Then I poured it over the Sweet Potatoes. I made sure I touched every potatoe on the top layer so that none would be dry during the baking process.

Em wanted to help me, so I let her sprinkle the last layer of cheese on top. Then, I covered it with foil and baked it for 30 minutes on 400 degrees. Then, I removed the foil and baked it for another 30 minutes. Be careful when you remove the foil because steam will escape and that may cause you to get burned.

This is what it looks like when you pull it out. Not sure if you can tell, but the milk will still be visible and almost appear like it isn’t finished because of so much being in the pan. NO WORRIES! I let mine cool for 30 minutes, allowing all the potatoes to absorb the milk. BY THE WAY: The brown around the edges is from the milk and steam. I showed this in the picture so you would know to expect it. 😉
After that, right before we were ready to eat, I popped it back in the oven for a few minutes on broil so that the cheese could get a little more browned. Make sure you watch it though! Cheese can burn VERY quickly if you aren’t watching it.

This is what it looked like when finished. Unfortunately, the picture doesn’t do it justice because it was later and there wasn’t as much light outside. (BUMMER!)
This was AMAZING with the Pork Tenderloin we had with it.

Lucky for me, I had just enough leftover for lunch today! Burp!
Recipe: Scalloped Sweet Potatoes
Ingredients:
2 cups Skim Milk
2 cloves of Garlic, minced
2 pounds Sweet Potatoes (about 4 or 5) , peeled and sliced about 1/8-inch thick *OR you could use Russet
Kosher Salt
Ground Black Pepper
1½ teaspoons Dried Thyme *OR you could use Chives
2 cups shredded Gruyère cheese (I used Apple Smoked) *OR you could use White Cheddar Cheese
Directions:
– Preheat oven to 400 degrees.
– Peel and Slice your Potatoes, if you haven’t already.
– Butter a 13 x 9 in. baking dish.
– Layer Sweet Potatoes in an overlapping pattern. Sprinkle with a little Salt, Pepper, and Thyme.
– Sprinkle with about a 1/2 cup of Gruyere cheese.
– Repeat layers 2 more times, ending with the cheese.
– Layer a final layer of Sweet Potatoes, set aside.
– In a small pot bring Skim Milk and Garlic just to a simmer for about 2 minutes. Remove from heat and pour on top of Sweet Potatoes, making sure you touch each potatoe on top layer. Milk will settle to bottom.
– Cover with Aluminum Foil and bake for 30 minutes.
– Remove Foil (BE CAREFUL) and bake an additional 30 minutes.
– Remove from oven and allow to cool for 30 minutes. Potatoes will soak up any milk during this time.
– Stick back in the oven for a few minutes on Broil and allow top to brown a little more.
– Serve immediately.

Turkey Tenderloin w/ Blueberry Sauce
I am always looking for something different to cook for dinner. Don’t get me wrong. Sometimes, I just want to fix spaghetti or order out a pizza, but I think we can all agree that we tend to get into a “dinner rut” from time to time.
Well, the other night, I had a Turkey Tenderloin that I had been wanting to cook. I new I wanted to do something different, so I started searching Eating Well’s website. I heart that site by the way. They have plenty of healthy recipes and the ingredients are not foreign sounding names that you look at and go , “HUH???”
Anyway, I searched Turkey Tenderloin recipes and this one came up: Turkey with Blueberry Pan Sauce
Now, before you go “HUH???” again, trust me on this one. It was REALLY good!!! Normally, I would put something like this in front of my kids and they would look at it…… sniff it…. and walk around it like a curious animal before pushing it with their nose over to the side, then eating the stuff they really wanted. *Did I just refer to my kids as dogs?
But NO! They ate it up. Even the little one!
It has the most subtle sweetness to it and let’s be honest. Cranberry Sauce goes just fine with Turkey at Thanksgiving, right?…….Cranberry haters, don’t answer that!
I liked this recipe so much, that I think I may just switch out the traditional Cranberry Sauce next Thanksgiving for something like this instead.

I did notice that the longer the sauce had time to sit in the pan, the sweeter it became. To tell you the truth, I preferred it that way.
I used frozen wild blueberries in mine because I didn’t have fresh on hand. I think either would work just fine. The recipe didn’t state whether or not they needed to be fresh or frozen.

If you want to look up the nutritional info, I have put a link to the recipe here. However, if that kind of thing doesn’t interest you, you could also just look below for the recipe. Notice the *’s . This is used wherever I substituted ingredients for the things I had 😉
Turkey Tenderloin w/ Blueberry Sauce
Ingredients:
- 1/4 cup all-purpose flour
- 3/4 teaspoon salt, divided
- 1/2 teaspoon freshly ground pepper
- 1 pound turkey tenderloin
- 1 tablespoon extra-virgin olive oil
- 1/4 cup chopped shallots (*I used regular onions)
- 1 tablespoon chopped fresh thyme (*I used what I had, which was dried ground)
- 2 cups blueberries (*I used frozen)
- 3 tablespoons balsamic vinegar
Directions:
- Preheat oven to 450°F. Whisk flour, 1/2 teaspoon salt and pepper in a shallow dish. Dredge turkey in the mixture. (Discard any leftover flour.)
- Heat oil in a large ovenproof skillet over high heat. Add the turkey; cook until golden brown on one side, 3 to 5 minutes. Turn the turkey over and transfer the pan to the oven. Roast until the turkey is just cooked through and no longer pink in the middle, 15 to 20 minutes. Transfer the turkey to a plate and tent with foil to keep warm.
- Place the skillet over medium heat. (Take care, the handle will still be very hot.) Add shallots and thyme and cook, stirring constantly, until the shallots begin to brown, 30 seconds to 1 minute. Add blueberries, vinegar and the remaining 1/4 teaspoon salt; continue cooking, stirring occasionally and scraping up any brown bits, until the blueberries burst and release their juices and the mixture becomes thick and syrupy, 4 to 5 minutes. Slice the turkey and serve with the blueberry pan sauce.
Enjoy! and let me know what you think!
XOXO,
Esther
 |
 |
|
 |

You must be logged in to post a comment.