
Kid Approved
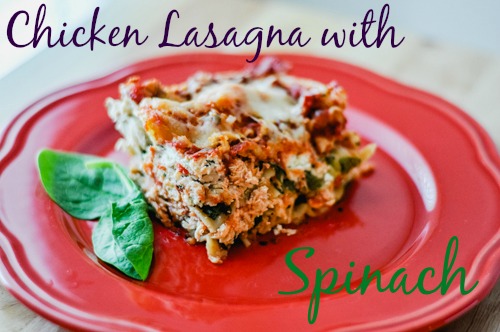
Chicken Lasagna with Spinach
So, lately for some reason, I have had great “ideas” that haven’t been good realities. (*Remember….. the chocolate cakes with ganache? LAWRD !!!! )
Well, I had to save those like I had to save this lasagna tonight. *Just keepin it real over here!*
Well, tonight’s dinner started out with the intent on being Chicken Lasagna Roll Ups. Then, it was dinner making time and I realized that I only had “oven ready” lasagna noodles. I had bought them before because they are magnificent! No boil, just layer those puppies in with the lasagna and you are good to go. I’m talkin STRAIGHT FROM THE BOX, PEOPLE!
Problem?
Well, I had never tried to actually boil them and because you need to boil the actual lasagna noodles in order to make them pliable enough to make the rolls, I was in deep doggy doo doo! *SIDE BAR: Anybody know whether or not you can actually boil these things? I only had enough for the actual lasagna with none to spare, so I was terrified to take that chance. Help a girl out, if ya know!
Instead, I decided to make my own version of Chicken Lasagna and prayed it turned out ok.
GUESS WHAT?
IT DID!
And now, because of my “almost possible maybe I might have had another EPIC FAIL”, I get to share that recipe with you! The people I love so much! 🙂
So, my loves, here you go:

RECIPE: Chicken Lasagna with Spinach
*TIP: I prepared this meal earlier in the day and just put it in the oven when I was ready!
Ingredients:
Sauce:
Lasagna/Filling:
• 1 (15 oz.) container part-skim ricotta cheese
• 1 1/2 cups reduced fat shredded mozzarella cheese, divided
• 1/2 cup grated parmesan cheese, divided
• 1/2 teaspoon salt
• 1/2 teaspoon dried oregano
• 1/8 teaspoon ground pepper
• 10 oz. fresh spinach
• 12 lasagna (OVEN READY) noodles, you may need more depending on how big noodles are. Make sure you make a layer each time.
• 2 cups shredded white meat chicken (*I used rotisserie)
Directions:
• To prepare sauce: Add first six ingredients to a medium size sauce pan. Season with the salt and pepper and bring to a slight boil on medium high heat. Reduce heat, cover and simmer for 30 minutes, stirring occasionally.
• Meanwhile, to prepare filling: Combine ricotta, 3/4 cup of mozzarella cheese, 1/4 cup of parmesan cheese, salt, pepper, and oregano in a bowl. Mix until well incorporated and set aside.
• Preheat oven to 350 degrees.
• In a 13 x9 in. pan, spread about 1 – 1 1/2 cup of sauce on bottom of pan. (just enough to really coat the bottom of pan). Then, top sauce with enough lasagna noodles to make a layer. *This could take 3-5 noodles depending on your noodles. I ended up using 5 on each layer.
• Top noodles with half of spinach.
• Crumble/Spread half of ricotta cheese mix over spinach.
• Spread half of shredded chicken on top of mixture.
• Repeat layers once more. *You may need to press down on layers as you go in case lasagna gets too full.
• End with one last layer of lasagna noodles on top.
• Spread remaining sauce over top of noodles.
• Sprinkle with remaining 3/4 cup of shredded mozzarella and 1/4 cup grated parmesan.
• Cover with aluminum foil that has been sprayed with non stick cooking spray (to prevent foil from sticking to lasagna).
• Bake, covered with the foil for 50 minutes.
• Remove foil, and bake for an additional 5-10 minutes until cheese is golden brown.
• Remove lasagna from oven and allow to cool and set for 5-10 minutes.
Enjoy!
XOXO, Esther

Chocolate Trifle w/ Raspberry Buttercream Frosting

This is the sweet I made for my sweets today.
This was also not what I had intended to make for them. On Valentine’s Day, we tend to make it more about the kids than ourselves anymore. So, the plan this year was to do steak, potatoes, asparagus, and a great dessert. We thought it would be fun to watch the movie, Alexander and the Terrible, Horrible, No Good, Very Bad Day. (Did I Say that right? I never do……..)
Little did I know how much that movie would impact my dessert making skills.
I had this great idea to fix these individual chocolate cakes with this great ganache topping with little Wilton sugar flowers on top.
Everything was going great until I got to here:

I was all like, “Oh yeah! I got this! Came up with this on my own. Going to rock this and my family is going to think I’m a rockstar!”
Yeahhhhhhhhhh……. not so good after that. Everything went wrong!

First, this happened………………
Then,

this………………………

Thank goodness I still had this. FYI: I used a boxed cake mix.

I heart boxed cake mixes.
Not a stinkin thing wrong with boxed cake mixes.
Just sayin……….. When people say, “oh my goodness! This is the best cake I have EVER had!”
You simply say, “Awe! Thank you!” And leave it at that. 😉

So, I went with Plan B. Start stuffing wine glasses and make a trifle.

I stuffed with left over cake and fresh raspberries, with some of the raspberry buttercream icing I made earlier for the cakes.
Wanna know how I made the frosting?
This is what I did:

I took two sticks of softened unsalted butter and using a hand mixer, beat for 2 minutes until light and fluffy. Then, I slowly added 6 cups of powdered sugar, alternating between 1/8 cup of skim milk in between when the mixture got too dry.
Then,

I added a 1/4 cup of raspberry puree to the frosting, which I made by first…………

taking a pint of fresh raspberries and 1 tablespoon of granulated sugar and pulsing in a blender until it was

smooth. Since I had little left over (approx. 1/4 cup) , I used it again later in assembling the trifle.

It made the BEST tasting Raspberry Buttercream Frosting. I often use fresh berries to flavor and turn icing a pink color instead of using red food dye b/c I have an allergy to it myself. Needless to say, I have never had Red Velvet Cake and I often dream of how it may taste. But alas, I shall never know. Oh well.
Anyway, back to the trifle!

Like I mentioned earlier, after layering in no particular order, the cake, fresh raspberries, and the frosting…….. I added a dollop of raspberry puree and then some more cake and frosting.

Then, I added some more frosting ( I know! Enough already with the frosting!) and berries and finally, the Wilton sugar flowers.
It could have been a Terrible, Horrible, No Good, Very Bad Day with the catastrophe that was my cake making skills, but a very wise Pastor once told me, “Never compare your Behind the Scenes to someone else’s Highlight Real”!
So, here I am. Melted cakes and all,
telling you that you can turn a mess into something beautiful and tasty afterall.

I wish y’all a Happy and Sweet Valentine’s Day, from my
HEART
to
YOURS!
XOXO,
Esther

Lee’s Lemon Cupcakes

So, my oldest turned 11 today……………… 11 , y’all!
It breaks my heart………….. mostly because it means I’m getting old.
However,
It doesn’t break my heart to share the cupcake recipe I made for her birthday.
A little while back, I shared a recipe of a cake that was my cake version of this very cupcake. Confusing? Hopefully not.
We bought some cupcakes that were called “Lemon Bliss” Cupcakes at Sam’s Club. They were instantly a HIT! Problem is, they are a seasonal item and you can’t get them all the time. One of my favorite things is to try to recreate foods that I have tried and put my own twist on them in the process. The cake was awesome and we had it for her birthday last year. You can check that post out here.
This year, we decided to do the actual cupcake version so we made a few adjustments.

With the cake I made, I used whipped cream as the “icing”. This time, I decided to go with buttercream and lemon pudding in the middle and also filled the inside of the cupcake with the pudding like a hostess cupcake.
The result was pure AWESOMENESS! The great thing is this cupcake is not heavy at all! I didn’t say it was’t fattening, just not heavy. So, I guess you might want to be careful since you could probably eat a few without blinking an eye. 😉

Have fun and let me know how your’s turn out!
Recipe: Lee’s Lemon Cupcakes
NOTE: It may be helpful to read entire recipe before starting.
Makes 24 Cupcakes (filled half way) or 20 Cupcakes filled 2/3 way high
Ingredients:
– 1 Boxed Lemon Cake , plus additional items needed for cake such as eggs, oil, water (etc.)
– 1 Box Instant Lemon Pudding, plus 2 cups milk needed for Pudding instructions.
– Lemon Buttercream Frosting (Recipe Follows)
– Cupcake Liners
– 1 Cupcake filler tip
– 1 Tip for Buttercream Frosting
– 2 Large Freezer Ziplock Bags
Lemon Butter Cream Frosting:
– 2 Sticks room temperature softened unsalted butter
– 6 Cups Confectioners Sugar
– 1/2 Cup Milk (I use Skim)
– 1 1/2 Teaspoons Lemon Extract
Directions:
– Line Muffin Pan with liners and mix and bake cupcakes according to cake instructions. Allow to cool completely.
– Meanwhile, make Lemon Pudding according to package instructions and put in fridge for 15 minutes to allow to “set up”.
– Make Buttercream frosting by beating 2 sticks butter with a hand mixer until smooth (about 2 minutes). Slowly add confectioners sugar and alternate between milk and confectioners sugar until all has been used. Add lemon extract and beat until completely smooth and all lumps from sugar are gone.
– Once cupcakes have completely cooled, take a large ziplock bag, snip one corner of bag at an angle and insert large long decorating tip for cupcake filling into bag. Fill bag with Lemon Pudding Filling. Seal bag and set aside.
– Take other large ziplock bag and snip a corner of bag at angle and insert another large decorating tip of your choosing for Butter Cream frosting. Fill bag with Butter Cream Frosting and set aside.
– Take cooled cupcakes and inserting the tip of the Lemon Pudding bag into center of cupcake, gently squeeze bag until you can see the lemon pudding filling come out of top. Finish filling remainder of cupcakes. You should have left over. Do not throw away! We will use at end.
– Take Butter Cream Frosting back and make a swirl around top outer edge of cupcake twice, allowing for a “circle” to remain on center of cupcake. Finish frosting remainder of cupcakes.
– Take remaining lemon pudding filling bag and fill remaining center “circle” on cupcake until pudding is level with butter cream frosting.
– Your done! Enjoy!

Thanksgiving Stuffing

That’s right, y’all!
Thanksgiving is NEXT WEEK!
Do you know what you are going to fix yet?
Did I just give you a mini heart attack?
If I did……..
I’m sorry!
Well, there is one thing that I know I am going to fix and it is good ole Stuffing!
I have a question though.
Do you fix Traditional Stuffing or do you fix Southern Dressing?
Well, I grew up with the Traditional style, while my husband grew up with the Southern Dressing. Though, I am not partial to either because I love both…….
You see, my mom would fix it the Traditional way and my Grandma would fix it the Dressing way.
So, I decided to fix each one and share the recipe!

First up is the Traditional Way. Rustic, large chunky bread and sausage, with celery and onions and LOTS of butter! 😉
I’m breaking the recipes up into two posts, but because I love you so much, I made a video. Make sure to check it out below and give it a “thumbs up” if you like it!
For the full written recipe, check it out below the video!
XOXO,
Esther

Recipe: Traditional Thanksgiving Stuffing
Ingredients:
• 8 Cups Cubed Bread (* 9 if omitting the Sausage)
• 16 oz. Sage Sausage (Regular is fine) * I used this to enhance the Sage flavor.
• 3/4 Cup Onion, Finely Chopped
• 1 1/2 Cup Celery, Chopped (with leaves)
• 1 3/4 Sticks Butter
• 1 1/2 Tsp. Dried Sage
• 1 Tsp. Dried Thyme
• 1/2 – 3/4 Cup Vegetable Stock , Unsalted (Use according to how dry you like)
• Salt and Pepper to taste
Directions:
• Preheat oven to 350 degrees.
• In a large skillet , melt butter on medium heat. Add celery and onions and saute’ until just softened.
• Stir in 1/3 of cubed bread and toss for a minute. Transfer mixture to a large bowl and set aside.
• In same skillet, add sausage and cook until completely brown.
• Add cooked sausage to vegetable and bread mixture.
• Add remaining bread and ingredients to bowl and toss until well combined.
• Add salt and pepper to your taste.
• Spray a 9 x 13 casserole dish with non-stick spray and transfer stuffing mixture to pan.
• Bake 30-40 minutes or until mixture is completely warmed through and top is golden brown and crispy.
NOTE: * Tossing mixture in the middle of cooking time, may help keep bread underneath from becoming too moist.

 |
 |
|
 |

You must be logged in to post a comment.