
Lemon
Lee’s Lemon Cupcakes

So, my oldest turned 11 today……………… 11 , y’all!
It breaks my heart………….. mostly because it means I’m getting old.
However,
It doesn’t break my heart to share the cupcake recipe I made for her birthday.
A little while back, I shared a recipe of a cake that was my cake version of this very cupcake. Confusing? Hopefully not.
We bought some cupcakes that were called “Lemon Bliss” Cupcakes at Sam’s Club. They were instantly a HIT! Problem is, they are a seasonal item and you can’t get them all the time. One of my favorite things is to try to recreate foods that I have tried and put my own twist on them in the process. The cake was awesome and we had it for her birthday last year. You can check that post out here.
This year, we decided to do the actual cupcake version so we made a few adjustments.

With the cake I made, I used whipped cream as the “icing”. This time, I decided to go with buttercream and lemon pudding in the middle and also filled the inside of the cupcake with the pudding like a hostess cupcake.
The result was pure AWESOMENESS! The great thing is this cupcake is not heavy at all! I didn’t say it was’t fattening, just not heavy. So, I guess you might want to be careful since you could probably eat a few without blinking an eye. 😉

Have fun and let me know how your’s turn out!
Recipe: Lee’s Lemon Cupcakes
NOTE: It may be helpful to read entire recipe before starting.
Makes 24 Cupcakes (filled half way) or 20 Cupcakes filled 2/3 way high
Ingredients:
– 1 Boxed Lemon Cake , plus additional items needed for cake such as eggs, oil, water (etc.)
– 1 Box Instant Lemon Pudding, plus 2 cups milk needed for Pudding instructions.
– Lemon Buttercream Frosting (Recipe Follows)
– Cupcake Liners
– 1 Cupcake filler tip
– 1 Tip for Buttercream Frosting
– 2 Large Freezer Ziplock Bags
Lemon Butter Cream Frosting:
– 2 Sticks room temperature softened unsalted butter
– 6 Cups Confectioners Sugar
– 1/2 Cup Milk (I use Skim)
– 1 1/2 Teaspoons Lemon Extract
Directions:
– Line Muffin Pan with liners and mix and bake cupcakes according to cake instructions. Allow to cool completely.
– Meanwhile, make Lemon Pudding according to package instructions and put in fridge for 15 minutes to allow to “set up”.
– Make Buttercream frosting by beating 2 sticks butter with a hand mixer until smooth (about 2 minutes). Slowly add confectioners sugar and alternate between milk and confectioners sugar until all has been used. Add lemon extract and beat until completely smooth and all lumps from sugar are gone.
– Once cupcakes have completely cooled, take a large ziplock bag, snip one corner of bag at an angle and insert large long decorating tip for cupcake filling into bag. Fill bag with Lemon Pudding Filling. Seal bag and set aside.
– Take other large ziplock bag and snip a corner of bag at angle and insert another large decorating tip of your choosing for Butter Cream frosting. Fill bag with Butter Cream Frosting and set aside.
– Take cooled cupcakes and inserting the tip of the Lemon Pudding bag into center of cupcake, gently squeeze bag until you can see the lemon pudding filling come out of top. Finish filling remainder of cupcakes. You should have left over. Do not throw away! We will use at end.
– Take Butter Cream Frosting back and make a swirl around top outer edge of cupcake twice, allowing for a “circle” to remain on center of cupcake. Finish frosting remainder of cupcakes.
– Take remaining lemon pudding filling bag and fill remaining center “circle” on cupcake until pudding is level with butter cream frosting.
– Your done! Enjoy!

When life hands you lemons…. (Make a Ridiculously Good Lemon Cake)

It’s been a while since I did a blog post. I have been buried waist deep in these awful things called taxes. Have you ever heard of them? Oh my word, they are awful! I’ll have to tell you about them sometime……. maybe some OTHER time…..
The important thing today is cake! Not just any cake. The kind of cake that makes you wanna slap your momma! *Sorry momma! I never liked that saying. At least not until after I became a momma!! 😉
You know, I have to say, I really surprised myself on this one. Even though it was the easiest of cakes to make (more on that in a minute), it didn’t taste like it was.
It all started with my oldest turning 10 at the beginning of the month. We usually make whoever’s birthday it is, their favorite meal and their favorite cake or one of their choosing. I had just bought these premade “lemon bliss” cupcakes, or so they were called from Sam’s Club. Lee absolutely fell in love with them…. and so did everyone else.
It was decided that she wanted a cake version of the cupcakes. Now, if I were really organized and thinking ahead for this blog post, I would have taken a picture of them. But that just wouldn’t be me. 😉
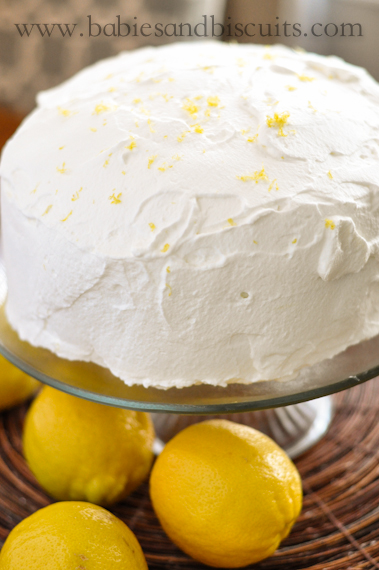
So instead, picture a lemon cupcake with a dollop of lemon pudding on top with a thin ring of buttercream icing around it.

Oh, how I love lemon!!!!
While I didn’t decide to use buttercream….. only because I felt it would have been just too much for the entire cake. I decided to go the whipped cream route instead.
This is what I did:

I took a lemon boxed cake (yes, boxed) and 2 packages of instant lemon pudding.

I did my best to evenly distribute the cake mix into two pans so that the layers would be as even as possible.

Now, here comes the stacking. However, what this picture doesn’t show is that right after this, I decided to put wax paper under the first layer to allow for spills with the whipped cream icing.

I took half of the lemon pudding and spread on top of the first layer. Then, I topped it with the second layer and spread the remaining pudding on top.

I spread it out to the edge as far as possible without dripping over.

Now, time for the whipped cream. I used my tried and true whipped cream recipe. It’s the same one I used for my Mixed Berry Tartlets. You can see it here. However, I added a teaspoon of lemon extract to amp up the lemon taste for this recipe.

Then, I just dumped it all ( a little at a time) because, well, WHY NOT?

I love whipped cream because it spreads so much easier than buttercream. I actually looked like I knew what I was doing in this pic.

Then, I just sprinkled some lemon zest on top and voila! I carefully pulled the sheets of overlapped wax paper out from under the cake and it made it look very clean.
I was so happy with how it turned out! It wasn’t just pretty, it was RIDICULOUSLY GOOD ! This recipe would be great all year long. It is light enough for Summer, even though I fixed it in the Winter.

If you fix this, I would love to know what you think !
Here is the Recipe:
Recipe: Ridiculously Good Lemon Cake
– 1 Lemon Flavored Box Cake ( I used the Very Moist Version) *You will also need oil, eggs, and water according to cake mix.
– 2 Boxes Lemon Instant Flavored Pudding
– 1 1/2 Cups Skim Milk
– 1 Pint Heavy Whipping Cream
– 2 Tablespoons Granulated Sugar
– 1 Teaspoon Lemon Extract
– Lemon Zest (Optional)
Directions:
– Prepare cakes according to directions. Allow to cool completely.
– When cakes are completely cooled, prepare lemon pudding by mixing together 2 packages pudding mix with milk. Whisk for 1- 2 minutes or until pudding becomes thick.
– Prepare whipped cream icing by mixing heavy whipping cream with sugar and lemon extract with an electric mixer until it forms stiff peaks.
– Start layering cakes by first, laying wax paper pieces in an overlapping patter on top of a cake plate. Put first cake layer on top of the sheets.
– Spread half of the prepared pudding on top of first layer.
– Top with second cake layer and gently press on top, allowing the pudding between layers to spread slightly.
– Spread prepared whipped cream over top and sides of cake.
– Sprinkle with (optional) lemon zest.
*For best results, refrigerate for 1 hour prior to serving.

Lavender Sugar Scrub
I think everyone needs a good Scrub.
Sugar Scrub that is.
Whether you are a Dude or a Dudette,
we all get dry skin in the Winter ,
AND
for some of us, Summer too! (Umm, yeah that would be me.)
I have an easy home recipe here that takes less than 5 minutes to whip up.

Most of the ingredients can be found in your pantry.

The only ingredient that most do no have is the essential oil.
Other than that, it is just Sugar, Olive Oil (I have Extra Virgin), Chamomile Tea, and your favorite Essential Oil.

The Essential Oil will give you your scent. I used Lavender which gives a Soothing quality so if you are going to bed afterwards, it really helps to calm you.
Lemon is a great scent too!
I almost did Peppermint, so when I run out of this one, I’ll probably do that next time.
You can find Essential Oils at your local craft store, but I bought mine at my local Health Store, called Bay Naturals.
Here is a link to their store: www.bay-naturals.com

The best thing about this is the fact that it makes your skin feel SOOO smoothe when you are finished.
You will have a glow to your skin and who doesn’t love that, right?
Recipe: Lavender Sugar Scrub
Ingredients:
– 1 Cup Granulated Sugar
– 3/4 Cup Olive Oil
– 1 Chamomile Tea Bag
– 1/2 Teaspoon Essential Oil such as Lavender
Directions:
– Cut open tea bag and pour into medium sized mixing bowl.
– Add Sugar and mix well.
– Using 1/4 Cup at a time, add Olive Oil to Sugar mixture until it is the texture of “wet sand”.
– Add essential oil. *If you would like to use more than recipe suggests, that is fine. Add to your liking, but be careful! A little goes a long way and may end up being too strong if you are not careful.
– Store in air tight container.
In shower:
– Wet skin and using scrub, gently massage onto body.
– Allow to sit on skin for 2 to 3 minutes before thoroughly rinsing.
*Be careful, shower floor may be slightly slippery afterwards, so use caution and REMEMBER: A little goes a long way!
Have fun with it! Try your favorite essential oil!
( * This was not a paid advertisement for Bay Naturals. I simply bought my ingredients there. )
Sweet Tea and Lemon Soap Bar

I thought we would finish up “Sweet Tea Week” with one of my FAVORITE things.
SOAP!
I know what you are thinking, SOAP? And to answer your question……. yes, soap!
I started making my own facial/body soap about 6 months ago. I was on my Anniversary trip which we like to call our “Staycation”. Instead of going on a trip away from home, my parents came to my home and kept the little ones, while the hubby and I took our camper and just parked it at the beach 10 minutes away. I guess I just couldn’t leave them for that long and go out of town. (I’m working on this) Maybe next year?
Oh well, while I was there, I ran out of my regular facewash. I don’t know about you, but I cannot use the same facewash for too long. It will work for me at first, but after about 2, maybe 3 months, something happens and it no longer works for my face. I start to break out really bad and I have to move onto the next thing.
SO!
I went to the store and bought an Aveeno product because in my head, Aveeno was great for sensitive skin, like my own. After washing my face a few times, I started to notice my skin was getting a little dry. Then, the next morning, I woke up to complete HORROR! I had all these little itchy red bumps on my face. I have a rosey complexion anyway, so anything that is red on me, becomes blotchy and irritated looking. I grabbed the bottle of facewash and only then noticed that it said Salicylic Acid as one of the MAIN INGREDIENTS! It was clearly stated on the front, which I clearly ignored when purchasing it.
Let me tell you, all of this didnt go away for the rest of the trip. I, of course, felt like the Prettiest girl in the world with my skin looking like I had some contagious disease!
I was pretty much done at this point with store bought facial cleansers. I told myself that as soon as I got home, I was going to research and start making my own. I basically had nothing to lose. I ended up finding out that Glycerin, which is a moisturizing element that is produced during the soap making process with Lye, is often taken out of regular soap and added to things like lotion. This is the reason that lotion is so moisturizing in the first place! Soap companies end up getting more for their money by being able to produce more products. Don’t get me wrong, their is still plenty of soap that contains Glycerin, but I wanted the main thing in my soap to be Glycerin because it is both gentle and moisturizing for the skin.
Which brings me to this recipe. It is a lot of fun. You don’t have to do sweet tea if you dont want to. I just did because it was fun and I was finishing up Sweet Tea Week. I have done Lavender, Lemon, Peppermint. The possibilites are endless.
Here is what I did:

First, start with a “Melt and Pour” Glycerin base. I picked this up at my local craft store for $9.99 › Continue reading

 |
 |
|
 |

You must be logged in to post a comment.