
Decorating
Tissue Paper Pom Pom

When I was in Catholic school, I was a Cheerleader.
It was actually pretty fun. Except for the fact that it was a CATHOLIC school! I really loved my school. However, instead of having sassy short skirts, we had knee length ones.
Instead of having really cool sleeveless tank style tops, we had sweaters. Have you ever seen a hot sweaty girl who’s cheeks get really flushed on a regular basis without even having to move…………. try to cheer in a hot itchy sweater? Let me just tell you………… It ain’t pretty!
Plus, I’m pretty sure I was still rockin my “waved” bangs and sides. (*Don’t even try to lie and act like you didn’t ! You know you were right there with me……… PLEASE say you were right there with me.)
*SIDEBAR: They got the cool uniforms the year AFTER I cheered. I still harbor resentment.
*Well, fast forward to 2013 and I am not talking about the pom poms that come with a skirt…….. or a sweater for that matter.
I’m talking about the fun, cute ones you make for parties. They take about 5 minutes TOPS and would be adorable at the next little birthday party you throw for a loved one. They also double as cute room decorations. Just group them with a few others at different lengths hanging from the ceiling and instant CHEAP accessory!
Here is what you need to do:

You will need a pack of tissue paper, one pipe cleaner (or something sturdy to fasten the middle of the pom pom, and some ribbon to hang it with).

I get the packs that have 8 sheets, but you can always buy one with more. It would just be fuller. This pack only cost $ .99 at Walmart. I already had the pipe cleaner and ribbon, so it only cost me the amount of the tissue paper.

Unfold the tissue paper and leave all the sheets still stacked on top of each other.

Start to fold the tissue paper in an accordion style. Fold one way, then the opposite way. Do this until you have folded the entire stack.
Since the paper comes folded already, you will have somewhat of a template to follow. However, I fold mine slightly smaller than the width they have.

Like so…..

When gathered in the middle, this is what it should look like.

Now, gather in the middle and secure a pipe cleaner to the middle of the folded tissue paper.

Either cut off the excess pipe cleaner or wrap the extra around like I did.

Now, one by one, starting pulling back the individual sheets on each side. Be careful not to rip the sheets. They are fragile.

I like to pull one on each side, working my way towards the middle until all of them have been done.

This is what it should look like when you have completed one side. Now, just repeat the same steps on the other side.

Looking straight through to the middle, this is what it will look like.

Now, take your ribbon and cut the desired length.

Attach around the pipe cleaner in the middle.

Make sure you fluff around where the center is in order to hide the opening.

AND VOILA!
Mix colors and have fun! We did this for the 4 Year Anniversary at my Church a few months back and hung them everywhere. At the end of service, we let all the little kiddies take one home.
Here is a picture of some from the 4 Year Anniversary Party:

Happy Partying and Happy Decorating!
XOXO,
Esther

Superhero Themed Boy’s Room

(*Lighting was not on my side this day for picture taking, but oh well…..)
Little Boys! Ahh….. I just love it!
You know, when we were starting to have our Babies, with the first being a girl, then the next being a girl……..
We basically got into a mindset that we were just meant to have little girls, and we were fine with that. In fact, we got to the point where we thought it would just be odd if we DID end up having a boy.
Flash forward a few more years and SURPRISE! Esther! You have a baby boy! He is 4 yrs. old and a big ole pot of CRAZY!
His loves are first and foremost, his MOMMA! Then his blankie, and then SUPERHEROES!

I have to admit that I absolutely love this! His room is very Superheros meets Andy’s Room from Toy Story.

When deciding on a color scheme, I felt that it had to be no other than blue and red, with touches of green.

We had to have a section for his ball caps too! By the way, his collection is very much influenced by his Daddy……….. hence the Yankees caps! 😀
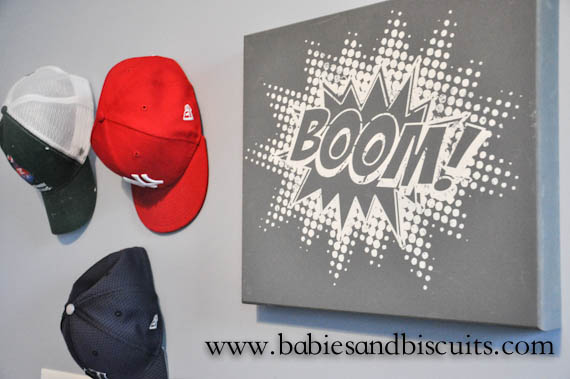
No Superhero room would be complete without a BOOM! sign. I couldn’t find a POW! one, so I have a sweet friend that is going to paint one for me instead.
The wall’s paint color is called November Skies, by Benjamin Moore.

I’m sure by the time we are finished, we will have a huge wall full of Superheroes to watch over my sleeping baby boy at night.

Thankfully, the toys haven’t gotten out of control just yet. I found that cool metal cage at Homegoods and attached it to the wall for shoe storage.

I really heart that little boy! He truly is “OuR LiTTle SuPeRHeRo!”
Sources for items in the room:
Boat Picture over bed – Homegoods
BOOM! Sign – Homegoods
Our Little Superhero – Homegoods
Batman Lunchbox – Old Navy
Red Curtains – Target
Red and Blue Toy Boxes with Chalkboard Fronts – Homegoods
*If there is anything I missed in the room and you would like to know where it was bought, leave a comment and I’ll let you know! 🙂
Happy Decorating!
XOXO,
Esther
Kitchen Cabinets (Makeover)
It was funny.
A couple of weeks ago,
a couple of women came to my home for the first time.
I remember we were talking about where I had gotten things I decorated the room with and what had been done to the house since we had bought it and moved in.
Then, we came to the cabinets in the kitchen.
One of the women had commented on how much she liked the original deep color of the cabinets.
I started to discuss how we had just bought the paint to start my next project, which would be painting the cabinets.
It’s funny because everyone looks at you when you say the dreaded words……
PAINT THE CABINETS!…. duh duh duhhhhhhhhh!
I, myself, was even guilty of this as recently as a few years back.
In fact, my husband, THE PAINTER was even guilty of this as recently as….. oh, I dont know…. a few MONTHS ago.
We had painted ….. attempted to paint our previous home’s cabinets several years ago.
It didn’t turn out so well. (Shhhh! Don’t tell my painter I said that.)
Back then, even though Z was a painter, he wasn’t up to speed with new products and he liked to “wing it” a lot. (too much)
Now that I have bashed my hubby for a few minutes (Sorry sweetie!)…
let me take a second to praise him.
He has since become awesome! The most awesomest, cutest painter I know.
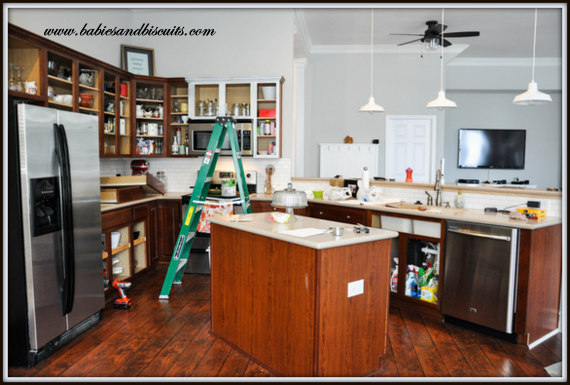
This is what our cabinets looked like before. Since we had installed the flooring in the house, everything was starting to look like one continuous color in the kitchen.
That sometimes works, but considering everything was that same brown, it was taking away from the floors moment to shine.
I really felt like if we just painted them, it would take care of it.

BUT! Then, I would have moments like this. Where I would look at it from a little distance and would think,”Now that doesn’t look so bad.”
Then I would have my “Clueless moment”. Not the mental one. The movie one.
You know, the part in the movie where Cher says, “It’s like a Monet!”
“It looks fine from a distance, but up close…………..

It’s a BIG OLE STINKIN MESS!”
I may or may not have added a few words there…..
So!
Since I only get things painted around my house when it rains…..
I got started.
It only took me 2 Rain Dances before the Rain Gods answered my request with some Wet Weather.
So, WE got started.

First we removed the doors and hardware. Then we took an electric sander and roughed them up.
Here is one like the one we used.
This is a very important step because you want to give the coating something to stick to.
If you just try to paint right over the cabinets, it will still work, but for the longevity of it, you should rough them up prior to application. Otherwise, it may start to peel a little down the road.
You can use sandpaper grit between 150 – 220 for this. For the power sander, they come in discs for this.

Then start painting! I’m going to tell you a secret…..
The paint we used for the cabinets doesn’t even need a primer prior to application!
SAY WHAT!?!
Yup! No primer! In fact, it is specially designed for cabinets and it is called Cabinet Coating.
It is a product carried by our local paint store, Spectrum Paints.
Others may carry it, but I haven’t checked. It is kind of pricey per gallon at $55/ea.
However, when you consider the fact that we only had to get 1 gallon for the base cabinets and 1 gallon for the upper cabinets AND still have left over, it is a pretty good deal.
We used a 4 in. wide Mohair Roller brush and a regular Paint brush for application.

Another great thing about this product is that it is “self leveling”, which means that when it dries, it levels out any brush strokes and looks like you sprayed it on or better yet… like you bought them that way.
We chose Benjamin Moore colors for the cabinets.
I also decided to do a “two toned” color palette.
It simply means that you go with one color for the base cabinets and a different one for the uppers.
The color for the base cabinets is Fieldstone.
The color for the upper cabinets is Vanilla Milkshake.

AND VOILA!
Now, I know what you are saying….. Ummmm. That’s a lot of gray!
Well, my camera was having a hissy fit that day and for some reason, everything looked very much the same color.
(It’s not though.)

Here is a little better idea of what it looks like. I know it is hard to believe, but the base color is actually darker than it appears in the picture.
I just love the way they turned out.

The floors finally have their moment to shine and do not have to compete with the cabinets any longer.

It’s like a breath of fresh air now coming into the kitchen. It’s so light and airy and somewhat beachy without being “cheesy beachy”???

The wineglasses finally have a home of their own.

The crystal knobs make me smile. FYI: Lowes and Home Depot have them for $3.97 ea.

Z hung my pot rack that I stole off of Joss and Main for $102.00, which might sound like a lot, but when you consider the fact that it has even a small amount of copper in it, it is an awesome price!
So, now I have more room in my cabinets.

I know I have shown shots of my little “conversation area” a million times, but I have added a light over the end table, so I had to share.
Probably won’t be the last time I throw a pic of this spot up here either.

See! Told ya! (Here is a closer look at the light)

I have been wanting this phrase for a while and saw it at a friend’s vinyl letter party, so I bought it right away. If you like it, email me and I can give you the name of the rep that I bought it from.
(Now, if I can only get Z to paint the crown…….)

I used to be that person who hung plates ALLLLL around her house. I have since toned it down a little, but when my mom bought this set for me for Christmas, I knew exactly where it was going to go.
The words are from “Patty Cake, Baker’s Man”, which my mom used to sing with me all the time when I was a baby, and I have with my own babies.
(Made me cry when I opened it.)

I let the light be darker in this picture, so it could really pick up on the green in the base cabinets.

I have wanted a set of measuring spoons like this ever since I saw Paula Deen’s on her show. Her’s were real pewter and I wasn’t about to spend that kind of money on something that I was going to get dirty all the time. LOL!
So, while Christmas shopping, my mom and I stumbled upon these at a cute shop in Myrtle Beach for $24.95. They have the same look of pewter without the price tag!!!!
I have since seen them all over, so if you do not plan on traveling to Myrtle Beach anytime soon, you could still find them.
*I just wanted to drop a little note. While I like to think I know a lot about painting, the truth is ……. I don’t. (I only know a little)
The other truth is…. Z DOES!
It’s his job and passion and has been for years.
I usually type my posts while he isn’t here. Then, he usually comes home and says, “Why did you tell everyone to buy that type of paint?!!?” Ooops!
Then, I go back on my site and correct what I wrote wrong! YIKES! LOL!
SO!
If you should have any questions at all, please feel free to email me and let me know and I will ask the EXPERT!
Then! I’ll even write you back with the answer! 😉
*I also wanted to add that the reps at Spectrum Paint said that while they can pretty much do any color in the Cabinet Coating, the best results are with “Pastel” colors. Apparently, the darker the color, the softer it makes the Coating.
The lighter colors do not break down the Coating and allow it to harden as it dries, yielding better results!
Hope you found some inspiration with the kitchen cabinets. I will probably do an update soon. We plan on painting the ceiling…..
Happy Thursday!
-Esther
Halloween Decorating
I love sprucing up the house for different Holidays. I especially love doing it for Halloween.
My mom, as well as my mother in law always do atleast a little decorating on the inside for it.

You don’t have to do much. I just take some “scary” things and put a little around the house.
For instance. . . . .

No coffee center would be complete without a few orange coffee cups, equipped with their own ghostly chains to drink out of.

A dead black rose and bones for stirring your cream and sugar.

Of course, if you aren’t careful . . . . . .

things can become a bit “overgrown”.

While pesky critters may come out to play!
However, you must REMEMBER, any Good Witch will tell you . . .

ALWAYS decorate your foyer.

NEVER dust for cobwebs,

ALWAYS put out your best Skeleton Heads,

And ALWAYS keep Lists.

And NEVER EVER forget your Black Cat.

Happy Haunting!
-Esther

 |
 |
|
 |

You must be logged in to post a comment.