
Decorating
Fall Decorating

When it comes to seasonal decorating, nothing gets me more excited than Fall.
It must be because change is happening all around you. It’s a lot like what Spring time does to someone who has been experiencing Winter for so long. Those long cold days that finally see the warmth of Spring, accompanied by the that first sign of new life in a budding flower.
It’s exactly the same thing for me after a long hot Summer.
Those first few true days of Fall when I start to see the leaves change colors with all the vibrant oranges and yellows and browns. The crisp cool air that begs you to grab that first hot chocolate or apple cider.

The thought of those endless ideas running through a little child’s head of what their imagination tells them they can be for that one special night on Halloween.

I think I enjoy all those Halloween movies more than my own children. I force them to watch the countless reruns of Halloween Town, Halloween Town Part 2, 3, 4……………… so that if someone comes in and catches me, I can blame it on them. It’s a good thing no one knows I can recite the entire movie of Hocus Pocus without even thinking about it. Don’t tell anyone I told you that!

Freshening up your front entry way can do wonders for your home. I had majority of the items already like the wood box, haystack, and pumpkins. I added a few mums and the corn stalks that I found at Lowes.
Small changes like even painting your front door can really freshen up the space as well. We used a dark gray on our doors that used to be red. I love gray for so many reasons. The best reason is that because it is so neutral, it goes well with any color scheme.

The silk leaves are left overs I had from last season and can be found at any craft store or even places like Walmart.

The window box on the front window got seasonal flowers as well. I couldn’t wait to try out this beautiful ornamental kale I found.

I have always seen these in pictures in magazines and as silly as it seems, I just had to get them.

I really love the way they look. It almost seems like they could be Cabbage Patch Kids…….. Admit it! You thought about it. 😉

Whatever you go with for your seasonal decorating, make sure to only use things that you really love! Don’t settle for anything else!
Happy Decorating!
XOXO,
Esther

One Kings Lane: Mixing Vintage and Modern Styles
The internet is an amazing place! In my opinion, the most amazing thing about the internet is being able to share your ideas in hopes that it may inspire someone else. Whether it is inspiring them in cooking, organizing, or even DECORATING!
Well, I couldn’t believe it when the awesome online store, One Kings Lane contacted me and asked me to share my ideas on how I like to mix vintage finds with more modern ones. They are a fantastic store that have sales on one of a kind finds. They and I, both, are loving this style right now.

I absolutely LOVE these old army boxes that my Dad brought me a couple of weeks ago. Not only are they cool, but they tell a story. I love to imagine who it was who used these boxes and what their life was like at the time.
I decided to stack them on top of each other and use them as a bedside table, since I was needing one in my spare bedroom.
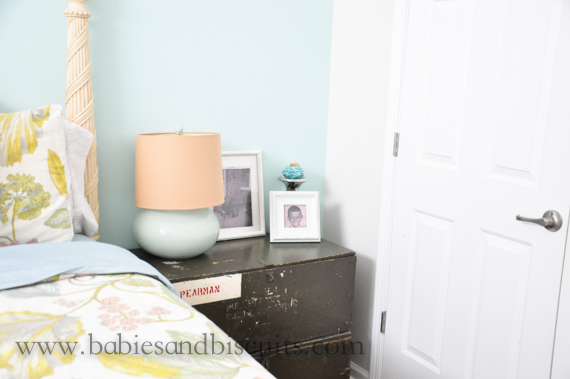
I decided to pair them with a modern style lamp and vintage pictures of my Mom and Dad. By the way, I think that is a great way to show guests they are important!

When a guest is visiting you and you have pictures of them, try placing them in the room that they are staying in. It personalizes their room and I bet they will get a kick out of it!

I happened to have this old vintage picture of my Dad as a young boy,

and this one of my Mom with her beloved cocker spaniel when she was a child. They really appreciated the gesture when they visited.

You also probably remember the lockers that Z brought home from a job that we painted and used in the entry way. They are still a “work in progress” , but they are just so cool and because of that we used them in the rest of the house as well.

We recently purchased the coolest light that has a vintage look to it to go above the lockers.

The pendant lights over the kitchen bar add to the vintage/modern design we love.

Of course, little man had to have a “superhero” red one……

and the girls’ got blue and purple ones.

I picked up this vintage sign at a flea market shop down on Ocracoke Island several years ago and it has had a spot on my wall ever since.

I bought these plates at the State flea market in Raleigh 5 years ago.

They are an unexpected piece of art placed on the wall next to modern style office accessories.

I have had this milk jug forever. I love these things. If I ever come across them, it is so hard to pass them up. I think they add such great character to any room and are great conversation pieces.
If you aren’t really sure about what category your style falls into, One Kings Lane has a great new feature they are offering to help you figure that out. It’s called their Home Decor’ Resource and you should definitely check it out!
I personally think I fall into a lot of different categories. I love so many styles! Don’t be afraid to explore and check out all the great deals they offer too!

Speaking of deals, I just fell in love with this drink dispenser! Those who know me well, know I LOVE a cool looking drink dispenser! I’ll be back in a little while! Got to go check out! 😉
XOXO,
Esther

Fun Shared Girls Room (Reveal)

I have been literally obsessed with finishing the girls’ new room, and honestly it isn’t really finished yet. There are a few things to tweak here and there and paint. There are also a few DIY projects that still need to be done, but don’t worry! I will definitely share them once they have been completed.
The girls’ new room is our old bonus/playroom that never got played in! Doesn’t that irritate you? Well, it DID irritate me! LOL!
What to do?
Answer: MOVE THE GIRLS UP THERE!
I need to back track a little though and let you know why I decided to move the girls upstairs. First, like I said, the room never got used even though we had tons of toys to play with up there. Our home’s lay out is to where the downstairs is our main living space and everything upstairs was considered (for us) bonus. One big bonus room, a bathroom, and another bedroom.
The girls shared one of the downstairs bedrooms and a king bed and were still fighting ALLLLLLLL the time! “She touched me! She looked at me! She FARTED on me! ” You know, the usual stuff.

Then, one day, I just looked at my husband with those ” I have an idea” looks. After I chased him down into the other room and made him listen to me, I told him I thought we should move the girls to the bonus room and maybe their own space would make things better.
So far, so good! I am really happy with how it turned out. A friend of mine said that it reminded her of a cool dorm room.

I knew that if I wanted to make this happen, it was going to have to be on a tight budget. Other than the beds, I didn’t want to have to spend much. I kind of had no way around purchasing the beds. I did, however, go to Walmart to buy the twin beds/box springs which I felt would be the cheapest alternative.(*around $300/each bed) The metal frames were universal ones that I picked up at Sam’s Club. ($38 each)
The hilarious thing is that they are happier with smaller beds. They went from sharing a King, down to a twin bed. I think something can definitely be said though for having your own space……. and not being farted on….. right? Sorry!

I wanted to visually divide the room to allow them to have their “own sides”. I already had these toy shelves in the room and decided to arrange them in a way that they both could have their own things stored on each side. It is basically 4 of the units that I picked up at Walmart for $17 each with fabric containers picked up at Target a while back.
This is one of the projects that still needs tweaking. My idea is to attach them with screws and put molding around the creases with maybe a top to match their desk tops. This way, the piece will look more like one piece, instead of 4.

Next off, the DESKS! I am extremely proud of these desks and I’ll tell you why. They cost me a total of $ 4 . 00 !!!! No, that wasn’t a typo!
Let me explain:
I actually took an old dining table that I had on my back porch (that I wanted to move) and cut it down (since it was a pub table), along with the chairs and attached it to the wall to make their desks. The only thing I had to pay for were the roller casters on the back legs, which I scored at Ollies for $ 4.00.
I had looked and looked on Pinterest for all sorts of ideas. I found some great ones, but they all were going to cost around $300 to $400 to complete, which definitely would have had to wait a while. *Remember the tight budget?

If you look closely, you can see that one end looks like it is coming out of the wall and only has 2 legs.
That is because of this:

I thought I was going to have to buy wood from the store to do this, but instead, we were able to reuse pieces from the original table! SCORE!

To let the girls personalize their own space, I generously gave up a few of my bulletin boards from my office I bought at Homegoods a while back.

This is my youngest daughter’s side.

This is her older sister’s side. I think you can guess which one has “HOARDING” tendencies……. LOL!

Here is a view of the chairs. When we initially cut them down, we didn’t allow for the fact that they all naturally leaned back, so we added the roller casters to the back to level it off. We didn’t want to have to cut two more of the four chairs that were left, in case I come up with more projects…… for my husband to do……. 😉 * He would have preferred to cut them all up and use them for a bonfire, I’m sure. Love you honey!

By now, you have probably noticed in a previous photo that the girls have LOCKERS in their room! This is all because of their cool daddy! While doing a painting project for the local Sheraton hotel in our city, they were getting rid of them!!!!!! There were 6 in total!!!! So, you know what that means…………. they were FREEEEEEE , aside from the paint that we purchased to paint them. They were originally a stale tan color like most lockers are.
You may not be able to tell so well in the pic, but the one in the picture above is a light blue since that is my youngest daughter’s favorite color.
The one in the previous photo further above is a light purple for, you guessed it, our oldest’s favorite color.

The girls and I did a really cool Pinterest DIY project for them. I bought one sheet of mosaic tile backsplash. Then, we pulled individual tiles off and attached peel n stick magnets to them.

Now, the girls can stick things on the lockers since they are magnetic! Lots of fun! They love it!
I love how they are able to express their own style and keep it on their own sides of the room.
There are so many things I love about this room, but one of my favorite things are their headboards.

I was really nervous that what I had envisioned would not come out right, but I am SOOOO happy with it!
Again, I had looked and looked on Pinterest for all kinds of ideas. I found so many great ideas. However, they all involved using a thick plywood for the base, which would have been fine, except I was determined to not have to ask for my husband’s help on this one. He was projected out by this time and I was wanting to do this one on my own.
I would have had to have him cut it and that just wasn’t going to work for me.
I decided instead to buy a very large canvas at AC Moore, which was on sale and went from there. Mom and Dad were visiting the weekend I decided to do it, so I sweet talked Mom into helping me. She was a trooper! I asked her because while I might have wanted to go it alone, it is definitely easier when you have two people tugging and stapling. Thanks MOM!
I will be posting a DIY post on it later.
The one above is my youngest’s. The stripes were actually a result of things not going exactly like I had planned, but then again, they say that some of the best things come from that and I think this turned out better because of it. It also allowed their headboards to be slightly different.

Here is a closer view of it.

Here is a close view of my oldest’s. I kept hers plain without stripes so that she could have, what I considered an older look. By the way, that is a painter’s drop cloth that is on the headboard. 😉 More on that in the DIY post.

AND this is the BEAST that I will be taking on next. The plan is to paint it a dark gray and add a long mirror above it. For this, I will definitely be needing my “painter husband” ‘s help. Once it is done, I will add a tutorial! *Maybe my first video tutorial? What do you think? 😉
Well, there you have it. This is the girl’s room ……… for now.
Anytime I add anything, I will make sure to let you know!
Until next time……
XOXO,
Esther
Sidebar: The bedding was bought at Target.
Turquoise comforter : $27.99 (comforter/sham),
Purple Comforter: $ 24.99 (comforter/sham)
Both Sheet sets: $ 17.99 (flat/fitted/pillow case)
Quilt on purple bedding: Gift from Nana for birthday
Holiday Home Tour: Casa Verde

WARNING!!!! This is a long post…… which you will love and not mind sitting and looking at. Women, prepare to drool. Men, prepare to hold onto your wallets, while your lady loves get more decorating ideas. In fact, Men, you might just go shopping too!
I am soooooo excited about this Holiday Home Tour!
I have the sweetest friends who were nice enough to let me invade their BEAUTIFUL home the other morning and take a few pictures. When I first thought about doing a Holiday Home Tour, they were the first ones I thought of and I am just so happy that they agreed to let me come on in!
Machel and Jerrad are the very talented owners of Vintage Marquee Lights. They create the COOLEST Lighting Art you will ever see. If you get a chance, check out their site here.

They have a Charleston style home in a neighborhood near mine and let me just tell you, it is GORGEOUS!

Inside, the foyer welcomes you in with a stunning white Christmas tree, decorated with vintage style ornaments. Machel painted the wall treatment herself that stands behind it. The garland that goes up the stair case is adorned with the same style ornaments.

The grand light in the foyer is practically an art sculpture itself.

To the left of the foyer is the most adorable little playroom/den for their son. I’m so jealous of these sliding barn doors that Jerrad and a friend made themselves. At least I know who to call when I want to tackle the project in my own home!

Here is a view looking in to the room from the foyer. Seriously! They have more creative talent in their pinky finger than I have in my ENTIRE body!

I love how they decorate with their products throughout their home.

Towards the back of the house is the living room and kitchen area, with the most adorable little fireplace. The chalkboard fire casts the cutest little “glow”. 😉

Machel didn’t want to go for just ordinary white cabinets when she was decorating her kitchen. So, she took some of her favorite fabric and pieced it behind the wood trim, hiding the seam. The shelves also help keep it in place. The result is stunning!
I really love this idea, so grab those extra remnants of fabric people and DO NOT throw them out!

A set of old vintage lockers hold their stockings in the corner, while a surfboard still reminds you that the beach is only minutes away.

The industrial style light fixture (WHICH I ABSOLUTELY LOVE) hangs over the bar area, where a cute little table top tree stands watch.

Towards the middle of the house, a magnificent display of twinkling lights and paper stars hang.

View from the dining room.

A quick peek inside the downstairs bathroom, shows a chalkboard lined with garland made from ornaments, a DIY project of Machel’s. “Casa Verde” is the name Machel and Jerrad gave to their home. Mine would read more like “Casa Loco”. In case you are wondering what mine might translate to, it would be “CRAZY HOUSE”!

Another DIY project in the dining room, is the Chandelier. If you take a closer look, you will see that it is clothes pins that make up the body of the chandelier. CLOTHES PINS, PEOPLE! Why didn’t I think of that?

The letters that spell “Joy”, very appropriate for the Holidays, is a creation of Machel and Jerrad’s and can be purchased on their site as well.

If I ever convince my hubby to let me remove the carpet on our stairs, this is exactly what will go in it’s place. I cannot express how much I love this!

I love how the stairs continue to count up as you go. It adds so much character to the home.

It just goes to show you that you don’t have to buy an old home in order to obtain that character. You can have a new home and put some of that character into it yourself!

On to the baby’s room! This little boy is very lucky! This is one of the most stylish baby rooms I have ever seen.


Christmas books double as art pieces on IKEA shelves, lining the wall.

Who wouldn’t want to sit a while and read a Christmas book or two in this corner?

An upstairs bathroom gets in the spirit too with an “I Believe in Santa Clause” picture and a series of Nutcrackers keeping watch.

The Master Bedroom gets festive too. Lit garland drapes the top of the headboard, while the lit Peace Symbol can’t help but remind you of John Lennon’s “Imagine” song.

The vanity’s mirror is not forgotten. Nor is the modern reindeer head that shows so distinctly. Frosted garland and a festive wreath dress the two.

Jewelry is displayed in the corner, while a dazzling full length mirror helps Machel get ready for her Holiday parties.

I couldn’t finish up this post without talking about the Master Bath. The rustic peace symbol over the tub and the Capiz shell chandelier make such a great combo with their eclectic married look.
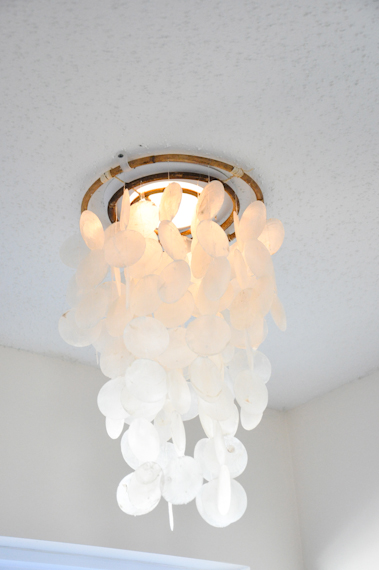
When Machel found out she couldn’t actually put a hanging chandelier over the tub, she didn’t let that stop her. She knew what look she wanted, so she decided to secure a non lit capiz shell chandelier around the existing standard light, giving the allusion of having a chandelier. BRILLIANT IDEA! *The girl knows what she wants! 😉

Instead of using interior lights to go over the vanity, she used exterior ones. I love how they both have such an aged look patina.

A quick look from the upstairs looking down.

Before we finish, take a look at their front doorway. It’s amazing what using some interior pieces outside can do for a space. They talk about bringing the outdoors in, but I say take the indoors out! This is such a cozy look and you haven’t even gone in yet!

I am such a sucker for chalkboards and I think I might just have to steal this idea! Too cute!
See! I told you, you would love every minute of this post! I think the only thing left to ask here is when can I move in?
*A special thank you to Machel and Jerrad for letting me invade “Casa Verde” and take these pictures. They are an amazingly talented couple with great design ideas. I pray they do more projects, which I will gladly come back and take more photographs of for you and I to drool over.
Check them out on Facebook and while you are there, give them a “like” so you can stay up to date with all the new exciting stuff they are working on! Don’t forget to visit their site to!
Happy Decorating!
XOXO,
Esther
 |
 |
|
 |

You must be logged in to post a comment.