
Projects
Tissue Paper Pom Pom

When I was in Catholic school, I was a Cheerleader.
It was actually pretty fun. Except for the fact that it was a CATHOLIC school! I really loved my school. However, instead of having sassy short skirts, we had knee length ones.
Instead of having really cool sleeveless tank style tops, we had sweaters. Have you ever seen a hot sweaty girl who’s cheeks get really flushed on a regular basis without even having to move…………. try to cheer in a hot itchy sweater? Let me just tell you………… It ain’t pretty!
Plus, I’m pretty sure I was still rockin my “waved” bangs and sides. (*Don’t even try to lie and act like you didn’t ! You know you were right there with me……… PLEASE say you were right there with me.)
*SIDEBAR: They got the cool uniforms the year AFTER I cheered. I still harbor resentment.
*Well, fast forward to 2013 and I am not talking about the pom poms that come with a skirt…….. or a sweater for that matter.
I’m talking about the fun, cute ones you make for parties. They take about 5 minutes TOPS and would be adorable at the next little birthday party you throw for a loved one. They also double as cute room decorations. Just group them with a few others at different lengths hanging from the ceiling and instant CHEAP accessory!
Here is what you need to do:

You will need a pack of tissue paper, one pipe cleaner (or something sturdy to fasten the middle of the pom pom, and some ribbon to hang it with).

I get the packs that have 8 sheets, but you can always buy one with more. It would just be fuller. This pack only cost $ .99 at Walmart. I already had the pipe cleaner and ribbon, so it only cost me the amount of the tissue paper.

Unfold the tissue paper and leave all the sheets still stacked on top of each other.

Start to fold the tissue paper in an accordion style. Fold one way, then the opposite way. Do this until you have folded the entire stack.
Since the paper comes folded already, you will have somewhat of a template to follow. However, I fold mine slightly smaller than the width they have.

Like so…..

When gathered in the middle, this is what it should look like.

Now, gather in the middle and secure a pipe cleaner to the middle of the folded tissue paper.

Either cut off the excess pipe cleaner or wrap the extra around like I did.

Now, one by one, starting pulling back the individual sheets on each side. Be careful not to rip the sheets. They are fragile.

I like to pull one on each side, working my way towards the middle until all of them have been done.

This is what it should look like when you have completed one side. Now, just repeat the same steps on the other side.

Looking straight through to the middle, this is what it will look like.

Now, take your ribbon and cut the desired length.

Attach around the pipe cleaner in the middle.

Make sure you fluff around where the center is in order to hide the opening.

AND VOILA!
Mix colors and have fun! We did this for the 4 Year Anniversary at my Church a few months back and hung them everywhere. At the end of service, we let all the little kiddies take one home.
Here is a picture of some from the 4 Year Anniversary Party:

Happy Partying and Happy Decorating!
XOXO,
Esther

Galvanized Bucket Planters
I love Galvanized Buckets, don’t you? They are perfect for so many uses and they just scream “Southern” to me.
The first thing that comes to mind when I think of them are Bobbing for Apples. In fact, when I went to the hardware store to buy them, that is exactly what the old man said to me. “Somebody’s gonna be bobbin for some apples, aren’t they?” he said.
“Actually…………… no,” I replied.
“Whatcha gonna use em for?”
“Well, I’m gonna make some holes in them and make em into planters.” (Yup! My grammar is just as good as his)
Then he said…….
“Alright now. Don’tcha be plantin any of dat there MARIJUANA, now!”
WHAT?!?!?!?!?!?!?
“Ummmmm, NO SIR! Don’t you worry about that, now!” (Yes, this is a true story and it happened yesterday! LOL!)
So, like I said folks.

I bought a couple of the galvanized buckets.

Flipped them over and made my “Brawny Man” poke some holes in the bottom for drainage. We used a nail and hammer.

They weren’t big enough, so I made him go back and make them bigger. 🙂

Then, I poured some drainage rocks into the bottom of the buckets.

About 2 or 3 inches high.

I filled it up with the same type of soil that I put in my vegetable beds and planted some herbs and a regular annual in them. (From back and going clockwise: Rosemary, Chocolate Mint, Annual, and Sweet Mint)
Em, my chocolate lover is very happy with me and cannot wait to help me with recipes using the chocolate mint.

I’m so happy with the way they turned out.

I did the same thing to the second one, except I planted some diffent things in there. You can’t really see it from the pic, but starting in the back and moving clockwise again is: Onion Chives, Citronella Plant (also known as a Mosquito Plant), Annual, and another Citronella Plant. The worst thing ever in the summer is trying to work in your vegetable garden and getting eaten up by Mosquitos. Let’s hope this helps a little. If it does, you might just see these EVERYWHERE in my backyard!

Since the Vegetable Bed post, which you can see here, we made another bed and used it for our Cucumbers. We also made it big enough to allow me to plant some more herbs in there as well. I planted Flat Leaf Parsley, Oregano, Sweet Basil, German Thyme, Dill, and one Okra Plant (I ran out of room in the other bed).

I am SOOOOO happy with the way everything turned out!

I personally think it is Beautiful and I cannot wait to do updated posts as the vegetables get bigger. We already have small clusters of tomatoes and I am proud to announce………..
NOT ONE SINGLE MARIJUANA PLANT in sight. 😉
HAPPY SATURDAY Y’ALL!
Go play in your yard!
XOXO,
ESTHER
Raised Vegetable Garden
Eeeeeek! Spring has Sprung and I am just tickled about it!
You know you are too! How could you not be?
The air is warming up and once in a while you get that perfect day that allows you to dream of those beautiful flowers and veggies you have wanted to plant and grow forever.
Then you grab your car keys……….. run out the door without hesitation………… and then RUN back in once you realize you have forgotten your children (don’t judge me) …………..
then you RUN back out the door and drive to your nearest Home Improvement Store and go WILD!
Right?
NO?
Well, I didn’t do that exactly, but I WANTED TO SOOOOOOOO BAD!
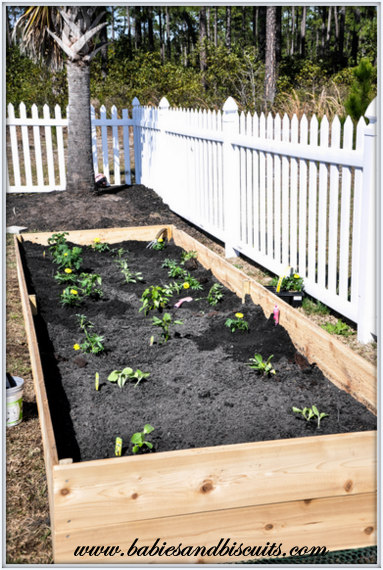
Instead, I was very patient ( which is completely UNLIKE me) and I waited and planned and built a Raised Vegetable Garden Bed with the hubster.
We did it without a plan and SO CAN YOU! Very easy. We were first time DIYers with this and it turned out great!
I have to say I am very Proud of us.
Here is what we did:

We knew that we wanted the garden bed to be 4ft. x 12ft., so we bought 12 ft. pieces of cedar. We figured for the sides, we could just cut them to 4 ft.
We also bought short 4 ft. pieces of wood that would act as support boards and also an area that the screws could adhere to, in order to stack the boards. We had a few pieces of cedar siding that we improvised with and used so that we wouldn’t have to buy as much cedar.
Don’t mind the ladder. It’s just there for moral support. 😉

We attached the first 12 ft. piece of cedar to the sticks. This top piece split a little on the car ride home, but it wasn’t a concern.

This is what it looked like afterwards.
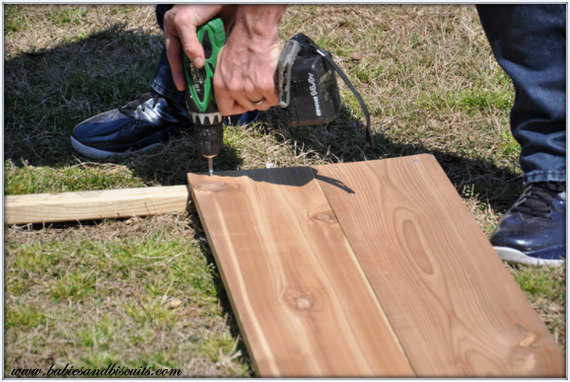
Then we attached the second piece using the same method. We just lined it up under the top one.

Now, we had (2) 12 ft. pieces of cedar attached to the 2 wood sticks at each end.

We had 4 screws on each side.

We knew we would need more support, so we added an additional board in the middle and attached the boards to it.

Afterwards, we trimmed the length on the support sticks.

This is what they looked like after being trimmed.

We repeated those steps with the boards for the other side. Then, instead of doing it again for the shorter 4ft. pieces, we decided to just attach them to the ends.

This is the 4ft end piece. We attached the two screws for it to the support stick that we had also attached the adjoining side to .

Z even let me get in on the action. Then, he went behind me, removed the crooked screw I attached, and reattached it correctly. Oh well….

Here is a shot of the bed after one board.

Now the finished side.

Then, to keep burrowing pests out, we attached a heavy duty plastic chicken net to the bottom with “U” shaped nails. We didn’t use wire netting b/c I have before and it toar up our hands during the process. I know you could just use gloves, but I’m lazy and I looked it up and the pests shouldn’t be able to chew through the heavy plastic. I might be updating this later if I find that not to be true.

We made sure that it was secure by nailing every ft. or so along the wood.

Since the netting wasn’t wide enough, we had to overlap some of it and then we just trimmed it off at the end with a razor blade.

Buster kept a watchful eye out just in case any rabbits tried to eat our veggies. How do I know I have rabbits? By the piles of “unpleasantries” I found left for me in my yard. (Is that a word?)

The great thing about gardening in general is it seems to awaken something within children. All 3 of my kids love to go out with their Nana and help her with the garden.
Heck! They will even help her pick up Doggie Poopoo at her house. I haven’t mastered that art here yet, but I’m working on it.
My oldest was beggin me to let her plant the veggies. I wanted to make sure they were done correctly the first time, so instead, I let her plant the marigolds around them.

I CANNOT wait to see how these turn out. I have wanted to plant Heirloom Tomatoes for a while. Z asked me if I thought we would get our money back out of the beds? As soon as I went to the grocery store and saw that tomatoes were $1.99 / lb. , I quickly answered , “Ummmmmm Errrrrrrrrrr Yup! ”

We planted 3 Crookneck Squash , 1 Zucchini, 2 Cherry Tomatoes, 4 Homestead Heirloom Tomatoe, 4 Marion Tomatoes, 2 Cayenne Peppers, and we will be making a seperate 4 x 4 ft. bed for our Cucumbers.
We also planted the Marigolds throughout the bed and will be doing the same thing with the Cucumber bed. Marigolds help keep the bugs off the plants. That is why we plant them. Plus, they look Purrrrrrrrty in there!
I should add that we used to have a garden back where we are from. We were so excited the first year we did it. We had a pretty big backyard, so we planted just about a 1/4 acre of it with all sorts of things. Well, I really had no idea how much it was going to yield and let me tell you , when it started ……….. it didn’t stop!
I couldn’t give it away fast enough before it started to go bad. I think this smaller modest raised bed is much better for us, though my friends might wish we had the larger garden so that we can share. 🙂

Happy Gardening!!!
*I’ll update as we go and show the progress of the plants, as well as give helpful tips on vegetable growing.
Master Bedroom
I have been wanting to do a post for a while about my Master Bedroom.
It took a little while longer than I wanted to complete it and I really shouldn’t even call it complete yet.
I still need to get my curtains up, but I just couldn’t wait any longer.
The reason for this is because I went totally different than I normally would with the paint color.

I wanted something “Sultry” for the Master.
Z told me that if I said that word one more time, he was going to Puke!
Hey! Can’t a girl dream?
It’s always nice to know his Flame still burns for me????…..
Anyway, I know it’s not complete yet.
I haven’t put anything on the walls besides the TV. (Had to have the TV!)
The light coming through the windows is actually lightening up the color in the picture above.
It’s actually darker than the picture really shows.

We painted the wall, crown, and ceiling all different colors.
A lot of times, people forget about “the fifth wall”. (That is what they call the ceiling)
What most do not realize is how much it can do for a room when you choose to paint the ceiling.
It can either cozy up really high ceilings or it can just make such a bold statement.
You can either use a flat paint which will cover easier, or you can go with an Eggshell.
Eggshell will reflect the light really well on a sunny day, but it is harder to work with and will show any flaws you have in the ceiling.
For a DIYer, it’s best to go with flat.

I thought it best to give the man of the house the masculine dresser and just to make sure he knows which one is his,
I marked it with his initial.
You can never be too careful about these things.

Ahhhhh! Refreshing white is mine.
I love that dresser!

One always needs a fan humming at night to block out the snores of their mate and pooch!

I loooooove these pillows I picked up at Homegoods.
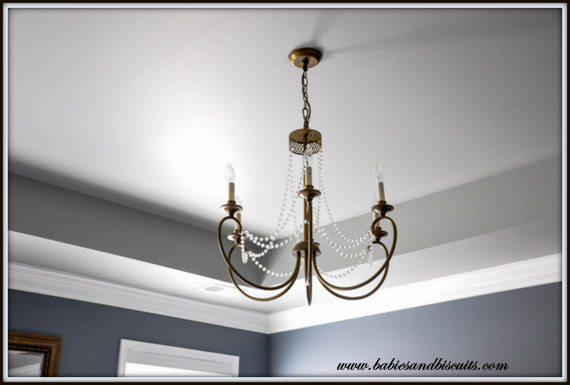
This is my beloved Chandelier. I drooled over this one for months before I actually pulled the trigger on it.
It is considered a “Champagne Bronze” and has glass pearls cascading down it, which I bought at The Home Depot.
I’m really excited because I just picked up the matching flush mount and the mini versions of it
for my Master Bath and Closet. ( I’ll show in a later post)

Here is another angle of it in the mirror’s reflection. I bought the mirror at Homegoods also a little while ago for only $29.

Here is another angle of the wall colors. It gives a little more accurate idea of the shade.

I will ALWAYS display my boots because I wuv them so much .

This is the view from the Master Bath, which should really be called “The Community Bath” instead.
I mean, let’s be honest here…..
Not until my children move out, will it ever truely be a Master Bath for just us.
Here is a link to the Wall Colors so you can check them out for your self:
*Keep in mind, that not all colors look the same online as they would on a wall.*
Wall – Wolf Gray by Benjamin Moore
Ceiling – Metropolitan by Benjamin Moore
Crown – Bright White (High Gloss) *Ask your paint salesman for a true Bright White (Most paint stores have a tendency to “gray” their whites)
*We used an Eggshell Paint which Z prefers to use for interiors.
If you have any questions regarding which paint to purchase for you next home project, email me and I will be more than happy to answer any questions you might have.
I’ll even ask “the expert”. ( Z )
Until Next Time…..
-Esther
 |
 |
|
 |

You must be logged in to post a comment.