
Let it Snow!

First off, let me just say that I hope you had an AMAZING Thanksgiving. My family visited me and I’m so thankful for it. I’m also thankful that know one got killed in the process, seeing as this was the first time we tried this! LOL!
While my family was down, I decided to have some fun and take their family pictures. I love fun, creative pictures, so I searched and searched Pinterest for some great ideas. I stumbled across the idea of using glitter.
The idea is to stand in front of the camera and blow the glitter towards the lens. The end result is supposed to give a cool effect. However, I wasn’t too keen on the idea of glitter getting stuck on my lens so I bought some big fake snow flakes to play with instead. They were only $5 from Target.

We thought it would be fun to act like the snow was falling down on everyone. So one by one, we had my sister’s husband sprinkling the snow from up high down onto whoever was the subject.

I wanted them to look like they were standing out in the snow and just loving it coming down on them. I think it turned out so sweet.

The trick to getting these shots were to use my 50 mm. I’m not sure the look would be the same if I had used my regular lens. The 50mm blurs out the background better and concentrates on the person or object in front much better, making the picture pop more!

My poor niece got it on her eye lashes and being the good Aunt that I am…………….
told her to sit still so I could take a picture of it!

Doesn’t that look cool? Of course, I helped her afterwards. LOL!

For my sister and her husband, we thought it would be sweet to make it look like they were kissing in the snow. I love how this turned out!
If you could have seen what it really looked like throwing those flakes, you would have died laughing! I was standing on the back of Z’s truck while my 9 year old daughter was literally throwing the snow by the handfuls at them while standing next to me. Let’s just say I have a new major appreciation for what goes on behind the scenes of a photo shoot! Haha!

He decided to dip her and I think it came out ADORABLY! 🙂
The snowflakes are in the Christmas decorations at Target. I wasn’t smart enough to take a picture of them before I threw the bag away. 🙁 They are only $5 like I said before, so for an inexpensive price, I think you can have such a cool look for your Christmas pictures this year.
The only downside to this is that because the flakes are so large, you look like you have MONSTER size dandruff flakes afterwards! LOL! Just make sure you shake a lot afterwards or go home after the shots.

Oh yeah! And don’t eat it either! I’m thinking you might get a big tummy ache! LOL!

Isn’t she cute? Um, I should probably add she didn’t really eat them! 😉
I definitely do NOT claim to be a photographer by any means, but this was so much fun to do and I just had to share them with you all!
Happy Holidays!
XOXO,
Esther

No Comments
Tissue Paper Pom Pom

When I was in Catholic school, I was a Cheerleader.
It was actually pretty fun. Except for the fact that it was a CATHOLIC school! I really loved my school. However, instead of having sassy short skirts, we had knee length ones.
Instead of having really cool sleeveless tank style tops, we had sweaters. Have you ever seen a hot sweaty girl who’s cheeks get really flushed on a regular basis without even having to move…………. try to cheer in a hot itchy sweater? Let me just tell you………… It ain’t pretty!
Plus, I’m pretty sure I was still rockin my “waved” bangs and sides. (*Don’t even try to lie and act like you didn’t ! You know you were right there with me……… PLEASE say you were right there with me.)
*SIDEBAR: They got the cool uniforms the year AFTER I cheered. I still harbor resentment.
*Well, fast forward to 2013 and I am not talking about the pom poms that come with a skirt…….. or a sweater for that matter.
I’m talking about the fun, cute ones you make for parties. They take about 5 minutes TOPS and would be adorable at the next little birthday party you throw for a loved one. They also double as cute room decorations. Just group them with a few others at different lengths hanging from the ceiling and instant CHEAP accessory!
Here is what you need to do:

You will need a pack of tissue paper, one pipe cleaner (or something sturdy to fasten the middle of the pom pom, and some ribbon to hang it with).

I get the packs that have 8 sheets, but you can always buy one with more. It would just be fuller. This pack only cost $ .99 at Walmart. I already had the pipe cleaner and ribbon, so it only cost me the amount of the tissue paper.

Unfold the tissue paper and leave all the sheets still stacked on top of each other.

Start to fold the tissue paper in an accordion style. Fold one way, then the opposite way. Do this until you have folded the entire stack.
Since the paper comes folded already, you will have somewhat of a template to follow. However, I fold mine slightly smaller than the width they have.

Like so…..

When gathered in the middle, this is what it should look like.

Now, gather in the middle and secure a pipe cleaner to the middle of the folded tissue paper.

Either cut off the excess pipe cleaner or wrap the extra around like I did.

Now, one by one, starting pulling back the individual sheets on each side. Be careful not to rip the sheets. They are fragile.

I like to pull one on each side, working my way towards the middle until all of them have been done.

This is what it should look like when you have completed one side. Now, just repeat the same steps on the other side.

Looking straight through to the middle, this is what it will look like.

Now, take your ribbon and cut the desired length.

Attach around the pipe cleaner in the middle.

Make sure you fluff around where the center is in order to hide the opening.

AND VOILA!
Mix colors and have fun! We did this for the 4 Year Anniversary at my Church a few months back and hung them everywhere. At the end of service, we let all the little kiddies take one home.
Here is a picture of some from the 4 Year Anniversary Party:

Happy Partying and Happy Decorating!
XOXO,
Esther
No Comments
Simple Thanksgiving Table Setting

I am beyond excited for Thanksgiving this year!
I thought I would share some of my ideas with you all in hopes that you may get a few ideas of your own. You know, in case you are in the same kind of tizzy. 🙂 (That IS a word, right?)

I am definitely a color person and I have been getting bored with my regular old white plates as of lately. I decided to go to Homegoods and “look” around.
However, I had a Starbucks in my hand and I can never just “look” when I have a Starbucks in my hand. All I will say is stores who have Starbucks in their stores know what they are doing. It’s like having waitresses serve you drinks when you are gambling in Vegas. The more you drink, the more you spend. It’s NO DIFFERENT with coffee. You are high on caffeine and BUY BUY BUY! Well, at least I do. LOL!

I fell in love with this blue and really built the color palette around this one plate. All the plates were $4.99 ea. at Homegoods.

Now, my centerpiece will be a little different come Turkey Day. I plan on lining mason jars down the center. Some with flowers and some with candles. I just didn’t have any flowers or candles on hand, so I thought this would look better than empty mason jars.

These Turkey salt and pepper shakers might get lucky enough to stay though……
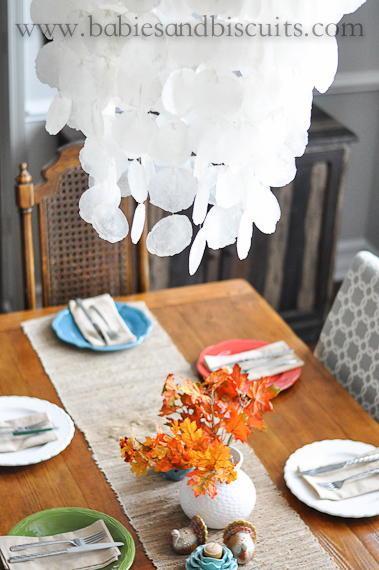
I definitely have quite an eclectic taste, as you can see. I still get all googly eyed when I look at my new chandelier.

I firmly believe in using lots of natural looking elements like Burlap. I found this Burlap Runner at Target a while back for about $17.00. I love it because it is so versatile. It usually stays on the Coffee Center, but I’m going to use it here for the dinner.
I know you are probably thinking to yourself by now, where are the glasses? The answer to that is I haven’t figured that part out yet. If I don’t by the actual day, then I guess we will be drinking out of Solo Cups. 😉
Or, I guess I could just toss the flowers out of the mason jars and use them instead…….. RIGHT?

So, what kind of table setting are you doing this year? I would love to know!
XOXO,
Esther
No Comments
Spiced Apple Cider
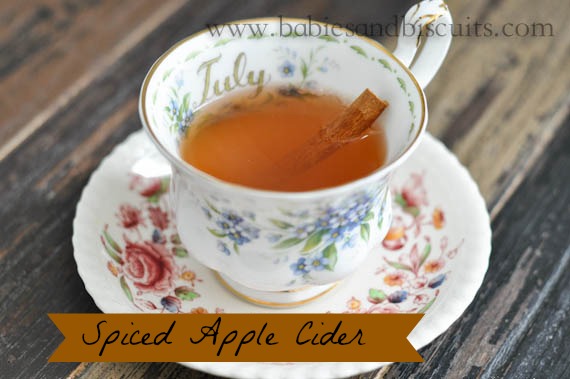
Oh! How I loooooooove Apple Cider. I’ll drink it cold or hot, but there is just something about a cool crisp Fall day and a cup of Warm Spiced Apple Cider.
I think I’m getting a little excited for Downton Abbey to come back on because I thought to myself, “Why not fancy it up a bit and put it in a tea cup?”
I know I know! Downton Abbey isn’t coming back on for quite a while still, but a girl can dream, right?
Well, if you fancy yourself some fancied up Warm Spiced Apple Cider, why not have a go at this easy recipe? When I say easy, I mean SUPER easy!
Here is what you need to do:

Take a teaspoon of pre-packaged mulling spices and add it to a saucepan. A new Fresh Market opened up here the other day (Insert: Angels Singing). I bought it there, but you can easily pick this up at any grocery store.

That is also where I picked up the Apple Cider, but again, you can get Apple Cider anywhere.

Add 1 cup of the cider to the mulling spices and wisk together.
Simmer the cider on low in the saucepan for 10 – 15 minutes.

Take any cup and add a cinnamon stick to it.

Add warm cider to cup and enjoy!
NOTE: This recipe is good for an individual cup of cider. However, lots of mulling spice packages (including the one I bought) have directions for making larger quantities.
This would be great for any day, but especially good on those chilly ones! Also great for little sore throats……… or BIG ones for that matter! 😉
XOXO,
Esther
No Comments
 |
 |
|
 |

You must be logged in to post a comment.