
Desserts
Rustic Apple Pie

A lot has been happening around here lately. For starters………………..
MY BABY BROTHER GOT MARRIED!
We are so so so happy for him and his new wife. We gained a sister, friend, and an entire new family that we deeply care for and love!
Now they just need to start having babies and my life will be complete. No pressure, right? LOL!
Well, Mom and Dad were here as well and one of the last nights they were here, we had everyone over for Sunday dinner and mom made Apple Pie! I have made it before, but when Mom is in town, it’s best to just leave things like this to the “professionals”. 😉
I LOOOOOOOVE HER APPLE PIE!
It always has this Rustic quality to it and I love that she never tries to make it too “fake looking”. Everything is from scratch, including the crust.
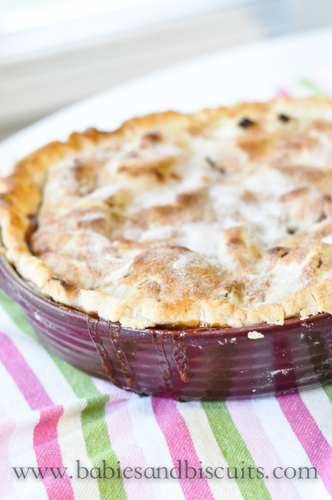
Just let me set the stage for you. It’s a crisp cool day in Fall. The aroma from the kitchen is taking over the house as the cinnamon and sugar fills the air. As you bring your fork to your mouth filled with that bite of perfection…….. um YEAH! That happened here that day! The crust was slightly crunchy, while the filling was a thick cinnamon apple yumminess!
Come on y’all, it’s FALL!!!
Why not get in the kitchen and bake you up some Apple Pie?

You know you want too! And just in case, because I love you so much……..Here is Mom’s recipe!
Recipe: Rustic Apple Pie
– 2 Homemade or Prepared Deep Dish Pie Crusts (*You will need 2 crusts, one for the bottom and one for the top. *NOTE: Crusts perform better when refrigerated well. If frozen, make sure to thaw completely and chill in fridge until you need it.)
– 15 Granny Smith Apples, Peeled, Cored and Sliced (*NOTE: Slice no larger than a 1/2 inch in thickness or apples will not cook properly)
– 1 Heaping Tbsp. Cinnamon
– 2 Cups Sugar
– 1 Tbsp. Cornstarch
– 4 Tbsp. Unsalted Butter
– 2 Tbsp. Milk
– Small amount of additional cinnamon and sugar for dusting the top of pie.
Directions:
– Preheat oven to 400 degrees.
– Take a 9in. pie plate and spread first crust evenly over bottom. Refrigerate.
– Place apple slices into a large mixing bowl.
– In a separate bowl, combine cinnamon and sugar and cornstarch.
– Add Cinnamon mixture to apples and mix well using hands, making sure all apples are coated well.
– Remove pie plate from fridge and add apple slice mixture. *NOTE: Apples will mound up in dish. This is normal and makes for a great pie!
– Cut 4 Tbsp. Butter in half and dot over apple mixture evenly.
– Top apples with remaining pie crust. Pinch all around edges of pie to “seal” crusts together. *NOTE: This can be done by using a fork or by index finger and thumb method all the way around.
– Brush top of pie with 2 Tbsp. Milk.
– Lightly dust top of pie with additional cinnamon and sugar.
-Cut 2-3 slits (1 in. long) in top of pie crust for steam to escape during baking.
– Bake pie in oven for 15 minutes.
– Turn temperature down to 350 degrees and continue baking pie for an additional 45 minutes.
– If at end of baking, pie is not golden brown, turn temperature back to 400 degrees and watch closely for 5 minutes. *That should do the trick! 😉
*APPLE PIE ALWAYS TASTES BETTER WITH VANILLA ICE CREAM! ……….. just sayin !
I hope you enjoy the recipe!
XOXO,
Esther

When life hands you lemons…. (Make a Ridiculously Good Lemon Cake)

It’s been a while since I did a blog post. I have been buried waist deep in these awful things called taxes. Have you ever heard of them? Oh my word, they are awful! I’ll have to tell you about them sometime……. maybe some OTHER time…..
The important thing today is cake! Not just any cake. The kind of cake that makes you wanna slap your momma! *Sorry momma! I never liked that saying. At least not until after I became a momma!! 😉
You know, I have to say, I really surprised myself on this one. Even though it was the easiest of cakes to make (more on that in a minute), it didn’t taste like it was.
It all started with my oldest turning 10 at the beginning of the month. We usually make whoever’s birthday it is, their favorite meal and their favorite cake or one of their choosing. I had just bought these premade “lemon bliss” cupcakes, or so they were called from Sam’s Club. Lee absolutely fell in love with them…. and so did everyone else.
It was decided that she wanted a cake version of the cupcakes. Now, if I were really organized and thinking ahead for this blog post, I would have taken a picture of them. But that just wouldn’t be me. 😉
So instead, picture a lemon cupcake with a dollop of lemon pudding on top with a thin ring of buttercream icing around it.

Oh, how I love lemon!!!!
While I didn’t decide to use buttercream….. only because I felt it would have been just too much for the entire cake. I decided to go the whipped cream route instead.
This is what I did:

I took a lemon boxed cake (yes, boxed) and 2 packages of instant lemon pudding.

I did my best to evenly distribute the cake mix into two pans so that the layers would be as even as possible.

Now, here comes the stacking. However, what this picture doesn’t show is that right after this, I decided to put wax paper under the first layer to allow for spills with the whipped cream icing.

I took half of the lemon pudding and spread on top of the first layer. Then, I topped it with the second layer and spread the remaining pudding on top.

I spread it out to the edge as far as possible without dripping over.

Now, time for the whipped cream. I used my tried and true whipped cream recipe. It’s the same one I used for my Mixed Berry Tartlets. You can see it here. However, I added a teaspoon of lemon extract to amp up the lemon taste for this recipe.

Then, I just dumped it all ( a little at a time) because, well, WHY NOT?

I love whipped cream because it spreads so much easier than buttercream. I actually looked like I knew what I was doing in this pic.

Then, I just sprinkled some lemon zest on top and voila! I carefully pulled the sheets of overlapped wax paper out from under the cake and it made it look very clean.
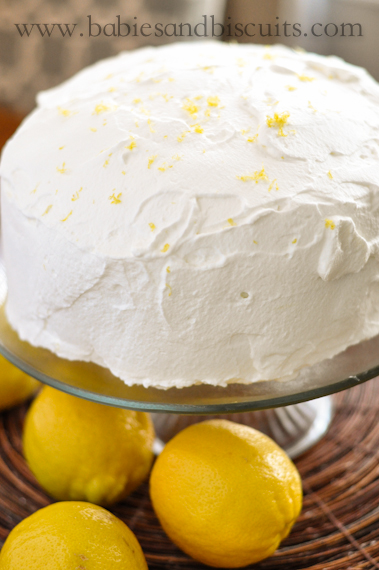
I was so happy with how it turned out! It wasn’t just pretty, it was RIDICULOUSLY GOOD ! This recipe would be great all year long. It is light enough for Summer, even though I fixed it in the Winter.

If you fix this, I would love to know what you think !
Here is the Recipe:
Recipe: Ridiculously Good Lemon Cake
– 1 Lemon Flavored Box Cake ( I used the Very Moist Version) *You will also need oil, eggs, and water according to cake mix.
– 2 Boxes Lemon Instant Flavored Pudding
– 1 1/2 Cups Skim Milk
– 1 Pint Heavy Whipping Cream
– 2 Tablespoons Granulated Sugar
– 1 Teaspoon Lemon Extract
– Lemon Zest (Optional)
Directions:
– Prepare cakes according to directions. Allow to cool completely.
– When cakes are completely cooled, prepare lemon pudding by mixing together 2 packages pudding mix with milk. Whisk for 1- 2 minutes or until pudding becomes thick.
– Prepare whipped cream icing by mixing heavy whipping cream with sugar and lemon extract with an electric mixer until it forms stiff peaks.
– Start layering cakes by first, laying wax paper pieces in an overlapping patter on top of a cake plate. Put first cake layer on top of the sheets.
– Spread half of the prepared pudding on top of first layer.
– Top with second cake layer and gently press on top, allowing the pudding between layers to spread slightly.
– Spread prepared whipped cream over top and sides of cake.
– Sprinkle with (optional) lemon zest.
*For best results, refrigerate for 1 hour prior to serving.

Mason Jar Birthday Cake !!!

Don’t you just love Mason Jars????
Well, I do. I must have a million of them. Between all the empty ones from canned goods I’ve used, to all the ones I decorate with, I might have to change that number to a BILLION!
They are pretty much a staple here in the South, mostly because they are so versatile.
Well, the other day was no exception!
Em turned a Big Ole’ 8 over the weekend and decided she wanted a slumber party. Yes, I still have all my hair…… BARELY!
I thought it would be fun to change up her Birthday cake. So, instead of doing one big cake, I did several smaller mason jars for all the girls.
First, I made a boxed chocolate cake (Em’s favorite).

Then I took one of my biscuit cutters that I knew would fit into the mason jar and cut holes out ….

The cake was a little thick, so I cut those in half and layered them in the bottom of 1/2 pint mason jars.

Then, I took the buttercream icing I made. (* I used this homemade recipe here , but store bought is fine. I mean, come on…. I used a boxed cake mix. )

Added a swirl of it to the top of the cake.

Then topped with some rainbow sprinkles.

Yummmmmmm.

Now, at this point, I realized that with the amount of buttercream icing I made and the amount of mason jars I still had to do, I would never have enough to keep going at the thickness I originally cut the cake. So, I decided to keep the cake as thick as the biscuit cutter cut it this time. If you do less jars than I did, you can always keep the thickness of the cake the same.

Then, I repeated with the buttercream and topped off with more sprinkles. Once I was finished, I felt like they looked like little milkshakes, so I stuck these cute blue and white polka dotted paper straws in them I found at Target.
TIP: Stick them in the fridge for 5 minutes and serve. There is something about giving them a slight little chill that makes them better in my opinion. 😉


My favorite part of the whole thing was that Em decided she wanted everyone to be able to make a wish that night, not just her. So, every girl got their own mason jar with their own candle to blow out!
I love her sweet heart!
Just a little side note: I had a lot of leftover cake. If you do not want to waste the cake, it would be great to break up the remaining cake and either freeze for later or use it within a day or so in a trifle.
Everything is better in a Mason Jar! These would be great for entertaining a large crowd too. Not to mention, they could be technically considered portion control, right?
XOXO,
Esther
Peach and Blueberry Fruit Crisp

The other night, we had my brother’s sweet girlfriend’s family over. We were meeting them for the first time, so we were very excited! We did really simple cookout food. Just hamburgers, pasta salads, baked beans, deviled eggs…… and a Peach and Blueberry Crisp for dessert!
I had never made it before and I usually NEVER do a new recipe for company. Especially company I have never met!
We put everything together a few hours before everyone got there so we could spend time with everyone without having to worry about slaving over a stove in the process.

We blanched the peaches in boiling water first, then transferred them quickly to cold water. *This helps the skins peel off really easily. Then we sliced them in big chunky pieces…… added some extra goodies like lemon zest, lemon juice, sugar etc. and then tossed in some blueberries and layered on the bottom of a stoneware baker.

I could have just ate the dessert as it was then and there, but instead…… we added some more goodness!

Yummers!

The kids wanted to help me so I let them spread the crumble for the “crisp” part on top.

I love recipes like this that allow the kids to jump in and help, and allow me not to worry. You really cannot mess this topping up. It’s very easy! Just spread on top like you want! Then pop it into the oven for 45 minutes!
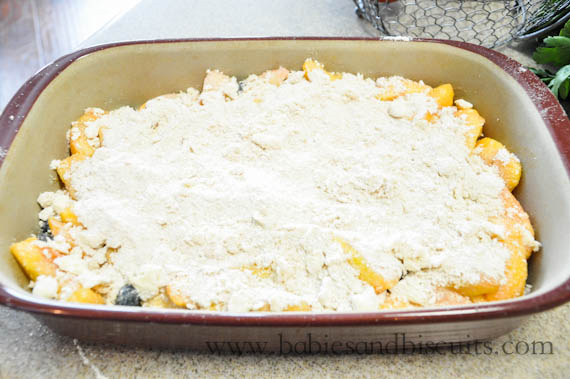
This is what it looked like before going into the oven……………
Now! Let me just take a “sidebar moment” to tell you something.
I rock in Dance Central 3.
Yes, I ROCK!
You may be asking yourself, “What on earth does that have to do with a Peach and Blueberry Crisp?”
Well, I’ll tell you.
After the crisp had gone about 45 minutes, my mom and I decided to check on it. We both decided that the topping wasn’t “browned” enough for our taste. SO! We thought, let’s broil it on low for a few minutes!
Just about that time, my oldest daughter started to say she was the best at Dance Off 3 and knowing this was untrue, I decided to challenge her to a duel! I looked at mom at that point, and she said, “I got this! Go! Go show your 9 year old who is boss!”
Well, in the middle of my 3 minutes duel, I smelled something……….. I didn’t smell the sweet aroma of a perfectly browned Peach and Blueberry Crisp bubbling away in the oven.
NO!
I smelled something far worse! It was the UNPLEASANT aroma of a perfectly BURNT Peach and Blueberry Crisp BURNING AWAY in the oven!
“MOM!”, I yelled.
(*Mom was no where to be found!) Mom had actually gone outside to tell everyone it was time to eat and walked away for a minute too long and POOF! *Sorry I called you out mom! I may have just lost my one and only reader! 😉
Well, there was only one thing to do. We did what every other smart, honest cooks would do………
We scraped off the burnt parts……….
REdid the topping………..
Plopped that stuff back on…………….
And put her back in the oven for 8 minutes and kept on truckin!
And may I say it turned out just fine!

And no one knows about our little mishap but ME, MOM,

And mom’s dog, Pepper! 😉 Shhhhhh!
Recipe: Peach and Blueberry Fruit Crisp
Ingredients:
– 2lbs. firm, ripe peaches (6 to 8 peaches)
– 2 teaspoons grated lemon zest
– 2 tablespoons freshly squeezed lemon juice
– 1/2 cup granulated sugar
– 1/4 cup all-purpose flour
– 1 cup fresh blueberries (1/2 pint)
For the crumble:
– 1 cup all-purpose flour
– 1/3 cup granulated sugar
– 1/4 cup light brown sugar, lightly packed
– 1/2 teaspoon kosher salt
– 1/4 teaspoon ground cinnamon
– 1/4 lb (1 stick) cold unsalted butter, diced
Directions:
– Preheat the oven to 350 degrees F.
– Immerse the peaches in boiling water for 30 seconds to 1 minute, until their skins peel off easily. Place them immediately in cold water. Peel the peaches, slice them into thick wedges, and place them in a large bowl. Add the lemon zest, lemon juice, granulated sugar, and flour. Toss well. Gently mix in the blueberries. Allow the mixture to sit for 5 minutes. Spoon the mixture into ramekins or one large baking dish. * I used a 13 x 9 in. pan.
– For the topping, combine the flour, granulated sugar, brown sugar salt, cinnamon, and the butter into the of an electric mixer fitted with a paddle attachment and mix until the butter is the size of peas. *If you do not have a mixer, no problem! Just mix well in a bowl and break up the diced butter with a fork or pastry cutter until the butter resembles small peas. Rub the mixture with your fingertips until it’s in big crumbles, then sprinkle evenly over the fruit. Place in oven and bake for 40-45 minutes or until the top is browned and juices are bubbly.
– Serve warm or at room temperature. Vanilla ice cream goes great with this!
 |
 |
|
 |

You must be logged in to post a comment.