
Southern Recipe
Rustic Apple Pie

A lot has been happening around here lately. For starters………………..
MY BABY BROTHER GOT MARRIED!
We are so so so happy for him and his new wife. We gained a sister, friend, and an entire new family that we deeply care for and love!
Now they just need to start having babies and my life will be complete. No pressure, right? LOL!
Well, Mom and Dad were here as well and one of the last nights they were here, we had everyone over for Sunday dinner and mom made Apple Pie! I have made it before, but when Mom is in town, it’s best to just leave things like this to the “professionals”. 😉
I LOOOOOOOVE HER APPLE PIE!
It always has this Rustic quality to it and I love that she never tries to make it too “fake looking”. Everything is from scratch, including the crust.
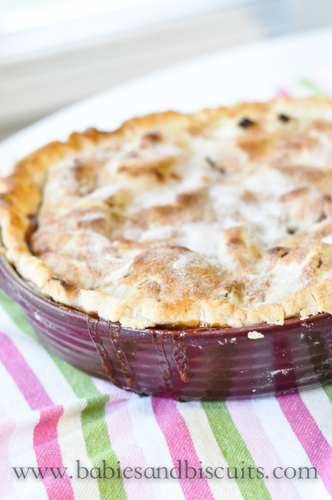
Just let me set the stage for you. It’s a crisp cool day in Fall. The aroma from the kitchen is taking over the house as the cinnamon and sugar fills the air. As you bring your fork to your mouth filled with that bite of perfection…….. um YEAH! That happened here that day! The crust was slightly crunchy, while the filling was a thick cinnamon apple yumminess!
Come on y’all, it’s FALL!!!
Why not get in the kitchen and bake you up some Apple Pie?

You know you want too! And just in case, because I love you so much……..Here is Mom’s recipe!
Recipe: Rustic Apple Pie
– 2 Homemade or Prepared Deep Dish Pie Crusts (*You will need 2 crusts, one for the bottom and one for the top. *NOTE: Crusts perform better when refrigerated well. If frozen, make sure to thaw completely and chill in fridge until you need it.)
– 15 Granny Smith Apples, Peeled, Cored and Sliced (*NOTE: Slice no larger than a 1/2 inch in thickness or apples will not cook properly)
– 1 Heaping Tbsp. Cinnamon
– 2 Cups Sugar
– 1 Tbsp. Cornstarch
– 4 Tbsp. Unsalted Butter
– 2 Tbsp. Milk
– Small amount of additional cinnamon and sugar for dusting the top of pie.
Directions:
– Preheat oven to 400 degrees.
– Take a 9in. pie plate and spread first crust evenly over bottom. Refrigerate.
– Place apple slices into a large mixing bowl.
– In a separate bowl, combine cinnamon and sugar and cornstarch.
– Add Cinnamon mixture to apples and mix well using hands, making sure all apples are coated well.
– Remove pie plate from fridge and add apple slice mixture. *NOTE: Apples will mound up in dish. This is normal and makes for a great pie!
– Cut 4 Tbsp. Butter in half and dot over apple mixture evenly.
– Top apples with remaining pie crust. Pinch all around edges of pie to “seal” crusts together. *NOTE: This can be done by using a fork or by index finger and thumb method all the way around.
– Brush top of pie with 2 Tbsp. Milk.
– Lightly dust top of pie with additional cinnamon and sugar.
-Cut 2-3 slits (1 in. long) in top of pie crust for steam to escape during baking.
– Bake pie in oven for 15 minutes.
– Turn temperature down to 350 degrees and continue baking pie for an additional 45 minutes.
– If at end of baking, pie is not golden brown, turn temperature back to 400 degrees and watch closely for 5 minutes. *That should do the trick! 😉
*APPLE PIE ALWAYS TASTES BETTER WITH VANILLA ICE CREAM! ……….. just sayin !
I hope you enjoy the recipe!
XOXO,
Esther

Father’s Day and a Fish Fry
When I think of my Dad, the first thing that comes to mind is his hands. They are true
Southern, Hard Working, Big, Farmer type hands. I always felt like my Dad was the strongest man in the world. I guess it’s kind of perfect that I went and saw “The Man of Steel” today, because that is exactly how I feel about my Dad.
SO! Since it is Father’s Day, I found it only fitting to go back and share another thing that comes to mind when I think of my Dad. His Fried Fish!
My Daddy can Fry a Fish like nobody’s business.
So, here is an old post I did when Mom and Dad visited last year.

Say “Hi!”, dad.![]()
Enjoy!

Well, my Mom and Dad visited this weekend and I was sooooo happy to see them. They only live 3 hours away, but 3 hours is still 3 hours no matter how you look at it and I was tickled to be able to see them.
The last time they came down, we had a fish fry and it was absolutely amazing! My daddy sure can fry some fish.
SO! We decided to make that a tradition from now on when they come down. Mom made her corn cake fritters to go along with it and it was perfect.![]()
Here is what we did!

First, dad took the catfish and rinsed them really well.![]()

Then he coated them in seafood breader. *Mom wanted me to make a point to say that they usually ONLY use “Atkinson” brand. However, all we could find down here was Moss’ brand and her picky little heart just had to settle. FYI: It was still REALLY good!![]()

Coat them really well. ![]()

THIS well!![]()

This picture makes me want to sing, “Daddy’s Haaaaaaaaaands, were soft and kind when I was cryin. Daddy’s Haaaaaaands…..” (Sorry, just thought I would share and break out a little Holly Dunn)![]()

On to the frying! Dad likes to use peanut oil to fry in. It has a higher smoking point, so it has a less tendency to burn the fish if cooking for long periods of time and gives it great flavor. I know that a lot of people have allergies these days to peanut oil, so substitute vegetable oil if this is the case.![]()

You can fry between four and five pieces at a time depending on the size of your frying pan. Make sure not to overcrowd the pan. If you do, it will bring your temperature down and the fish may not cook correctly.![]()

Fry smaller pieces of fish between 2-3 minutes. Fry larger pieces of fish between 3-4 minutes PER SIDE. ![]()

When fish are finished cooking, it is a great idea to drain them on a wired cooling rack so that the grease can drain and the fish stay crispy.![]()

This is what they will look like! Yummy, right? RIGHT???

Dad’s 6 pounds of fish!![]()
Recipe: Dad’s Fish Fry
Ingredients:
– 3-4 lbs. of white fish cut into pieces (we used catfish)
– 1 cup seafood breader to coat
– salt/pepper
– peanut oil or vegetable oil for frying
Directions:
Clean fish by rinsing with water. Do not dry. Sprinkle with salt and pepper. Coat with seafood breader. (Breader will adhere to fish because of being wet from rinsing with water).
Meanwhile, fill pan with oil until about 2 inches deep. Heat oil over medium high heat to around 350 degrees.
*Always drop fish in and away from you. This way, if any hot grease splatters up, it will most likely do so away from you.
Fry small pieces of fish 2-3 minutes total. Fry larger pieces of fish 3-4 minutes PER SIDE.
Drain fish on a wire cooling rack to get a crispier crust.

Pumpkin Bread in a Mason Jar
Happy Thanksgiving Week!
What are y’all doing right now?
Planning your menus, planning your diet and exercise regime for after your menus?
Maybe doing lunges or stretching out your muscles to prepare for the Black Friday Madness?
Well, I am making bread. That’s right!
Bread!
But not just any kind of bread. Pumpkin Bread!

This is a great Southern Recipe!
We are going to be on the road this Holiday and we always end up stopping along the way for breakfast. This usually consists of Bojangles.
Now, any good Eastern Southerner typically knows about “Bojangles”. The good ole Fried Chicken Restaurant.
I have decided this time will be something better. Pumpkin Bread!
I made them in Mason Jars, so the “Babies” can just eat their bread with a spoon in the car.
Hopefully, this means less clean up for Z and myself. I guess we will see.

The best thing ever is Fresh Canned Pumpkin. Store bought is completely fine too. I just happened to have a jar in my pantry that my mom had given me.

You can make this in a loaf pan, muffins, or even little mini poppers. I thought the mason jars gave it a fun twist. I sprayed the inside so that they wouldn’t stick.

Make sure you wipe off the rim of the jar afterwards so that the lids will seal.

A funnel is a great tool to use to keep batter off the rim.

I filled the mason jars about half way full and set on top of a cookie sheet.

I baked them at 350 degrees for 35 minutes, until a toothpick came out clean. Then I sprinkled additional finely chopped walnuts on top.

And sprinkled each one with a little powdered sugar!

While they were still hot, I topped each one with a lid/seal. They will actually seal on their own after a few minutes, just like the canning process.
Did you know they will last up to 6 months sealed ! ? !
However, these won’t make it past the morning!

When ready to serve, you can either run a knife down and around all the sides of the jar, and tapping the bottom a bit, it will come out as a “log”. Simply slice it and serve.
OR!
You can do my personal favorite and what we will be doing tomorrow morning.
AND…..
Taking a spoon…..
Sit down……
Open the lid/seal……
and go to town! Yum!

HAPPY THANKSGIVING!
Recipe: Pumpkin Bread
Ingredients:
– 1 3/4 cup All Purpose Flour
– 1 1/2 cup Sugar
– 3/4 tsp. Salt
– 1 tsp. Baking Soda
– 1/2 tsp. Cinnamon
– 1/2 tsp. Nutmeg
– 1 tsp. Vanilla Extract
– 1/2 cup Vegetable Oil
– 2 large Eggs
– 1/3 cup Water
– 1 cup Fresh Pumpkin or Store Bought
– 1/2 cup Chopped Walnuts, plus more finely chopped Walnuts for Garnish (Optional)
– Powdered Sugar
Directions:
– Preheat oven to 350 degrees.
– Combine all dry ingredients (except powdered sugar and walnuts). Mix well.
– In another bowl, conbine pumpkin, water, eggs, vanilla, and oil. Mix well.
– Add dry ingredients to mixture and beat thoroughly.
– Stir in nuts and pour batter into greased loaf pan or 1/2 way up greased mason jars.
– If using a loaf pan, bake 75-80 minutes. If using mason jars, bake 35 minutes or until toothpick inserted into middle, comes clean.
– Cool 15 minutes in loaf pan and then sprinkle with powdered sugar. If using mason jars, sprinkle with finely chopped walnuts, powdered sugar and carefully put lids/seals on top and twist to tighten. *Jars are HOT! Be careful!

 |
 |
|
 |

You must be logged in to post a comment.