
Recipe
4th of July: Yogurt “Ice Cream” Pops

There is nothing more Patriotic then RED, WHITE, and BLUE! Even if you are talking about Ice Cream!
However, making Ice Cream is not really my forte’. Even though I am a self proclaimed lover of gadgets, the one thing I do not have is an Ice Cream Maker. *Have to put that one on my list!
A couple of Saturdays ago, I was watching my cooking shows and one had a recipe for Strawberry Yogurt Ice Cream Pops! I thought to myself, “That would be an AWESOME idea for July 4th!”
So with some tweaking here and there, I had it!

I just took some strawberries and mixed with some sugar and a splash of vanilla. *Not to worry! Recipe will follow! 😉
Allow to sit for 15-20 minutes.

Then, I took 1 1/2 cups blueberries.

Mixed with a 1/2 cup of regular Yogurt. (I generally eat Greek Yogurt, but for this, I used regular. The Greek is just to sour.)

Then, I tried it and realized it needed a little dash of sugar for the kids to like it. I would have been fine without it. But I did it anyway.

Then, I cleaned out the blender and repeated the same steps with the Strawberries. Since I already added sugar and vanilla to this, I just blended with another 1/2 cup of Yogurt.

Time to assemble the Pops!
I bought the molds for $1.50 each at Walmart.

I layered everything in a Red, White, and Blue pattern. Strawberry Mixture, a little regular Yogurt, then Blueberry Mixture.

Insert tops! By the way, I love these! They have a little sipper on the ends for anything that melts.

One lick ……….

And little babies everywhere are SUPER HAPPY! Who doesn’t love that?
RECIPE: 4th of July Yogurt “Ice Cream” Pops
– 1 Cup Fresh Strawberries, Sliced
– 1/4 Cup Sugar
– 1 1/2 Cups Fresh Blueberries
– Tbsp. Sugar
– 1 Tsp. Vanilla Extract
– 1 Cup Plain Yogurt, Divided plus Additional for Layering Pops
– 2 (4 count) Ice Cream Molds
Directions:
– Combine Strawberries, 1/4 Cup of Sugar, and 1 Teaspoon Vanilla. Set aside for 15-20 minutes.
– Meanwhile, combine Blueberries, 1 Tbsp. Sugar, and 1/2 cup Yogurt in a blender and blend until smooth. Set aside.
– Rinse out Blender and add Strawberries and remaining 1/2 cup Yogurt. Blend until smooth and set aside.
– Take Ice Cream molds and layer a small amount of Strawberry mixture, then a little Regular Yogurt, and then top off with Blueberry Mixture. If you still have room, start to repeat layers in a Red, White, Blue pattern.
– Top molds with tops and place in the freezer for atleast 4 hours or until firm.
ENJOY!

Herbed Compound Butter
<a href=”http://www.bloglovin.com/blog/8641235/?claim=jh9cqpf625f”>Follow my blog with Bloglovin</a>
Herbed Compound Butter!……………….
What?…………
You mean, you haven’t heard of it? “Why, I declare!”
Look! Compound Butter is just a fancy shmancy way of saying Butter with Stuff in it! And since we try not to be too fancy shmancy around here, that’s what we will call it.
Well, let me just tell you. The other night, I started off with the idea of making some for the grilled corn we were making for dinner. Then, as we started to sit down and eat, I remembered that I had seen an episode once on Foodnetwork where someone put it on their steak!
Since we just so happened to be having steak with that corn, I decided to give it a try. LAWRDY, Y’ALL!
You will die and go to heaven when you try it! It’s a MUST! Not sure I will ever have steak another way again! (*It was that good!)

Pretty sure after you try it, you’ll feel the same way. Plus, you aren’t going to believe how easy it is!

First, take some herbs. Anything you like. I chose to do Parsley and Rosemary.

Finely Chop…….

Add that to a softened stick of butter.

Mix well…. (*Now, most would put this in plastic wrap, form into a log, and place in the fridge to set up. After that, you can slice it like you would cookie batter and put on whatever you like.)
Me? I just put the bowl into the fridge for about 5 minutes and then just spooned it over whatever I wanted. LOL! *Patience is NOT a virtue of mine.
By the way, it’s just as good either way! 😉

Slather all over some fresh grilled corn AND a grilled steak! Oh my! Oh my!
You will NOT be disappointed!

ENJOY!
Recipe: Herbed Compound Butter
Ingredients:
– 1 Stick Butter
– 2 Tablespoons Parsley, Chopped
– 2 Tablespoons Rosemary, Chopped
Directions:
– Combine all ingredients and place in plastic wrap. Form into a “log”. Place in fridge for 1 hour . Cut butter into slices and place on top of vegetables, meats, casseroles……. the possibilities are endless!
– If you dont want to do any of this, just place bowl into fridge for 5-10 minutes and serve as you wish.
Mixed Berry Tartlets with Lemon Drizzle

CALLING ALL DADS!
Every Mother’s Day, I fantasize that my husband is losing sleep over the perfect meal to cook me with his 3 perfectly hair combed children in their best Sunday dresses and suit.
As he pours over countless cookbooks, he realizes that he has not yet vacuumed and dusted, which he quickly attends to. His children are making their beds and tidying up their rooms JUST BECAUSE they want to and JUST BECAUSE being clean feels SO good! (This is my fantasy, remember?)
Where am I, you ask?
Well, of course I’m at the Spa getting pampered by a crew of estheticians who want to make me feel good about my self JUST BECAUSE they care that much!
Then I stop dreaming………….. I wake up……………
to the sound of my 2 girls screaming and fighting and pulling eachother’s hair (that is not perfectly combed, by the way) JUST BECAUSE the other one took her pink furry pillow without asking. My son is throwing his little basketball everywhere but actually IN the basketball goal, which is followed up by a crashing sound. Not to mention the girls took it upon themselves to fix “breakfast” which may or may not have consisted of Nutella, Crackers, Half & Half, Cold Left Over White Rice, and Cheezits.
I know, Yummy.
All this, while my husband still sleeps soundly in his bed……. (Love ya Baby!) 😉
Well fellas, to help you out and make your #1 lady think you poured over cookbooks all day, I’m going to help you out with this Super Easy Dessert!

Why not try to make these Mixed Berry Tartlets. Heck, if you want to impress her even more than the fact that you made these to start with……. tell her they are Mixed Berry Tartlets with a Lemon Drizzle.
You only need 7 things and there is a chance that you may have a few of the ingredients already!
Here is what you need to do:

Cut up an 18 oz. package of Strawberries and add to a mixing bowl.

Throw in a couple of handfuls of fresh blueberries and sprinkle mixture with 1 Tablespoon of Sugar…… Toss to Combine. Set aside.

Take a package of Ready Crust Graham Cracker Tartlet minis.

Brush them with a little bit of egg white. (*You don’t have to, but it gives the crust a nice brown color when baking)

Put the tartlets on a cookie sheet and bake according to the package instructions for only 5 minutes. *I think it was 375 degrees, but might have been 350. Make sure you check!
While that is baking,

Squeeze the juice of 1 lemon into bowl and whisk in 1/2 cup of Powdered Sugar.

Your lemon drizzle should still be runny, but slightly thick like this. Set it aside.

Now take 1 cup of Heavy Whipping Cream. (*If you can’t find “Heavy”, regular Whipping Cream is fine) TIP for DAD: Creams like this have their own section next to the milk area in the Grocery Store. 😉

Find mom’s electric hand mixer and put the whisk attachment on. Beat on low at first unless you want to have the entire thing on your clothes. Add 1 Tablespoon Granulated Sugar and eventually go to highest setting and beat until cream becomes a thick whip with “stiff peaks” like this. BE CAREFUL! If you whisk too long, it could turn into butter! YIKES!
DAD: If making this whipped cream on your own proves to be too overwhelming, no one will judge you for buying Cool Whip! However, if you REALLY want to impress mom, go for the homemade stuff and earn those brownie points!

After the tartlets have baked and cooled, mound them up with the berry mixture. (You will probably have leftover berries)

Spoon the lemon drizzle over each tartlet to your liking. A couple spoonfuls each is fine.

Top each with whipped cream.

And garnish with fresh strawberries!

Mom will be SO SURPRISED and touched that you went the extra mile JUST BECAUSE you love her so much!
Recipe: Mixed Berry Tartlets
Ingredients:
– 18oz. package Fresh Strawberries
– Couple Handfuls of Fresh Blueberries
– 1 cup Heavy Whipping Cream
– 2 Tablespoons Granulated Sugar, Divided
– Juice of 1 Lemon
– 1/2 Cup Powdered Sugar
– 1 Package Ready Crust Graham Cracker Tartlet Minis
– 1 egg white (Optional)
Directions:
– Dice up Strawberries and add to a bowl. Add the Blueberries and Sprinkle with 1 Tablespoon of the Granulated Sugar. Set aside.
– Brush 1 eggwhite (optional) over the crusts and bake according to package instructions. Set aside to cool when finished.
– While crusts are baking, combine lemon juice and powdered sugar by whisking until smooth. Set aside.
– With the whisking attachment of an electric mixer, whisk remaining tablespoon of granulated sugar with the 1 cup of heavy whipping cream in a bowl. Whisk until mixture forms “stiff peaks”. Set aside.
– To assemble, take cooled tartlets, and mound each one with berry mixture.
– Add a couple of spoonfuls of lemon drizzle to each tartlet.
– Top with whipped cream.
– Garnish with fresh berries.
– Stick in the fridge for atleast 10 minutes. If making ahead, desserts will keep just fine in the fridge!
Sweet Potato Au Gratin
I have to admit. I have a problem. I happen to be a “gadget girl”. There! I said it. It’s out now and I can’t take it back.
Whenever I’m in a homestore or go to a home party where these things are sold, I have to practice self control.
My palms start to get sweaty (nice, huh?) , my pupils begin to dilate, and I have even been know to twitch a little. I know! I am painting a very pretty picture for you.
One of the little gadgets I have always craved, but have to be honest, have been scared of is the Mandoline. No, not the one you play.
The one you SLICE with!
So, while in the store the other day, a Sweaty Palmed girl broke down and bought one.
BEHOLD!

This is the one I got. I paid only $24.99 for it at my local Sam’s Club. These can run pretty high. That is the reason it has taken me so long to purchase one. They can go upwards of $100. I didn’t want to pay a lot, only to find out I wouldn’t use it. This is the only reason I bought this, because I was so excited it wasn’t $100!
Well, let me just tell you………… I LOVE IT! By the way, since purchasing this, I have seen them even cheaper than what I paid for mine. Even as low as $11.99 online!!!
I have always shied away from recipes that call for thinly sliced ingredients. If I couldn’t buy them already that way, I probably wouldn’t fix it.
Ladies and Gentlemen, I am proud to announce that GONE ARE THE DAYS where I do this anymore!
I had some Sweet Potatoes lying around that I wanted to use up and so I decided to make Sweet Potato Au Gratin for dinner last night. Before you go, “Esther! I don’t like Sweet Potatoes…..” You can definitely do this recipe by substituting them for regular Russett Potatoes. If you do that, you can also either use the Thyme I used in my recipe along with the Gruyere OR you could also substitute those for maybe Chives and White Cheddar Cheese.

So, without further adieu, this is what I did:

I peeled and sliced (with the Mandoline) 4 or 5 Sweet Potatoes (it depends on size) and put the setting to “3/16” of an inch.

I buttered a 13 x 9 in. baking dish.

Quick Tip from my MOM: Don’t throw away those empty butter wrappers! Save them for something like this where you need to butter a dish. It makes it much easier to do it and your hands get less messy! 🙂

I made a layer the Sweet Potatoes in a slightly overlapping pattern on the bottom of the baking dish.

Then I sprinkled with a little Salt, Pepper, and Thyme. Then I sprinkled a thin layer (about 1/2 cup) of Smoked Apple Gruyere Cheese on top. YUM! Is all I can say!
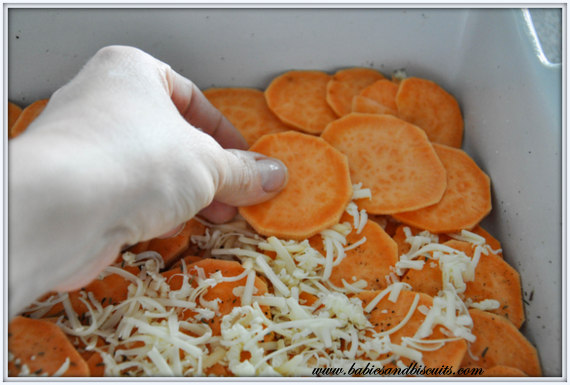
Next, I repeated the layers 2 more times.

After that, I put 1 more layer of Sweet Potatoes on top. (By now, I had 4 layers of Sweet Potatoes total)

Then, I simmered 2 cups of Skim Milk and 2 cloves of Minced Garlic for 2 to 3 minutes.

Then I poured it over the Sweet Potatoes. I made sure I touched every potatoe on the top layer so that none would be dry during the baking process.

Em wanted to help me, so I let her sprinkle the last layer of cheese on top. Then, I covered it with foil and baked it for 30 minutes on 400 degrees. Then, I removed the foil and baked it for another 30 minutes. Be careful when you remove the foil because steam will escape and that may cause you to get burned.

This is what it looks like when you pull it out. Not sure if you can tell, but the milk will still be visible and almost appear like it isn’t finished because of so much being in the pan. NO WORRIES! I let mine cool for 30 minutes, allowing all the potatoes to absorb the milk. BY THE WAY: The brown around the edges is from the milk and steam. I showed this in the picture so you would know to expect it. 😉
After that, right before we were ready to eat, I popped it back in the oven for a few minutes on broil so that the cheese could get a little more browned. Make sure you watch it though! Cheese can burn VERY quickly if you aren’t watching it.

This is what it looked like when finished. Unfortunately, the picture doesn’t do it justice because it was later and there wasn’t as much light outside. (BUMMER!)
This was AMAZING with the Pork Tenderloin we had with it.

Lucky for me, I had just enough leftover for lunch today! Burp!
Recipe: Scalloped Sweet Potatoes
Ingredients:
2 cups Skim Milk
2 cloves of Garlic, minced
2 pounds Sweet Potatoes (about 4 or 5) , peeled and sliced about 1/8-inch thick *OR you could use Russet
Kosher Salt
Ground Black Pepper
1½ teaspoons Dried Thyme *OR you could use Chives
2 cups shredded Gruyère cheese (I used Apple Smoked) *OR you could use White Cheddar Cheese
Directions:
– Preheat oven to 400 degrees.
– Peel and Slice your Potatoes, if you haven’t already.
– Butter a 13 x 9 in. baking dish.
– Layer Sweet Potatoes in an overlapping pattern. Sprinkle with a little Salt, Pepper, and Thyme.
– Sprinkle with about a 1/2 cup of Gruyere cheese.
– Repeat layers 2 more times, ending with the cheese.
– Layer a final layer of Sweet Potatoes, set aside.
– In a small pot bring Skim Milk and Garlic just to a simmer for about 2 minutes. Remove from heat and pour on top of Sweet Potatoes, making sure you touch each potatoe on top layer. Milk will settle to bottom.
– Cover with Aluminum Foil and bake for 30 minutes.
– Remove Foil (BE CAREFUL) and bake an additional 30 minutes.
– Remove from oven and allow to cool for 30 minutes. Potatoes will soak up any milk during this time.
– Stick back in the oven for a few minutes on Broil and allow top to brown a little more.
– Serve immediately.
 |
 |
|
 |

You must be logged in to post a comment.