
Recipes
Loaded Potato Soup

I don’t know what is up with the weather lately. We have been getting so much rain this Summer!
Usually, we are talking about how much we wish it WOULD rain during the Summer, but instead, I find myself wishing it wouldn’t as much.
One thing I crave when we get rain is SOUP, regardless how hot it is outside! Not sure what it is, but my brain just seems to be wired like that.
I did a previous post once on a soup I fix when it rains a lot called Hamburger Soup. If you want to check that post out, you can see it here.
This one, however, is a “doctored” up version of my Mom’s regular Potato Soup. I LOOOOOOOVE my Mom’s Potato Soup!
It is the perfect comfort food for me because my mom used to make it all the time.
Her’s is a basic Irish version, but it’s easy to make it Loaded Potato Soup! You just add everything that you would normally add to a traditional Baked Potato.
Of course, I would probably refrain from adding any crazy things like salsa. Yup, wouldn’t add salsa…………….
And from the scratching you are doing to your noggin right now must mean I’m the only nut that adds salsa to their Baked Potato. *Moving ON!

I added Shredded Cheese, Crumbled Bacon, Sour Cream, and Chives. I swear I even saw the owls on this kitchen towel smile when I did it. They even knew how good this soup was. 😉
So, without further Adieu, I would like to share the recipe with you….. ‘Cause I wuv you that much! 😉

Recipe: Loaded Potato Soup
Ingredients:
– 7 or 8 Large Russet Potatoes, Skinned and Diced
– 2 Large Onions, Chopped
– 3 Tbsp. Butter
– 2 Tbsp. Olive Oil
– 2 Tbsp. All-Purpose Flour
– 6 Cups Milk, (I used Skim)
– 2 Cups Water
– Cheddar Cheese, Crumbled Bacon, Sour Cream, Chives for Topping
Directions:
– Heat a large pot over medium high heat.
– Add onions, butter, and olive oil to pot and saute’ onions until “translucent” and softened.
– Reduce heat to medium.
– Add potatoes and stir well.
– Add flour, one tablespoon at a time and stir to coat in between adding flour. (work quickly because potatoes will try to stick to bottom of pot)
– Add milk and water to pot and stir.
– Simmer soup for 40 – 45 minutes until potatoes have softened and soup has thickened.
– To serve, top each bowl of soup with preferred toppings.
*Tip: If potatoes have softened and soup is not as thick as you would like, thicken by adding a 1/4 cup of Cornstarch to 1 cup of soup liquid in a separate bowl. Once thoroughly combined, add to soup pot and stir continuously until soup thickens. However, keep in mind that soup will definitely thicken once you add all your toppings.

Peach and Blueberry Fruit Crisp

The other night, we had my brother’s sweet girlfriend’s family over. We were meeting them for the first time, so we were very excited! We did really simple cookout food. Just hamburgers, pasta salads, baked beans, deviled eggs…… and a Peach and Blueberry Crisp for dessert!
I had never made it before and I usually NEVER do a new recipe for company. Especially company I have never met!
We put everything together a few hours before everyone got there so we could spend time with everyone without having to worry about slaving over a stove in the process.

We blanched the peaches in boiling water first, then transferred them quickly to cold water. *This helps the skins peel off really easily. Then we sliced them in big chunky pieces…… added some extra goodies like lemon zest, lemon juice, sugar etc. and then tossed in some blueberries and layered on the bottom of a stoneware baker.

I could have just ate the dessert as it was then and there, but instead…… we added some more goodness!

Yummers!

The kids wanted to help me so I let them spread the crumble for the “crisp” part on top.

I love recipes like this that allow the kids to jump in and help, and allow me not to worry. You really cannot mess this topping up. It’s very easy! Just spread on top like you want! Then pop it into the oven for 45 minutes!
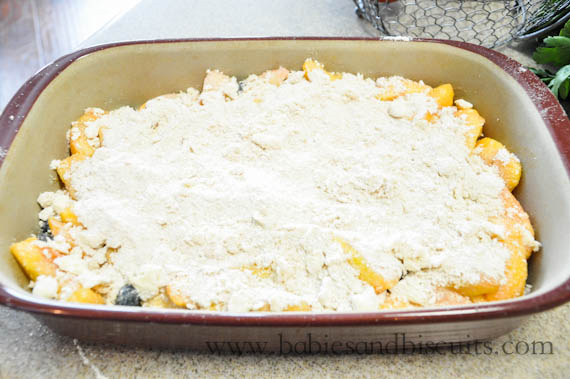
This is what it looked like before going into the oven……………
Now! Let me just take a “sidebar moment” to tell you something.
I rock in Dance Central 3.
Yes, I ROCK!
You may be asking yourself, “What on earth does that have to do with a Peach and Blueberry Crisp?”
Well, I’ll tell you.
After the crisp had gone about 45 minutes, my mom and I decided to check on it. We both decided that the topping wasn’t “browned” enough for our taste. SO! We thought, let’s broil it on low for a few minutes!
Just about that time, my oldest daughter started to say she was the best at Dance Off 3 and knowing this was untrue, I decided to challenge her to a duel! I looked at mom at that point, and she said, “I got this! Go! Go show your 9 year old who is boss!”
Well, in the middle of my 3 minutes duel, I smelled something……….. I didn’t smell the sweet aroma of a perfectly browned Peach and Blueberry Crisp bubbling away in the oven.
NO!
I smelled something far worse! It was the UNPLEASANT aroma of a perfectly BURNT Peach and Blueberry Crisp BURNING AWAY in the oven!
“MOM!”, I yelled.
(*Mom was no where to be found!) Mom had actually gone outside to tell everyone it was time to eat and walked away for a minute too long and POOF! *Sorry I called you out mom! I may have just lost my one and only reader! 😉
Well, there was only one thing to do. We did what every other smart, honest cooks would do………
We scraped off the burnt parts……….
REdid the topping………..
Plopped that stuff back on…………….
And put her back in the oven for 8 minutes and kept on truckin!
And may I say it turned out just fine!

And no one knows about our little mishap but ME, MOM,

And mom’s dog, Pepper! 😉 Shhhhhh!
Recipe: Peach and Blueberry Fruit Crisp
Ingredients:
– 2lbs. firm, ripe peaches (6 to 8 peaches)
– 2 teaspoons grated lemon zest
– 2 tablespoons freshly squeezed lemon juice
– 1/2 cup granulated sugar
– 1/4 cup all-purpose flour
– 1 cup fresh blueberries (1/2 pint)
For the crumble:
– 1 cup all-purpose flour
– 1/3 cup granulated sugar
– 1/4 cup light brown sugar, lightly packed
– 1/2 teaspoon kosher salt
– 1/4 teaspoon ground cinnamon
– 1/4 lb (1 stick) cold unsalted butter, diced
Directions:
– Preheat the oven to 350 degrees F.
– Immerse the peaches in boiling water for 30 seconds to 1 minute, until their skins peel off easily. Place them immediately in cold water. Peel the peaches, slice them into thick wedges, and place them in a large bowl. Add the lemon zest, lemon juice, granulated sugar, and flour. Toss well. Gently mix in the blueberries. Allow the mixture to sit for 5 minutes. Spoon the mixture into ramekins or one large baking dish. * I used a 13 x 9 in. pan.
– For the topping, combine the flour, granulated sugar, brown sugar salt, cinnamon, and the butter into the of an electric mixer fitted with a paddle attachment and mix until the butter is the size of peas. *If you do not have a mixer, no problem! Just mix well in a bowl and break up the diced butter with a fork or pastry cutter until the butter resembles small peas. Rub the mixture with your fingertips until it’s in big crumbles, then sprinkle evenly over the fruit. Place in oven and bake for 40-45 minutes or until the top is browned and juices are bubbly.
– Serve warm or at room temperature. Vanilla ice cream goes great with this!
4th of July: Yogurt “Ice Cream” Pops

There is nothing more Patriotic then RED, WHITE, and BLUE! Even if you are talking about Ice Cream!
However, making Ice Cream is not really my forte’. Even though I am a self proclaimed lover of gadgets, the one thing I do not have is an Ice Cream Maker. *Have to put that one on my list!
A couple of Saturdays ago, I was watching my cooking shows and one had a recipe for Strawberry Yogurt Ice Cream Pops! I thought to myself, “That would be an AWESOME idea for July 4th!”
So with some tweaking here and there, I had it!

I just took some strawberries and mixed with some sugar and a splash of vanilla. *Not to worry! Recipe will follow! 😉
Allow to sit for 15-20 minutes.

Then, I took 1 1/2 cups blueberries.

Mixed with a 1/2 cup of regular Yogurt. (I generally eat Greek Yogurt, but for this, I used regular. The Greek is just to sour.)

Then, I tried it and realized it needed a little dash of sugar for the kids to like it. I would have been fine without it. But I did it anyway.

Then, I cleaned out the blender and repeated the same steps with the Strawberries. Since I already added sugar and vanilla to this, I just blended with another 1/2 cup of Yogurt.

Time to assemble the Pops!
I bought the molds for $1.50 each at Walmart.

I layered everything in a Red, White, and Blue pattern. Strawberry Mixture, a little regular Yogurt, then Blueberry Mixture.

Insert tops! By the way, I love these! They have a little sipper on the ends for anything that melts.

One lick ……….

And little babies everywhere are SUPER HAPPY! Who doesn’t love that?
RECIPE: 4th of July Yogurt “Ice Cream” Pops
– 1 Cup Fresh Strawberries, Sliced
– 1/4 Cup Sugar
– 1 1/2 Cups Fresh Blueberries
– Tbsp. Sugar
– 1 Tsp. Vanilla Extract
– 1 Cup Plain Yogurt, Divided plus Additional for Layering Pops
– 2 (4 count) Ice Cream Molds
Directions:
– Combine Strawberries, 1/4 Cup of Sugar, and 1 Teaspoon Vanilla. Set aside for 15-20 minutes.
– Meanwhile, combine Blueberries, 1 Tbsp. Sugar, and 1/2 cup Yogurt in a blender and blend until smooth. Set aside.
– Rinse out Blender and add Strawberries and remaining 1/2 cup Yogurt. Blend until smooth and set aside.
– Take Ice Cream molds and layer a small amount of Strawberry mixture, then a little Regular Yogurt, and then top off with Blueberry Mixture. If you still have room, start to repeat layers in a Red, White, Blue pattern.
– Top molds with tops and place in the freezer for atleast 4 hours or until firm.
ENJOY!
Herbed Compound Butter
<a href=”http://www.bloglovin.com/blog/8641235/?claim=jh9cqpf625f”>Follow my blog with Bloglovin</a>
Herbed Compound Butter!……………….
What?…………
You mean, you haven’t heard of it? “Why, I declare!”
Look! Compound Butter is just a fancy shmancy way of saying Butter with Stuff in it! And since we try not to be too fancy shmancy around here, that’s what we will call it.
Well, let me just tell you. The other night, I started off with the idea of making some for the grilled corn we were making for dinner. Then, as we started to sit down and eat, I remembered that I had seen an episode once on Foodnetwork where someone put it on their steak!
Since we just so happened to be having steak with that corn, I decided to give it a try. LAWRDY, Y’ALL!
You will die and go to heaven when you try it! It’s a MUST! Not sure I will ever have steak another way again! (*It was that good!)

Pretty sure after you try it, you’ll feel the same way. Plus, you aren’t going to believe how easy it is!

First, take some herbs. Anything you like. I chose to do Parsley and Rosemary.

Finely Chop…….

Add that to a softened stick of butter.

Mix well…. (*Now, most would put this in plastic wrap, form into a log, and place in the fridge to set up. After that, you can slice it like you would cookie batter and put on whatever you like.)
Me? I just put the bowl into the fridge for about 5 minutes and then just spooned it over whatever I wanted. LOL! *Patience is NOT a virtue of mine.
By the way, it’s just as good either way! 😉

Slather all over some fresh grilled corn AND a grilled steak! Oh my! Oh my!
You will NOT be disappointed!

ENJOY!
Recipe: Herbed Compound Butter
Ingredients:
– 1 Stick Butter
– 2 Tablespoons Parsley, Chopped
– 2 Tablespoons Rosemary, Chopped
Directions:
– Combine all ingredients and place in plastic wrap. Form into a “log”. Place in fridge for 1 hour . Cut butter into slices and place on top of vegetables, meats, casseroles……. the possibilities are endless!
– If you dont want to do any of this, just place bowl into fridge for 5-10 minutes and serve as you wish.
 |
 |
|
 |

You must be logged in to post a comment.