
Sweets
Rustic Apple Pie

A lot has been happening around here lately. For starters………………..
MY BABY BROTHER GOT MARRIED!
We are so so so happy for him and his new wife. We gained a sister, friend, and an entire new family that we deeply care for and love!
Now they just need to start having babies and my life will be complete. No pressure, right? LOL!
Well, Mom and Dad were here as well and one of the last nights they were here, we had everyone over for Sunday dinner and mom made Apple Pie! I have made it before, but when Mom is in town, it’s best to just leave things like this to the “professionals”. 😉
I LOOOOOOOVE HER APPLE PIE!
It always has this Rustic quality to it and I love that she never tries to make it too “fake looking”. Everything is from scratch, including the crust.
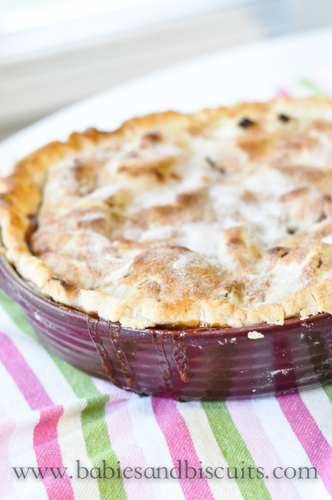
Just let me set the stage for you. It’s a crisp cool day in Fall. The aroma from the kitchen is taking over the house as the cinnamon and sugar fills the air. As you bring your fork to your mouth filled with that bite of perfection…….. um YEAH! That happened here that day! The crust was slightly crunchy, while the filling was a thick cinnamon apple yumminess!
Come on y’all, it’s FALL!!!
Why not get in the kitchen and bake you up some Apple Pie?

You know you want too! And just in case, because I love you so much……..Here is Mom’s recipe!
Recipe: Rustic Apple Pie
– 2 Homemade or Prepared Deep Dish Pie Crusts (*You will need 2 crusts, one for the bottom and one for the top. *NOTE: Crusts perform better when refrigerated well. If frozen, make sure to thaw completely and chill in fridge until you need it.)
– 15 Granny Smith Apples, Peeled, Cored and Sliced (*NOTE: Slice no larger than a 1/2 inch in thickness or apples will not cook properly)
– 1 Heaping Tbsp. Cinnamon
– 2 Cups Sugar
– 1 Tbsp. Cornstarch
– 4 Tbsp. Unsalted Butter
– 2 Tbsp. Milk
– Small amount of additional cinnamon and sugar for dusting the top of pie.
Directions:
– Preheat oven to 400 degrees.
– Take a 9in. pie plate and spread first crust evenly over bottom. Refrigerate.
– Place apple slices into a large mixing bowl.
– In a separate bowl, combine cinnamon and sugar and cornstarch.
– Add Cinnamon mixture to apples and mix well using hands, making sure all apples are coated well.
– Remove pie plate from fridge and add apple slice mixture. *NOTE: Apples will mound up in dish. This is normal and makes for a great pie!
– Cut 4 Tbsp. Butter in half and dot over apple mixture evenly.
– Top apples with remaining pie crust. Pinch all around edges of pie to “seal” crusts together. *NOTE: This can be done by using a fork or by index finger and thumb method all the way around.
– Brush top of pie with 2 Tbsp. Milk.
– Lightly dust top of pie with additional cinnamon and sugar.
-Cut 2-3 slits (1 in. long) in top of pie crust for steam to escape during baking.
– Bake pie in oven for 15 minutes.
– Turn temperature down to 350 degrees and continue baking pie for an additional 45 minutes.
– If at end of baking, pie is not golden brown, turn temperature back to 400 degrees and watch closely for 5 minutes. *That should do the trick! 😉
*APPLE PIE ALWAYS TASTES BETTER WITH VANILLA ICE CREAM! ……….. just sayin !
I hope you enjoy the recipe!
XOXO,
Esther

Mason Jar Birthday Cake !!!

Don’t you just love Mason Jars????
Well, I do. I must have a million of them. Between all the empty ones from canned goods I’ve used, to all the ones I decorate with, I might have to change that number to a BILLION!
They are pretty much a staple here in the South, mostly because they are so versatile.
Well, the other day was no exception!
Em turned a Big Ole’ 8 over the weekend and decided she wanted a slumber party. Yes, I still have all my hair…… BARELY!
I thought it would be fun to change up her Birthday cake. So, instead of doing one big cake, I did several smaller mason jars for all the girls.
First, I made a boxed chocolate cake (Em’s favorite).

Then I took one of my biscuit cutters that I knew would fit into the mason jar and cut holes out ….

The cake was a little thick, so I cut those in half and layered them in the bottom of 1/2 pint mason jars.

Then, I took the buttercream icing I made. (* I used this homemade recipe here , but store bought is fine. I mean, come on…. I used a boxed cake mix. )

Added a swirl of it to the top of the cake.

Then topped with some rainbow sprinkles.

Yummmmmmm.

Now, at this point, I realized that with the amount of buttercream icing I made and the amount of mason jars I still had to do, I would never have enough to keep going at the thickness I originally cut the cake. So, I decided to keep the cake as thick as the biscuit cutter cut it this time. If you do less jars than I did, you can always keep the thickness of the cake the same.

Then, I repeated with the buttercream and topped off with more sprinkles. Once I was finished, I felt like they looked like little milkshakes, so I stuck these cute blue and white polka dotted paper straws in them I found at Target.
TIP: Stick them in the fridge for 5 minutes and serve. There is something about giving them a slight little chill that makes them better in my opinion. 😉


My favorite part of the whole thing was that Em decided she wanted everyone to be able to make a wish that night, not just her. So, every girl got their own mason jar with their own candle to blow out!
I love her sweet heart!
Just a little side note: I had a lot of leftover cake. If you do not want to waste the cake, it would be great to break up the remaining cake and either freeze for later or use it within a day or so in a trifle.
Everything is better in a Mason Jar! These would be great for entertaining a large crowd too. Not to mention, they could be technically considered portion control, right?
XOXO,
Esther

Ghoulishly Good For You Smoothie
I love smoothies! They are yummy and sweet and best of all, GOOD FOR YOU!
Goulishly Good For You, that is! *Pretty sure that’s a word?

You can use any kind of blender, but recently, I bought a Blendtec and I haven’t regretted it for one second!
This thing makes a mean smoothie, amongst other things.
It literally makes it as smooth as the ones you would buy in the store. Most people wouldn’t care about that, but I have never been able to get that consistency until now. 🙂
Here is what I did:

I took a couple handfuls of fresh spinach, 1 kiwi, 1/2 cup fresh blueberries, 1 apple (sliced into wedges), 1 whole banana (peeled of course), and 1 1/2 cups water.

Then I tossed all the ingredients into the blender, secured the lid and pressed the smoothie button. *For a regular blender, just blend until completely smooth.
I should also mention that I like my smoothies more on the thinner side so that they are easier to drink. If you prefer yours on the thicker side, I would use a little less water. You could also add some ice cubes to the smoothie as well to have a thicker consistency.

In the end, you are left with a great energy boosting drink that has loads of fiber and vitamins.

Did I mention that my children would probably sell me to the highest bidder for one of these drinks? They love it!
They have absolutely no idea that it is so good for them.
I promise that you can’t taste the spinach. They always have to ask me if I put spinach in it. 😉

It’s a good thing that they can’t taste everything in the smoothies. It would just be too awkward to explain things after the neighbor’s cat went missing…….
Mooooohaahaahaahaahaa! (*Evil Laugh)

Yeah, Z didn’t get it either. Guess I’ll have to work on my jokes.
XOXO,
Esther
4th of July: Yogurt “Ice Cream” Pops

There is nothing more Patriotic then RED, WHITE, and BLUE! Even if you are talking about Ice Cream!
However, making Ice Cream is not really my forte’. Even though I am a self proclaimed lover of gadgets, the one thing I do not have is an Ice Cream Maker. *Have to put that one on my list!
A couple of Saturdays ago, I was watching my cooking shows and one had a recipe for Strawberry Yogurt Ice Cream Pops! I thought to myself, “That would be an AWESOME idea for July 4th!”
So with some tweaking here and there, I had it!

I just took some strawberries and mixed with some sugar and a splash of vanilla. *Not to worry! Recipe will follow! 😉
Allow to sit for 15-20 minutes.

Then, I took 1 1/2 cups blueberries.

Mixed with a 1/2 cup of regular Yogurt. (I generally eat Greek Yogurt, but for this, I used regular. The Greek is just to sour.)

Then, I tried it and realized it needed a little dash of sugar for the kids to like it. I would have been fine without it. But I did it anyway.

Then, I cleaned out the blender and repeated the same steps with the Strawberries. Since I already added sugar and vanilla to this, I just blended with another 1/2 cup of Yogurt.

Time to assemble the Pops!
I bought the molds for $1.50 each at Walmart.

I layered everything in a Red, White, and Blue pattern. Strawberry Mixture, a little regular Yogurt, then Blueberry Mixture.

Insert tops! By the way, I love these! They have a little sipper on the ends for anything that melts.

One lick ……….

And little babies everywhere are SUPER HAPPY! Who doesn’t love that?
RECIPE: 4th of July Yogurt “Ice Cream” Pops
– 1 Cup Fresh Strawberries, Sliced
– 1/4 Cup Sugar
– 1 1/2 Cups Fresh Blueberries
– Tbsp. Sugar
– 1 Tsp. Vanilla Extract
– 1 Cup Plain Yogurt, Divided plus Additional for Layering Pops
– 2 (4 count) Ice Cream Molds
Directions:
– Combine Strawberries, 1/4 Cup of Sugar, and 1 Teaspoon Vanilla. Set aside for 15-20 minutes.
– Meanwhile, combine Blueberries, 1 Tbsp. Sugar, and 1/2 cup Yogurt in a blender and blend until smooth. Set aside.
– Rinse out Blender and add Strawberries and remaining 1/2 cup Yogurt. Blend until smooth and set aside.
– Take Ice Cream molds and layer a small amount of Strawberry mixture, then a little Regular Yogurt, and then top off with Blueberry Mixture. If you still have room, start to repeat layers in a Red, White, Blue pattern.
– Top molds with tops and place in the freezer for atleast 4 hours or until firm.
ENJOY!
 |
 |
|
 |

You must be logged in to post a comment.