
Fall Decorating

When it comes to seasonal decorating, nothing gets me more excited than Fall.
It must be because change is happening all around you. It’s a lot like what Spring time does to someone who has been experiencing Winter for so long. Those long cold days that finally see the warmth of Spring, accompanied by the that first sign of new life in a budding flower.
It’s exactly the same thing for me after a long hot Summer.
Those first few true days of Fall when I start to see the leaves change colors with all the vibrant oranges and yellows and browns. The crisp cool air that begs you to grab that first hot chocolate or apple cider.

The thought of those endless ideas running through a little child’s head of what their imagination tells them they can be for that one special night on Halloween.

I think I enjoy all those Halloween movies more than my own children. I force them to watch the countless reruns of Halloween Town, Halloween Town Part 2, 3, 4……………… so that if someone comes in and catches me, I can blame it on them. It’s a good thing no one knows I can recite the entire movie of Hocus Pocus without even thinking about it. Don’t tell anyone I told you that!

Freshening up your front entry way can do wonders for your home. I had majority of the items already like the wood box, haystack, and pumpkins. I added a few mums and the corn stalks that I found at Lowes.
Small changes like even painting your front door can really freshen up the space as well. We used a dark gray on our doors that used to be red. I love gray for so many reasons. The best reason is that because it is so neutral, it goes well with any color scheme.

The silk leaves are left overs I had from last season and can be found at any craft store or even places like Walmart.

The window box on the front window got seasonal flowers as well. I couldn’t wait to try out this beautiful ornamental kale I found.

I have always seen these in pictures in magazines and as silly as it seems, I just had to get them.

I really love the way they look. It almost seems like they could be Cabbage Patch Kids…….. Admit it! You thought about it. 😉

Whatever you go with for your seasonal decorating, make sure to only use things that you really love! Don’t settle for anything else!
Happy Decorating!
XOXO,
Esther

No Comments
Cinnamon Twists

When I was growing up, both my mom and grandma took us to a grocery store called, The Fresh Market. To my knowledge, they are across the United States, so I’m sure you are probably familiar with it.
Apart from having organic food items, they had and still do have an AMAZING Bakery!
Well, it was considered AMAZING to a little child growing up.
We all had our favorite things we loved and pretty soon those things became something we couldn’t live without when we would go to there. At least that is what we would tell anyone who took us, in hopes we could sweet talk them into buying something for us.
We weren’t spoiled, right?
I remember my sister’s favorite were the Chocolate Eclairs. Mine were whatever Sugary Confection looked good that day…… (I never have met a baked good I didn’t like). AND…….My brother’s were the Cinnamon Twists! (Which also, eventually, became my favorite as well)
Well, when my brother and I moved away from Raleigh, we moved to an area that didn’t have a Fresh Market. Well, at least not initially.
Within a few years of living here, they actually, to our surprise, built one, not too far from our house! I was literally in heaven! Nothing will get this girl more excited than when a new awesome grocery store hits town! The first thing on my list to buy there were going to be……. you guessed it,
CINNAMON TWISTS!
However, that wouldn’t happen. 🙁
I went to the store and didn’t see them. After asking an employee where they were, he told me that I must have been a Fresh Market customer for a LONG time, because they stopped making them years ago.??????????
WHAT?!?!?! , I thought?
I guess I hadn’t gone that often when I still lived in Raleigh, because I reckon I would have known this!?!?
They had some “other version ” of them now. But Y’all!!!! Let me just tell you…….
“Other Versions” just don’t cut it when you want the REAL VERSION of something. Not when you grew up having One Version of it and One Version only. Uh uh!
So, long story short….. (TOO LATE!)
I decided to make my “OWN VERSION”!
So, I hope you like them.
Here is what I did:

I took one sheet of Puff Pastry. I used Pepperidge Farm’s, but use whatever brand you like. I only had one sheet, so the recipe will be based off that. If using 2 sheets, and I definitely recommend doing that, because you will want MORE!……. just double the rest of the ingredients.

Lightly dust a counter surface with flour so that you can work with the pastry sheet and it will not stick to the counter. *You honestly don’t need much.

Mine came lined with sheets of parchment paper, so I thought it would be a great idea to use this as a “ruler” of some sort or at least something that would give me a straight edge to cut the strips with. Using a pizza cutter,

I cut several strips of the puff pastry. Make sure to cut an even amount, as you will twist two together. *NOTE: I would go back and cut the strips thinner next time. They don’t have to bake as long when they are thinner. However, these did just fine and tasted great!

Then, I took a very small amount of milk and brushed it lightly on the strips to act as a “glue” for the cinnamon and sugar.

I mixed together 1 teaspoon of cinnamon with a 1/4 cup of sugar.

I heavily sprinkled the cinnamon and sugar mixture over all of the strips. Then, I turned them over and did the exact same thing to the other sides.

Time to TWIST! Take two strips and cross them at the top, pinching together. Taking both strips, I twisted them all the way down and pinched them again at the bottom to seal.

This is what they look like when twisted. Then, I cut them in half and made sure all the ends were pinched together as well.

Smaller cut strips getting ready to go into the oven on 400 degrees for 12-15 minutes. (*Thinner ones will be less)

And VOILA! Make sure to let them cool completely. As they cool, they will become stiffer and will in turn have this “crunch” to them that is simply DIVINE! That is exactly the way they used to be at The Fresh Market too! 🙂
I have to say that I was proud of myself. I surprised my brother with a few and I really hope he liked them! If he didn’t he can give them back because I know a few peeps around these parts that will gobble them up!
When the kids came home from school, they devoured them. Even my oldest, who is not a big sweet person (not sure she is really my kid……) LOVED THEM!
Then, both her and her sister decided that they would go best with Apple Cider. If you haven’t seen my Cider Recipe, you can check it out here.
Until next time…….
XOXO,
Esther
Recipe: Cinnamon Twists
– Flour for dusting
– 1 Frozen Puff Pastry Sheet, thawed
– 1 Teaspoon Cinnamon
– 1/4 Cup Granulated Sugar
– Small amount of milk for brushing Pastry
Directions:
– Take a small amount of Flour and lightly dust a counter or cutting board surface. Take Puff Pastry sheet, and lie flat on lightly dusted surface.
– Using a pizza cutter or knife and straight edge, cut strips in puff pastry sheet, remembering to do an even number for twisting purposes. Cutting thinner strips may work better. However, wider ones work just as well. Line strips on working surface.
– Meanwhile, in a small bowl, combine the Cinnamon and Sugar.
– Using a pastry brush, lightly brush surface of pastry sheets with milk.
– Heavily dust each strip with Cinnamon/Sugar mixture. Flip strips over and repeat on other side.
– Carefully, take two strips and criss-cross strips on one edge. Proceed to wrap strips around each other and secure other end just like the beginning.
– Lay strip down on cut in half, remembering to pinch the cut edges together so that they will hold their shapes. Repeat steps with remaining strips.
– Lay strips on a baking sheet and bake for 12-15 minutes until puffy and golden brown. Sprinkle with additional Cinnamon/Sugar mixture if you wish.
– Allow the strips to cool completely. *If you do this, they will become crispier and fantastic! If you eat them to soon, they will not be as crispy!

No Comments
Cajun Stew

(Recipe: Courtesy of Martha Stewart’s “One Pot” Recipe Book)
I’m soooooooo happy to share this post with y’all! I found the “Holy Grail” of fast Gumbo recipes!
Not too long ago, I made Gumbo for the first time ever. It was FANTASTIC! …………….. It also took me 4 1/2 hours to make!
Now don’t get me wrong. Gumbo…….. “authentic” gumbo just can’t be duplicated completely in only 50 minutes. But it can definitely come in at a close 2nd!
I bought Martha Stewart’s new cookbook the other day and couldn’t wait to start trying out the recipes!
I did what I usually do when I get a new cookbook………………..
I attacked it!

……………With Post It Notes! 😉
I fully recommend this book and depending on what recipes you choose to fix, only because certain cuts of meat are more expensive than others, it can be really reasonable to cook these recipes.
Most of them only have 7 to 10 ingredients and considering that most of those ingredients include staples like oil, salt/pepper and spices……… I don’t thing that is a lot. It surprised me because most of her stuff seems to take forever and involves a ton of steps and ingredients, but not this book!
Considering that everyone is pressed for time and wants good, wholesome, quick meals for their families and themselves, I think this recipe book is a WINNER!

This recipe only took 50 minutes to make, which half of that time was really just contributed to simmering so I definitely wasn’t standing at the stove that entire time.
My kids loved it. The girls went back for 2nds and even 3rds. My littlest only ate his sausage and shrimp, but he is also going through his “picky faze”, and the hubster near about made himself sick on how many extra servings he got. Even with all that eating, we still had leftovers for lunch the next day.
I decided to serve the Stew over Cheese Grits and OH BOY! So good!
Recipe: Cajun Stew
Ingredients:
– 2 Tbsp. Vegetable Oil
– 2 Tbsp. All-Purpose Flour
– 1 Red Onion, thinly sliced (*I used pre-chopped red onion from the produce department b/c red onion is not nice to my poor eyes)
– 2 Garlic Cloves, minced
– 2 Celery Stalks, coarsely chopped
– Red or Green Bell Pepper, coarsely chopped (*I used red)
– 1/4 Tsp. Cayenne Pepper
– Coarse Salt
– 1 Can (28oz.) Diced Tomatoes
– 1 1/2 Cups Water
– 3/4 lb. Andouille or Kielbasa Sausage, sliced into 1/2 in. thick rounds (*I used Kielbasa)
– 2 Cups Frozen Sliced Okra (from a 12 oz package), thawed
– 1/2 lb. Shrimp, peeled and deveined (*I used a whole lb. because my family wouldn’t have forgiven me for only using 1/2!!!!! LOL!)
Directions:
– Heat a large skillet (*I used my large cast iron) over medium heat. Add oil and flour; cook, whisking constantly, until golden brown, 5 to 7 minutes.
– Add onion, garlic, celery, and bell pepper; cook until crisp-tender, about 7 minutes. Add cayenne and 1/2 teaspoon salt.
– Stir in tomatoes (with their liquid), the water, and sausage. Bring to a boil, reduce to a simmer, and cook, partially covered, until slightly thickened, about 25 minutes.
– Add okra and simmer 3 minutes. Add shrimp and cook until opaque, 3 to 4 minutes more.
– Season with salt.
– Serve either over white rice or cheese grits, like I did.
*And here is just one more pic to make your mouth water…………………

I hope you enjoy this recipe as much as my family and I did!
Can’t wait to try some of the rest and share the best ones with y’all!
Enjoy your Tuesday, friends!
XOXO,
Esther

No Comments
Rustic Apple Pie

A lot has been happening around here lately. For starters………………..
MY BABY BROTHER GOT MARRIED!
We are so so so happy for him and his new wife. We gained a sister, friend, and an entire new family that we deeply care for and love!
Now they just need to start having babies and my life will be complete. No pressure, right? LOL!
Well, Mom and Dad were here as well and one of the last nights they were here, we had everyone over for Sunday dinner and mom made Apple Pie! I have made it before, but when Mom is in town, it’s best to just leave things like this to the “professionals”. 😉
I LOOOOOOOVE HER APPLE PIE!
It always has this Rustic quality to it and I love that she never tries to make it too “fake looking”. Everything is from scratch, including the crust.
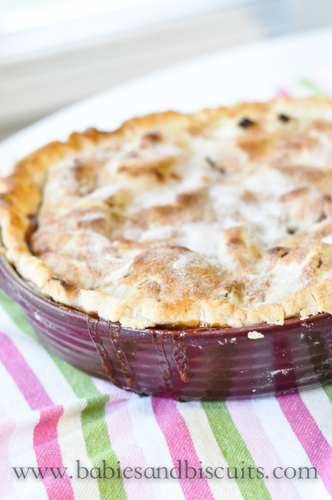
Just let me set the stage for you. It’s a crisp cool day in Fall. The aroma from the kitchen is taking over the house as the cinnamon and sugar fills the air. As you bring your fork to your mouth filled with that bite of perfection…….. um YEAH! That happened here that day! The crust was slightly crunchy, while the filling was a thick cinnamon apple yumminess!
Come on y’all, it’s FALL!!!
Why not get in the kitchen and bake you up some Apple Pie?

You know you want too! And just in case, because I love you so much……..Here is Mom’s recipe!
Recipe: Rustic Apple Pie
– 2 Homemade or Prepared Deep Dish Pie Crusts (*You will need 2 crusts, one for the bottom and one for the top. *NOTE: Crusts perform better when refrigerated well. If frozen, make sure to thaw completely and chill in fridge until you need it.)
– 15 Granny Smith Apples, Peeled, Cored and Sliced (*NOTE: Slice no larger than a 1/2 inch in thickness or apples will not cook properly)
– 1 Heaping Tbsp. Cinnamon
– 2 Cups Sugar
– 1 Tbsp. Cornstarch
– 4 Tbsp. Unsalted Butter
– 2 Tbsp. Milk
– Small amount of additional cinnamon and sugar for dusting the top of pie.
Directions:
– Preheat oven to 400 degrees.
– Take a 9in. pie plate and spread first crust evenly over bottom. Refrigerate.
– Place apple slices into a large mixing bowl.
– In a separate bowl, combine cinnamon and sugar and cornstarch.
– Add Cinnamon mixture to apples and mix well using hands, making sure all apples are coated well.
– Remove pie plate from fridge and add apple slice mixture. *NOTE: Apples will mound up in dish. This is normal and makes for a great pie!
– Cut 4 Tbsp. Butter in half and dot over apple mixture evenly.
– Top apples with remaining pie crust. Pinch all around edges of pie to “seal” crusts together. *NOTE: This can be done by using a fork or by index finger and thumb method all the way around.
– Brush top of pie with 2 Tbsp. Milk.
– Lightly dust top of pie with additional cinnamon and sugar.
-Cut 2-3 slits (1 in. long) in top of pie crust for steam to escape during baking.
– Bake pie in oven for 15 minutes.
– Turn temperature down to 350 degrees and continue baking pie for an additional 45 minutes.
– If at end of baking, pie is not golden brown, turn temperature back to 400 degrees and watch closely for 5 minutes. *That should do the trick! 😉
*APPLE PIE ALWAYS TASTES BETTER WITH VANILLA ICE CREAM! ……….. just sayin !
I hope you enjoy the recipe!
XOXO,
Esther

No Comments
 |
 |
|
 |

You must be logged in to post a comment.