
Entertaining
Why, it’s GREASE lightning!

One of my favorite movies of all time is GREASE!
I remember when I first saw it. How, right before my cousin let me watch it, she had asked me if I had ever seen it. I remember I kept thinking how dumb a movie would be that was called Grease? I just couldn’t wrap my head around it.
Now, I know the entire movie, word for word, song for song, and dance move for dance move!
Now, let me just say that I have this incredibly crafty friend. She always does these themed Family Nights with the coolest ideas and I am just so jealous of how she pulls these things together.
I have been wanting to do something like that for the longest time but just couldn’t get it together and come up with anything……. UNTIL a light bulb finally went off. “DRIVE-IN MOVIE THEATER NIGHT”!!!! This “theater” would be showing Grease!
So, I got to work!
I went to Lowe’s and bought 3 Large sized moving boxes that we would later turn into their “cars”. I let the kids pick their colors, so I left with 2 cans of spray paint and then just used some left over paint we had around the house for the 3rd one.

Here is the one for my Purple Girl.

Little man had to have black.

And there would be no other color for Em than blue…… light blue. 😉

I ran by the grocery store and picked up some white paper plates that I spray painted black. These would be the wheels.

Next, we cut little white circles from drawing paper for the center of the wheels.

We found this great post from Parenting.com that shows you step by step how to cut a card board box into a car! What are the odds?
You can check the same post out here.
I hot glued red plastic plates to the front for head lights and hot glued the wheels on as well. You can’t see it, but I also cut out rectangles from the red plastic plates and hot glued them onto the back for brake lights.

(At the Drive In, waiting for the food they “ordered”.)

(Hot dogs, French Fries, and the one and only Glass Bottled Cokes.)

I was really surprised at how spacious the boxes were. They were able to sit their food down in front of them and still be comfortable.

Which proved to be VERY disappointing for Buster, who was hoping someone would drop something…… anything!

We even had room for pillows. 🙂
The BEST thing about this “Drive-In” was
that it only cost me $25 !!!!
The Breakdown:
Cars: $10.00
Movie: $5.00
Food: $10.00
I can’t remember ever having a fun family night that only cost me $25. That was the cost for our entire family.
Granted, we stayed at home. However, being able to do this and have something the kids could play with even after Family Night was worth it for me. It took me the afternoon to make the cars, but the longest part was allowing time for things to dry.
Plus, this “Drive-In” was extremely FUN!……….. Rain or Shine!
XOXO,
Esther

The Brentwood Restaurant
As you may know, it our my 11 year Anniversary a couple of weeks ago. I know what you are thinking, “Wow! 11 Years? How could someone who looks as young as you be married for 11 years?”
NO?
You weren’t thinking that?
Well, who asked you anyway?
Well, we like to call ourselves “foodies” around here. (*Not to be confused with the term “food snob”. Though, I have been called that a few times.)
I had been wanting to try out a local restaurant called The Brentwood Restaurant in Little River. It was a farmhouse that had been turned in to a restaurant and they concentrate on “farm to table” cuisine. Not to mention the Chef and Owner is French. Stir in a little Low Country with that and you have yourself one heck of a meal!

Here is a pic of the Restaurant. I love everything about it. It’s country home feel, the greenery,

the gazebo…………… We used to have one just like it when I was little. Everytime I see a gazebo, I think of my mom. I remember the house we lived in at the time and even though we were renting, my dad decided to buy her one. Then we moved to another house 30 minutes away and even though I don’t remember seeing my dad move it to the next location, I imagine he did it in True Redneck Style, perhaps hanging off the end of a small pick up truck going down a back road. (Love you Daddy!)
My parents were in town for the weekend, so they offered to keep the “babies” for us. SCORE!
Since I like to stay in hotel rooms that are close to where I plan on eating…. (More on that later),
we decided to get a room for the night at Prince Resort in Cherry Grove.

I was one Happy Momma! LOL!
The Restaurant was only a few miles away, so it was perfect!
We decided to do the Chef’s Tasting Menu, which was a seven course menu. They have 3 different ones you can choose from. There is the Silver, Gold, and Platinum Fork.
Since it was neither our Silver nor Golden Anniversary, we decided to go with the Platinum! Hey! You only live once! Right? 😀
I even brought my camera with me anticipating I might blog about it. (If Z was embarrassed, he hid it well). Some of the pics came out ok and some didn’t due to the light.

The first course was a Smoked Salmon dish. It was sooooo good! I’m just going to warn you. The Platinum had a few courses of Seafood, so if that isn’t your thing, you can always try another one.
They are very accommodating too. They were more than happy to substitute a few dishes for us as well if we didn’t like a particular item.

Next, we had White Sturgeon Caviar with Warm Blinis and Chive Cream. I originally turned my nose up to this because of a bad experience I had as a child with Caviar. I even told the Chef’s wife about it and after I finished the story, realized how much I SHOULDN’T have told ANYONE that story! Since I never learn my lesson, I’ll tell you too.
As a child, we met a family at the beach while camping at The Outer Banks. We decided to go to the Mountains and camp with the same family. (*First MISTAKE) Looking back on it, what were my parents thinking????
Then, the dad of the other family, decided to bust out a can of “Caviar”…………. with Saltine Crackers…………. did I mention we were camping in the Mountains?????? Oh yeah….. So, they asked me if I wanted to try it and being the daring 12 year old that I was said, “SURE!” ………. You might as well have poured Table Salt into my mouth because that is exactly what it tasted like………………………. AGAIN! Did I mention we were CAMPING IN THE MOUNTAINS?????????
Anyhoo, when I thought long and hard about whether or not I wanted to try the White Sturgeon Caviar at the Restaurant, I ultimately decided to give it another shot.
I’m so happy I did. It was so Fresh, it didn’t taste like Salt at all! It had arrived the day before and had been harvested the same week. White Sturgeon, ironically enough live in The Mountains! 😀
I’m not sure where the “other dad” got his, but it wasn’t from the same place! Haha!
Our next course would have been Seared Duck Foie Gras, which is basically Duck Liver. *Don’t you love it how the French make it sound that much nicer? I have had it before and I don’t really care for it, so they were sweet enough to let me choose whatever I wanted from the Appetizer Menu.

I chose Lobster Risotto and oh man, was it good. RidONculously good!
I love Lobster and I love Rice, so naturally this was a great choice! It was cooked perfectly and the risotto was so creamy!

This was our “Palette Cleanser”. It was a Fresh Mango & Spicy Rum Sorbet with a Hazelnut Wafer. Z kept trying to turn up his glass and proceeded to tap the bottom of it so he could get all the Rum out that was teasing him on the bottom………. I can’t take him anywhere! (*Love you Baby!)

This is where my camera started to act up so I had to resort to using my phone instead.
This was our Main Course, which was Lamb. It was AMAZING! Not sure if you can tell, but there are also Grapes and Spinach in there and it is over a Bordelaise Sauce. The sweetness from the Grapes complemented the Spinach so well. The sauce was rich and thick. It was very Yummy!
Our next course was Cheese.
My computer has acted up and lost my pic on this. It was a Roquefort Blue Cheese on a Toasted Baguette with Poached Pears and a Honey Candied Pecan. It was really good. It was a very Strong Blue Cheese and the Pears and Pecans all paired really well with it. I layered everything everytime I took a bite!

And last but surely not least, THIS WAS DESSERT! Another stinky picture taken by my phone, but oh my….. SO GOOD!
Up until now, I had never had a Caramel Cage! Sure, I had seen it on TV and even tried to be so ambitious as to try to do it myself with NO LUCK!
Other people from other tables were asking what we had gotten. It is very impressive in person.
Our dessert was a Belgium Chocolate Cake with Raspberry Ice Cream, the Caramel Cage, and was garnished with Fresh Mint.
Enough Said! 🙂
We had a Wonderful Anniversary! One that we will never forget thanks to Chef Eric and his staff!
Here is a link to The Brentwood Restaurant’s website.
Next time you are in town or in Little River, give them a try! You will not be sorry!
But be careful, it is know to have a few extra ghostly guests from time to time as well. So, you may not be “entirely” alone at your table.
XOXO,
Esther
Sweet Potato Au Gratin
I have to admit. I have a problem. I happen to be a “gadget girl”. There! I said it. It’s out now and I can’t take it back.
Whenever I’m in a homestore or go to a home party where these things are sold, I have to practice self control.
My palms start to get sweaty (nice, huh?) , my pupils begin to dilate, and I have even been know to twitch a little. I know! I am painting a very pretty picture for you.
One of the little gadgets I have always craved, but have to be honest, have been scared of is the Mandoline. No, not the one you play.
The one you SLICE with!
So, while in the store the other day, a Sweaty Palmed girl broke down and bought one.
BEHOLD!

This is the one I got. I paid only $24.99 for it at my local Sam’s Club. These can run pretty high. That is the reason it has taken me so long to purchase one. They can go upwards of $100. I didn’t want to pay a lot, only to find out I wouldn’t use it. This is the only reason I bought this, because I was so excited it wasn’t $100!
Well, let me just tell you………… I LOVE IT! By the way, since purchasing this, I have seen them even cheaper than what I paid for mine. Even as low as $11.99 online!!!
I have always shied away from recipes that call for thinly sliced ingredients. If I couldn’t buy them already that way, I probably wouldn’t fix it.
Ladies and Gentlemen, I am proud to announce that GONE ARE THE DAYS where I do this anymore!
I had some Sweet Potatoes lying around that I wanted to use up and so I decided to make Sweet Potato Au Gratin for dinner last night. Before you go, “Esther! I don’t like Sweet Potatoes…..” You can definitely do this recipe by substituting them for regular Russett Potatoes. If you do that, you can also either use the Thyme I used in my recipe along with the Gruyere OR you could also substitute those for maybe Chives and White Cheddar Cheese.

So, without further adieu, this is what I did:

I peeled and sliced (with the Mandoline) 4 or 5 Sweet Potatoes (it depends on size) and put the setting to “3/16” of an inch.

I buttered a 13 x 9 in. baking dish.

Quick Tip from my MOM: Don’t throw away those empty butter wrappers! Save them for something like this where you need to butter a dish. It makes it much easier to do it and your hands get less messy! 🙂

I made a layer the Sweet Potatoes in a slightly overlapping pattern on the bottom of the baking dish.

Then I sprinkled with a little Salt, Pepper, and Thyme. Then I sprinkled a thin layer (about 1/2 cup) of Smoked Apple Gruyere Cheese on top. YUM! Is all I can say!
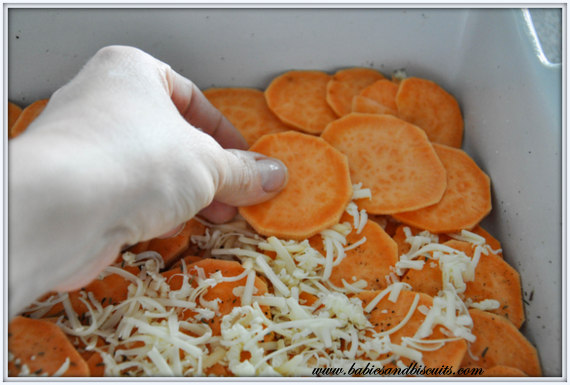
Next, I repeated the layers 2 more times.

After that, I put 1 more layer of Sweet Potatoes on top. (By now, I had 4 layers of Sweet Potatoes total)

Then, I simmered 2 cups of Skim Milk and 2 cloves of Minced Garlic for 2 to 3 minutes.

Then I poured it over the Sweet Potatoes. I made sure I touched every potatoe on the top layer so that none would be dry during the baking process.

Em wanted to help me, so I let her sprinkle the last layer of cheese on top. Then, I covered it with foil and baked it for 30 minutes on 400 degrees. Then, I removed the foil and baked it for another 30 minutes. Be careful when you remove the foil because steam will escape and that may cause you to get burned.

This is what it looks like when you pull it out. Not sure if you can tell, but the milk will still be visible and almost appear like it isn’t finished because of so much being in the pan. NO WORRIES! I let mine cool for 30 minutes, allowing all the potatoes to absorb the milk. BY THE WAY: The brown around the edges is from the milk and steam. I showed this in the picture so you would know to expect it. 😉
After that, right before we were ready to eat, I popped it back in the oven for a few minutes on broil so that the cheese could get a little more browned. Make sure you watch it though! Cheese can burn VERY quickly if you aren’t watching it.

This is what it looked like when finished. Unfortunately, the picture doesn’t do it justice because it was later and there wasn’t as much light outside. (BUMMER!)
This was AMAZING with the Pork Tenderloin we had with it.

Lucky for me, I had just enough leftover for lunch today! Burp!
Recipe: Scalloped Sweet Potatoes
Ingredients:
2 cups Skim Milk
2 cloves of Garlic, minced
2 pounds Sweet Potatoes (about 4 or 5) , peeled and sliced about 1/8-inch thick *OR you could use Russet
Kosher Salt
Ground Black Pepper
1½ teaspoons Dried Thyme *OR you could use Chives
2 cups shredded Gruyère cheese (I used Apple Smoked) *OR you could use White Cheddar Cheese
Directions:
– Preheat oven to 400 degrees.
– Peel and Slice your Potatoes, if you haven’t already.
– Butter a 13 x 9 in. baking dish.
– Layer Sweet Potatoes in an overlapping pattern. Sprinkle with a little Salt, Pepper, and Thyme.
– Sprinkle with about a 1/2 cup of Gruyere cheese.
– Repeat layers 2 more times, ending with the cheese.
– Layer a final layer of Sweet Potatoes, set aside.
– In a small pot bring Skim Milk and Garlic just to a simmer for about 2 minutes. Remove from heat and pour on top of Sweet Potatoes, making sure you touch each potatoe on top layer. Milk will settle to bottom.
– Cover with Aluminum Foil and bake for 30 minutes.
– Remove Foil (BE CAREFUL) and bake an additional 30 minutes.
– Remove from oven and allow to cool for 30 minutes. Potatoes will soak up any milk during this time.
– Stick back in the oven for a few minutes on Broil and allow top to brown a little more.
– Serve immediately.
Roast Chicken with Root Vegetables and Gravy
I haven’t found many people out there who don’t love a good Roast Chicken.
I have tried it myself by cooking the whole thing (Thanksgiving Style), just sitting in the pan. Maybe doctured up with some butter and salt and pepper.
Nothing too great. I may have even tried to add some type of citrus to it a time or too, but still nothing that great.
My chicken always had some spot in it that might still look a little pink or God forbid, bloody (GASP!), and my kids would get totally grossed out!!!
So, you can probably guess where the rest of that story goes….
I decided to make it a different way about a week ago and I have to say that I will probably never make Roast Chicken another way again.

This is by far, the easiest way I have EVER cooked Roast Chicken.

First, I took some Carrots, Onions, and some Sweet Potatoes.
I roughly cut them into about 1 to 2 inch pieces. You don’t have to be precise, as they will cook down. In fact, the more UNprecise you are, the better. It gives it a “rustic” look.

Then I drizzled some Extra Virgin Olive Oil over them, tossed, and added a little salt and pepper. Then tossed again.
Then I tossed them aside. Well, not really. More like slid them.

Now, back to the chicken!
I cut the backbone out, and pressing down, skin side down, pressed until I heard a pop. This “butterflies” your chicken.
Before you say, “Oh, I can’t do that”…… Let me just tell you, YES YOU CAN!
I used to always buy my chicken already cut up from the store, which by the way cost more than a whole chicken you can cut up yourself.
My mom tried to show me how to cut one up myself, but I was never interested.
(F.Y.I.: I plan on doing a tutorial later on how to cut a whole chicken up.)
Back to topic: IT IS SOOOOO EASY TO CUT THE BACKBONE OUT OF A CHICKEN.
Just turn it over, find the area that looks literally like a backbone (I do not mean to insult your intelligence).
Start at the top, and going down both sides of it, cut.
This can be done with a knife, but I found it easier to do with kitchen shears.
If I’m not grossing you out yet, read on. : )

I salt and peppered the chicken and then I used my “Herbs de Provence” Pampered Chef seasoning mix and sprinkled it on it.
This is it below. You can also pick this up at your local Grocery Store in other brands. I just happened to have that one on hand.

By the way, this is a great mix to use on Chicken, Pork, Vegetables (you name it!).

Then I coated my Cast Iron Skillet with a couple of tablespoons of Extra Virgin Olive Oil.
Put the whole Butterflied Chicken in skin side down and seared it on medium-high heat for 5 to 6 minutes, until it was golden brown.

Flipped it over………

And added all the vegetables to the pan. It may look like the pan is too crowded, but it isn’t. These will cook down and the chicken will cook just fine as well.

I sprinkled the vegetables with a little more Herbes de Provence.

I popped it in the oven for about an 1 hour and 15 minutes and this is what it looked like when finished.
It will literally fall off the bone!
But WAIT!
There’s MORE!

I removed the chicken and the vegetables to a platter and covered with aluminum foil to keep warm.
I couldn’t just let all these juices from the meat and vegetables go to waste!

Couldn’t let the little bit of wine that was left in this bottle go to waste either. (“Waste not, Want Not!) Right?

There was about a cup left in the bottle and it all went into the pan.

I let it simmer for about 8 or 9 minutes until it had reduced by half. Then I added a tablespoon of butter.

Stirred in until butter had melted and Voila!

Yummy gravy! In fact, it was so good, I caught Z drinking the rest of it after we were cleaning up the table. YES! I said DRINKING IT!
Oops! Maybe I shouldn’t have told you that.
Well, he won’t know if we don’t tell him.

If you try this recipe, please let me know what you think.
This is a definite “KID APPROVED” meal.
The sweetness from the onions, carrots, and sweet potatoes cook into the chicken and make it soooo good!
By the way, this is a great easy meal to entertain with or if you just want to share with your family.
ENJOY!
-Esther
RECIPE: Roast Chicken w/ Root Vegetables and Gravy
Ingredients:
– 1 Whole Chicken ( 3 to 4 lbs.)
– 2 tablespoons Herbs de Provence, divided
– Salt and Pepper
– 4 tablespoons Olive Oil
– 4 Carrots
– 4 Sweet Potatoes
– 2 Sweet Onions
– 1 cup White Wine, I used Chardonnay OR if you prefer, you can use Chicken Stock
– 1 tablespoon Butter
Directions:
– Preheat oven to 350 degrees F.
– Cut Onions, Carrots, and Sweet Potatoes roughly into 1 to 2 inch cubes.
– Combine vegetables and drizzle with 2 tablespoons olive oil. Sprinkle with Salt and Pepper. Toss to coat and set aside.
– Use kitchen shears to cut out the backbone of the chicken.
– Lay chicken open, skin side up, like a book. Flatten the chicken with your hands, pressing down until you hear a pop or crack noise.
– Sprinkle chicken with Herbs de Provence, salt and pepper.
– Heat a 12 inch or larger size cast iron skillet on medium-high heat. Once hot, add 2 tablespoons olive oil to skillet. Add chicken, skin side down, and sear 5 to 6 minutes, or until golden brown.
– Flip the chicken over and add vegetables to open areas around chicken. It’s ok if it seems overcrowded.
– Roast chicken 1 hour and 15 minutes or until an instant- read thermometer inserted into the thickest part of the thigh reads 165 degrees F.
– Remove chicken and vegetables to a platter, cover with aluminum foil, and keep warm.
– Add the wine to the pan and stir with a wooden spoon loosening any brown bits in bottom of pan.
– Allow to simmer for 8 to 9 minutes or until liquid has reduced by half. Stir often.
– Add tablespoon butter and stir until melted. Season with salt and pepper to taste. You won’t need much, if any.
– Carve chicken, set on platter with vegetables and serve with gravy.

 |
 |
|
 |

You must be logged in to post a comment.