
Zucchini
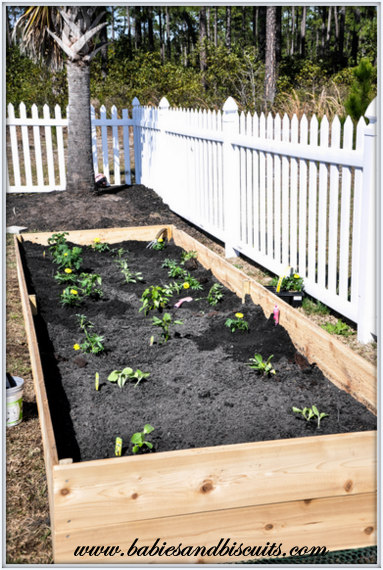
Raised Vegetable Garden
Eeeeeek! Spring has Sprung and I am just tickled about it!
You know you are too! How could you not be?
The air is warming up and once in a while you get that perfect day that allows you to dream of those beautiful flowers and veggies you have wanted to plant and grow forever.
Then you grab your car keys……….. run out the door without hesitation………… and then RUN back in once you realize you have forgotten your children (don’t judge me) …………..
then you RUN back out the door and drive to your nearest Home Improvement Store and go WILD!
Right?
NO?
Well, I didn’t do that exactly, but I WANTED TO SOOOOOOOO BAD!
Instead, I was very patient ( which is completely UNLIKE me) and I waited and planned and built a Raised Vegetable Garden Bed with the hubster.
We did it without a plan and SO CAN YOU! Very easy. We were first time DIYers with this and it turned out great!
I have to say I am very Proud of us.
Here is what we did:

We knew that we wanted the garden bed to be 4ft. x 12ft., so we bought 12 ft. pieces of cedar. We figured for the sides, we could just cut them to 4 ft.
We also bought short 4 ft. pieces of wood that would act as support boards and also an area that the screws could adhere to, in order to stack the boards. We had a few pieces of cedar siding that we improvised with and used so that we wouldn’t have to buy as much cedar.
Don’t mind the ladder. It’s just there for moral support. 😉

We attached the first 12 ft. piece of cedar to the sticks. This top piece split a little on the car ride home, but it wasn’t a concern.

This is what it looked like afterwards.
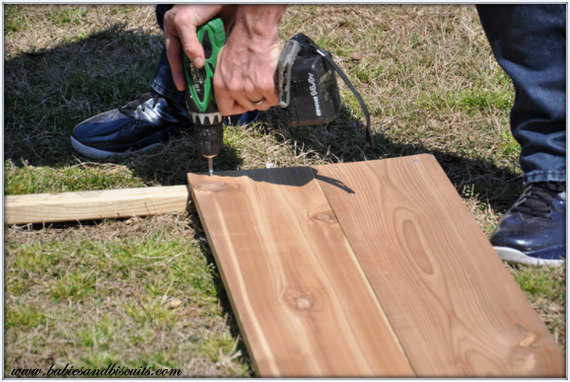
Then we attached the second piece using the same method. We just lined it up under the top one.

Now, we had (2) 12 ft. pieces of cedar attached to the 2 wood sticks at each end.

We had 4 screws on each side.

We knew we would need more support, so we added an additional board in the middle and attached the boards to it.

Afterwards, we trimmed the length on the support sticks.

This is what they looked like after being trimmed.

We repeated those steps with the boards for the other side. Then, instead of doing it again for the shorter 4ft. pieces, we decided to just attach them to the ends.

This is the 4ft end piece. We attached the two screws for it to the support stick that we had also attached the adjoining side to .

Z even let me get in on the action. Then, he went behind me, removed the crooked screw I attached, and reattached it correctly. Oh well….

Here is a shot of the bed after one board.

Now the finished side.

Then, to keep burrowing pests out, we attached a heavy duty plastic chicken net to the bottom with “U” shaped nails. We didn’t use wire netting b/c I have before and it toar up our hands during the process. I know you could just use gloves, but I’m lazy and I looked it up and the pests shouldn’t be able to chew through the heavy plastic. I might be updating this later if I find that not to be true.

We made sure that it was secure by nailing every ft. or so along the wood.

Since the netting wasn’t wide enough, we had to overlap some of it and then we just trimmed it off at the end with a razor blade.

Buster kept a watchful eye out just in case any rabbits tried to eat our veggies. How do I know I have rabbits? By the piles of “unpleasantries” I found left for me in my yard. (Is that a word?)

The great thing about gardening in general is it seems to awaken something within children. All 3 of my kids love to go out with their Nana and help her with the garden.
Heck! They will even help her pick up Doggie Poopoo at her house. I haven’t mastered that art here yet, but I’m working on it.
My oldest was beggin me to let her plant the veggies. I wanted to make sure they were done correctly the first time, so instead, I let her plant the marigolds around them.

I CANNOT wait to see how these turn out. I have wanted to plant Heirloom Tomatoes for a while. Z asked me if I thought we would get our money back out of the beds? As soon as I went to the grocery store and saw that tomatoes were $1.99 / lb. , I quickly answered , “Ummmmmm Errrrrrrrrrr Yup! ”

We planted 3 Crookneck Squash , 1 Zucchini, 2 Cherry Tomatoes, 4 Homestead Heirloom Tomatoe, 4 Marion Tomatoes, 2 Cayenne Peppers, and we will be making a seperate 4 x 4 ft. bed for our Cucumbers.
We also planted the Marigolds throughout the bed and will be doing the same thing with the Cucumber bed. Marigolds help keep the bugs off the plants. That is why we plant them. Plus, they look Purrrrrrrrty in there!
I should add that we used to have a garden back where we are from. We were so excited the first year we did it. We had a pretty big backyard, so we planted just about a 1/4 acre of it with all sorts of things. Well, I really had no idea how much it was going to yield and let me tell you , when it started ……….. it didn’t stop!
I couldn’t give it away fast enough before it started to go bad. I think this smaller modest raised bed is much better for us, though my friends might wish we had the larger garden so that we can share. 🙂

Happy Gardening!!!
*I’ll update as we go and show the progress of the plants, as well as give helpful tips on vegetable growing.

Herbed Chicken Parmesan (Picky Eater Style)
I consider myself pretty lucky.
I have children who aren’t that picky when it comes to food.
Well, 2 of my 3 children aren’t that picky.
My four year old is actually in the “picky” faze right now and I’m counting the days until it passes.
While I hold my breath for that,
I decided to try a version of Chicken Parmesan that he and the girls might like.
I call it Herbed Chicken Parmesan…… Picky Eater Style!

I figured anything over Colorful Bowtie Pasta for my little ones is a Homerun any night.

Usually, I will have a little bit of left overs when it comes to most meals.
This, however, had nothing!
Not a crumb!
Not even an itty bitty bowtie.
When my 4 year old cleaned his plate, I knew I had a winner!
So, if you have picky eaters, try this recipe.
Even if you don’t, you’ll love it!
AND! It’s done with Chicken tenders, so Portion control is easy!
Recipe: Herbed Chicken Parmesan (Picky Eater Style)
Ingredients:
1/4 Cup Dry Breadcrumbs
1 Tablespoon Chopped Fresh Parsley
1/2 Teaspoon Dried Basil
1/4 Teaspoon Salt, Divided
1/3 Cup Grated Fresh Parmesan Cheese, Divided
1 Large Egg White, Lightly Beaten (I use Egg Beaters)
1 lb. Chicken Breast Tenders
1 Tablespoon Butter
1 (14.5 oz) Can Tomato Sauce
2 Teaspoons Balsamic Vinegar
1/4 Teaspoon Black Pepper
1/3 Cup Shredded Provolone Cheese (I folded 4 slices in half twice, then sliced very thin)
Directions:
– Preheat broiler.
– Combine 2 Tablespoons Parmesan Cheese, Breadcrumbs, Parsley, Basil, and 1/8 Teaspoon Salt in a shallow dish.
– Place Egg White (Or Egg Beaters) in another shallow dish.
– Dip each chicken tender in Egg White, and then dredge in Breadcrumb mixture.
– Melt butter in a large Nonstick Skillet over medium high heat. Add chicken, making sure not to over crowd the pan. Cook 3 minutes on each side or until done. Chicken should be golden brown.
– Transfer Chicken to a broiler pan or oven safe dish large enough to hold all of Chicken Tenders. Set aside.
– Combine 1/8 Teaspoon Salt, Tomato Sauce, Vinegar, and Pepper in a microwave-safe bowl.
– Cover with plastic wrap, and vent on one side.
– Microwave on high for 2 minutes or until thoroughly heated. Spoon over Chicken. Do not discard extra sauce.
– Sprinkle evenly with remaining Parmesan Cheese and Provolone Cheese.
– Broil 2 minutes or until cheeses melt.
– Serve over Tri Colored Bowtie Pasta, drizzled with Olive Oil, Salt and Pepper.
*I say do not discard the sauce because everyone wanted extra to go over their chicken. 🙂

Side Dish Idea: Roasted Herbed Zucchini w/ Parmesan
– 3 Zucchini
– Extra Virgin Olive Oil
– Dried Italian Seasoning
– Grated Parmesan Cheese

Directions:
– Preheat oven to 375 degrees.
– Cut off ends of zucchini.
– Cut zuchinni in half length wise.
– Drizzle a little olive oil over zucchini halves.
– Sprinkle each half with dried Italian Seasoning.
– Roast for 20 minutes.
– Sprinkle Parmesan Cheese on top of zucchini.
– Turn oven to broil.
– Allow to broil until cheese is melted and golden brown.

Enjoy!
~Esther~

 |
 |
|
 |

You must be logged in to post a comment.