
Living Room
House Tour: Living Room and Planning Center

You know, there is just something about a comfortable, plop down on the couch, furry rug…… living room! Don’tcha think?
Well, I do!
Folks, I can’t think of a more comfy space than the living room in my house. I really wanted it to be this place that was easy to keep clean but also a place where you could do just that…… PLOP! Just come in and sit right down. Kick up your feet and stay a while. Well, not too long, I suppose! LOL!
In order to do that, I knew I was going to have to put things that were easy to wash, were soft, but could also take the abuse that my family would give it.
Yes, I jumped on the white slipped cover “band wagon” . We went to IKEA right before we moved in and bought these couches. BEST DECISION EVA!
I really love how the white is so versatile, yet can be washed if it were to get dirty. When I bought these, I chose to get a second set that was a darker gray. My idea is to switch them out every few months. Hopefully, this will help with the longevity of the slip covers. If not, the good thing is they are not expensive to replace and who doesn’t like a good excuse to go to IKEA, right? 😉

My last couch was a wrap around and we literally had it until it began to dry rot. I am not one who likes to buy a really expensive nice couch when I know my kiddos are probably going to spill something on it , or, like my little man, use it as a trampoline or a base jump spot to dive off of. *What is it going to take to make that KID stop! AHHHHHH! That one is definitely going to be my ER baby!
I yell and yell at my whole family and tell them that we will not be eating or drinking on this AT ALL, but let’s be honest. That is like saying the same thing about a new car. You have really good intentions initially, and then that one day comes where you make the exception and suddenly it goes from looking like this:

to looking like THIS:

Well, hopefully not this bad. I mean, we don’t smoke so we shouldn’t have the cigarette packs and all. 😉

When we first moved in, we only had our fireplace on the wall here. I knew that I wanted to do built ins, so I called Steve Egloff from The Wandering Woodshop who did all the carpentry work in our house and together we came up with plan. He custom designed the built ins to work for my space.
If you notice, the thermostat was put on the wall very close to where I wanted the built ins to go, so made sure the design would work with the position of the thermostat and still look good and symmetrical for the space.
I think he did a fantastic job!

We went with a backing that has an unfinished horizontal boarding. At first, my plan was to white wash the backing, but after looking at for a day, I noticed that the backing was really picking up some of the yellow and tan accents I had in that space so I decided to keep it and I am so happy that I did. It also, to me, has a beach feel and since I have coastal accents in my house, I LOVE IT!
*Reference Purposes: The color of the blue paint that is used on the accent wall is Benjamin Moore’s Labrador Blue. Benjamin Moore’s Revere Pewter is the main color on the wall.

I really love the contrast of the honey tones on the back of the space work so well with the greens and silver.

We went with some of the same hardware that we have used in the kitchen and the baths throughout the house. They are from The Martha Stewart line at Home Depot. They are usually in the store and also in stock.

We went with a lot of the same squared off craftsman style cuts we have used on other detail projects in the house.

It’s really believe it is all in the details, and Steve really takes the time to do that.

On to the thing that was probably one of the biggest reasons we chose this house. For as long as I can remember, I have tried to create a “command center” or area that we can utilize for the kids things or things for the home that require planning. Papers always overflow if they do not have a home. Homework always ends up on the dinner table. I could go on and on……….
BEHOLD!!!!!!
THE PLANNING CENTER!
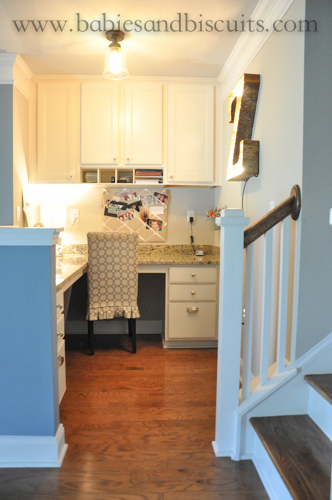
I am so happy we have this space. It is out of the way at the base of our stairs and holds all the homework items, important papers, and crafting items that one could need.

Everything is nice and hidden behind the cabinet doors and the countertop stays open for the kids to spread their homework out.

I made sure when we were adding electrical outlets, that I added plenty in this space for purposes of charging any phones, tablets, laptops etc. While we are using the cubby areas currently for scratch paper for homework or construction paper for projects and headphones, and staplers……. the first thought we had for the space was “WOW! We that space would be perfect for the tablets and ipods! The ideas are endless !

I decided to put a photo holder in the space for fun memories and and also put an IKEA organizing bar in the corner too. The extra hooks are there to hold up to two more buckets as the need grows to have them.
Even though the light above the space is casting a yellow glow, the granite is actually not that yellow. The color for reference purposes is Santa Cecilia.

Hardware for the space is a mix of Martha Stewart silver knobs and square cup pulls (Special Order) from Home Depot on the lower cabinet area and a glass knobs for the upper cabinets. I couldn’t find them online, but they are always in stock at either Home Depot or Lowes for about $3.50 each.

Probably the best thing about this area of the house is this. You can’t see the mess that might be made behind the wall that it resides behind.
-
We have had the Z Marquee Light for a little while now and got this from our good friends at Vintage Marquee Lights. They are awesome!
Well, my dear friends, that is all for today! Thank you so much for spending more time with me as I shared the living room space and planning center area with you today. I hope you were able to get some great ideas that may help you with your own decorating journeys.
If you have some great tips to share, or if you have any questions, please feel free to do so in the comments! I would love to hear from you.
Please check back next week where I share how I turned what might have been a girly office into a shared office space for the hubster and myself! 😉
XOXO,
Esther

What I’ve been up to!
Projects! Projects! Projects!
When I don’t post for a while, rest assured it’s because I have been very busy.
That is exactly the situation again.
If you didn’t already know, we moved into a new home a few months ago. Since then, we have been trying to update it a little bit. For one, it is bigger than my last one. (HALLELUJAH!)
So, we needed to actually get some furniture for it, which I’ve written about in other posts. Well, there is something else now. The floors!
The floors were pretty nasty to begin with. There were so many “pet stains”, that when we pulled the carpet back, I couldn’t tell where one ended and another began. : (
Plus, to top it all off, we have allergies that get worse when you involve that ugly little carpet word.

Here is a “Before” shot of part of the living room. The carpet doesn’t look that bad in this pic. My camera is being very kind to me.

It was the best feeling in the world when I got to see the first row of boards go down.

This however, was not. It took him the whole weekend to get the tile in the foyer out! : ( We later found out that a much lighter tool would have done the job in way less time! Oh well, lesson learned.

This is a “still in progress” picture of the living room.
The whole project isn’t finished yet. However, when it is, I’ll post the final pictures.
While the kitchen, living room, and pretty much the rest of the house was a mess…… we decided to go ahead and do the backsplash I’ve been wanting in the kitchen.

I had this at the last house, so I knew that I would like it. It only cost me $140 in materials! For a tile backsplash, that is great!

The undercabinet lights kind of made the picture too bright, but I’m too lazy to turn them off and take another. It isn’t grouted yet, but I will update the photos when it is.

I also managed to snag this pendant light from The Goodwill down the road for $5.95. With a little paint, it and it’s 2 siblings will be the fun, quirky light fixtures I have been looking for to go over the bar.
SO!
That is what I have been up to lately. Updating the house and now hopefully updating Babies and Biscuits.
Oh!
I did manage to make a pot of Chili along the way!

Recipe to follow tomorrow!
-Esther

 |
 |
|
 |

You must be logged in to post a comment.