
Summer
Family Behavior System

“SCHOOOOOOOOLS OUT…….. FOR…………… SUMMER!” Yes it is!
I kind of did a little freak out when Summer first started. Obviously, I love my little babies, but I’m not gonna lie! Towards the end of the school year, they all started to get these little attitudes where they just thought that they could say whatever they wanted, act however they wanted, and be as nasty to eachother as they wanted. It was starting to get really bad, so I did what any other mother would do…….. I turned to the BUS STOP!
You can find a lot of things out at the Bus Stop!
I had heard the word on the street was Behavior Coupons. Basically, the kids got rewarded for showing good behavior. That was alright, I thought. But I needed something a little more.
I had some pretty good ideas, but no real structure. If I went with the coupon idea, I would have to make them. That was fine! I would just go to the nearest craft store for my supplies, right? Well, let me tell you a little about my experience with craft stores. I love them! I really do! The only problem is I go in there and see all these different cool things, buy them, then end up spending $100, come home and have a huge haze over my eyes and try to remember what my original idea was for going to the store in the first place. I look around at what I bought and have a million different things that have nothing to do with eachother. Needless to say, it all ends up in a closet somewhere, never to be heard from again. That reminds me, I need to clean my closets out……
Anyhoo!
Well, NOT THIS TIME Y’ALL!!!!
I found it!
The HOLY GRAIL of Behavior Systems!
It’s called Family Do Dots!

It’s so great! It incorporates Behavior, Responsibilities, Rewards….. The best thing is, you can tailor it to your family’s specific situation. I think this is so important because no two families are alike.

Another thing that is great, is that they include the Whole Family ! Of course, you don’t have to do this, but we thought it was important so that we weren’t singling out just the kids. They make a point to also take things that the children need improvement on, like not hitting or not talking back, and they turn it into a positive thing. They say things like “Nice Hands” or “Nice Words” instead. I LOVE THAT!
It all originated when a sweet couple in Utah, decided to make their own system for their family. After a while, their friends and family were asking them to make them. They started to think that maybe they had something special and before they knew it, Family Do Dots was a business! I am so happy they decided to make them because it has been night and day for my family!
The kids start out on what they call Level One, every morning. They have certain things they have to complete before they can get on Level Two, which is where they have their privileges. These can be things like watching TV or playing with their electronic devices or anything they really like to do. *Sidebar: I have been a little lenient with this since it is Summer. I let them watch a little TV first thing in the morning, but then make them do their Responsibilities on Level One. Once the kids have completed these things, they can “flip their magnet”. This is so much fun for them, because it gives them a sense of accomplishment! I just love it!

Basically, once the kids get on Level Two, they can get Rewards. These come in the form of Tickets, which the company provides for you. They provide everything you need! At the end of every week, we open our “Family Store”, which has all kinds of goodies, toys (etc.). FYI: These do not have to be expensive. You can go to the dollar store if you want.
The kids take the tickets that they have earned over the course of the week and one by one, go to the Family Store and purchase things with their tickets that they have earned all by themselves just for doing what is expected of them and being good.
I could go on and on about all the great things with this system, but I’m even starting to bore myself here. LOL! Please go to their site and check them out! For less than the price of what I would have spent on my “Craft Store Idea”, I had a full system with access to continued online support and ideas for my family.
Here is another look at the the whole board.
*Keep in mind that this is only what it looks like first thing in the morning. It becomes very colorful once the kids start flipping their magnets…… and Mom and Dad’s too! 😉
DISCLAIMER: I am not working with Family Do Dots. I bought my system just like everyone else. I just feel so strongly about this system because it has really helped my family. 🙂

Sweet Potato Au Gratin
I have to admit. I have a problem. I happen to be a “gadget girl”. There! I said it. It’s out now and I can’t take it back.
Whenever I’m in a homestore or go to a home party where these things are sold, I have to practice self control.
My palms start to get sweaty (nice, huh?) , my pupils begin to dilate, and I have even been know to twitch a little. I know! I am painting a very pretty picture for you.
One of the little gadgets I have always craved, but have to be honest, have been scared of is the Mandoline. No, not the one you play.
The one you SLICE with!
So, while in the store the other day, a Sweaty Palmed girl broke down and bought one.
BEHOLD!

This is the one I got. I paid only $24.99 for it at my local Sam’s Club. These can run pretty high. That is the reason it has taken me so long to purchase one. They can go upwards of $100. I didn’t want to pay a lot, only to find out I wouldn’t use it. This is the only reason I bought this, because I was so excited it wasn’t $100!
Well, let me just tell you………… I LOVE IT! By the way, since purchasing this, I have seen them even cheaper than what I paid for mine. Even as low as $11.99 online!!!
I have always shied away from recipes that call for thinly sliced ingredients. If I couldn’t buy them already that way, I probably wouldn’t fix it.
Ladies and Gentlemen, I am proud to announce that GONE ARE THE DAYS where I do this anymore!
I had some Sweet Potatoes lying around that I wanted to use up and so I decided to make Sweet Potato Au Gratin for dinner last night. Before you go, “Esther! I don’t like Sweet Potatoes…..” You can definitely do this recipe by substituting them for regular Russett Potatoes. If you do that, you can also either use the Thyme I used in my recipe along with the Gruyere OR you could also substitute those for maybe Chives and White Cheddar Cheese.

So, without further adieu, this is what I did:

I peeled and sliced (with the Mandoline) 4 or 5 Sweet Potatoes (it depends on size) and put the setting to “3/16” of an inch.

I buttered a 13 x 9 in. baking dish.

Quick Tip from my MOM: Don’t throw away those empty butter wrappers! Save them for something like this where you need to butter a dish. It makes it much easier to do it and your hands get less messy! 🙂

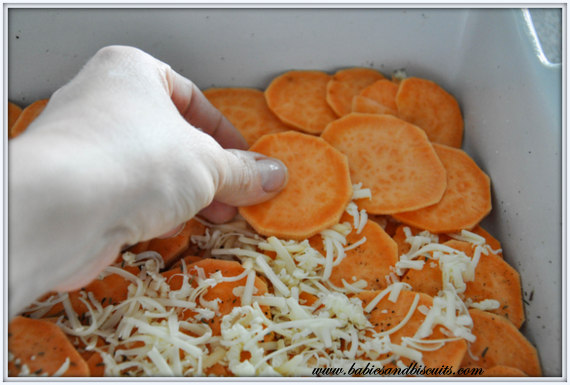
I made a layer the Sweet Potatoes in a slightly overlapping pattern on the bottom of the baking dish.

Then I sprinkled with a little Salt, Pepper, and Thyme. Then I sprinkled a thin layer (about 1/2 cup) of Smoked Apple Gruyere Cheese on top. YUM! Is all I can say!
Next, I repeated the layers 2 more times.

After that, I put 1 more layer of Sweet Potatoes on top. (By now, I had 4 layers of Sweet Potatoes total)

Then, I simmered 2 cups of Skim Milk and 2 cloves of Minced Garlic for 2 to 3 minutes.

Then I poured it over the Sweet Potatoes. I made sure I touched every potatoe on the top layer so that none would be dry during the baking process.

Em wanted to help me, so I let her sprinkle the last layer of cheese on top. Then, I covered it with foil and baked it for 30 minutes on 400 degrees. Then, I removed the foil and baked it for another 30 minutes. Be careful when you remove the foil because steam will escape and that may cause you to get burned.

This is what it looks like when you pull it out. Not sure if you can tell, but the milk will still be visible and almost appear like it isn’t finished because of so much being in the pan. NO WORRIES! I let mine cool for 30 minutes, allowing all the potatoes to absorb the milk. BY THE WAY: The brown around the edges is from the milk and steam. I showed this in the picture so you would know to expect it. 😉
After that, right before we were ready to eat, I popped it back in the oven for a few minutes on broil so that the cheese could get a little more browned. Make sure you watch it though! Cheese can burn VERY quickly if you aren’t watching it.

This is what it looked like when finished. Unfortunately, the picture doesn’t do it justice because it was later and there wasn’t as much light outside. (BUMMER!)
This was AMAZING with the Pork Tenderloin we had with it.

Lucky for me, I had just enough leftover for lunch today! Burp!
Recipe: Scalloped Sweet Potatoes
Ingredients:
2 cups Skim Milk
2 cloves of Garlic, minced
2 pounds Sweet Potatoes (about 4 or 5) , peeled and sliced about 1/8-inch thick *OR you could use Russet
Kosher Salt
Ground Black Pepper
1½ teaspoons Dried Thyme *OR you could use Chives
2 cups shredded Gruyère cheese (I used Apple Smoked) *OR you could use White Cheddar Cheese
Directions:
– Preheat oven to 400 degrees.
– Peel and Slice your Potatoes, if you haven’t already.
– Butter a 13 x 9 in. baking dish.
– Layer Sweet Potatoes in an overlapping pattern. Sprinkle with a little Salt, Pepper, and Thyme.
– Sprinkle with about a 1/2 cup of Gruyere cheese.
– Repeat layers 2 more times, ending with the cheese.
– Layer a final layer of Sweet Potatoes, set aside.
– In a small pot bring Skim Milk and Garlic just to a simmer for about 2 minutes. Remove from heat and pour on top of Sweet Potatoes, making sure you touch each potatoe on top layer. Milk will settle to bottom.
– Cover with Aluminum Foil and bake for 30 minutes.
– Remove Foil (BE CAREFUL) and bake an additional 30 minutes.
– Remove from oven and allow to cool for 30 minutes. Potatoes will soak up any milk during this time.
– Stick back in the oven for a few minutes on Broil and allow top to brown a little more.
– Serve immediately.
Lavender Sugar Scrub
I think everyone needs a good Scrub.
Sugar Scrub that is.
Whether you are a Dude or a Dudette,
we all get dry skin in the Winter ,
AND
for some of us, Summer too! (Umm, yeah that would be me.)
I have an easy home recipe here that takes less than 5 minutes to whip up.

Most of the ingredients can be found in your pantry.

The only ingredient that most do no have is the essential oil.
Other than that, it is just Sugar, Olive Oil (I have Extra Virgin), Chamomile Tea, and your favorite Essential Oil.

The Essential Oil will give you your scent. I used Lavender which gives a Soothing quality so if you are going to bed afterwards, it really helps to calm you.
Lemon is a great scent too!
I almost did Peppermint, so when I run out of this one, I’ll probably do that next time.
You can find Essential Oils at your local craft store, but I bought mine at my local Health Store, called Bay Naturals.
Here is a link to their store: www.bay-naturals.com

The best thing about this is the fact that it makes your skin feel SOOO smoothe when you are finished.
You will have a glow to your skin and who doesn’t love that, right?
Recipe: Lavender Sugar Scrub
Ingredients:
– 1 Cup Granulated Sugar
– 3/4 Cup Olive Oil
– 1 Chamomile Tea Bag
– 1/2 Teaspoon Essential Oil such as Lavender
Directions:
– Cut open tea bag and pour into medium sized mixing bowl.
– Add Sugar and mix well.
– Using 1/4 Cup at a time, add Olive Oil to Sugar mixture until it is the texture of “wet sand”.
– Add essential oil. *If you would like to use more than recipe suggests, that is fine. Add to your liking, but be careful! A little goes a long way and may end up being too strong if you are not careful.
– Store in air tight container.
In shower:
– Wet skin and using scrub, gently massage onto body.
– Allow to sit on skin for 2 to 3 minutes before thoroughly rinsing.
*Be careful, shower floor may be slightly slippery afterwards, so use caution and REMEMBER: A little goes a long way!
Have fun with it! Try your favorite essential oil!
( * This was not a paid advertisement for Bay Naturals. I simply bought my ingredients there. )
 |
 |
|
 |

You must be logged in to post a comment.