
Recipe
Shrimp, Tomatoes, and Orzo with Basil

(Recipe adapted from Martha Stewart’s Cookbook, “One Pot Meals”)
Hello, my beautiful Friends! I have really missed you!
I am so excited to get back to blogging after this long hiatus I have been on. I thought it would be simple to blog while my family lived in our tiny little apartment for the past 6 months, but boy was I wrong. We were falling on top of each other all the time and adding blogging to that situation was a NO GO! We just recently started liking each other again. LOL!
I kept telling myself that one day I would be able to look back on this temporary decision and be happy I made it. Honestly, I second guessed myself ALLLLLL THEEEEE TIME!
BUT!
I can finally say that the day came when I could finally say that the decision did actually pay off. We couldn’t afford to build our home while still living in the home we had. So, we sold first, then did a 6 month lease while it was built.
That is behind us now since we recently moved in. (Everybody take a deep breath with me and exhale slowly now…………AHHHHHHHHHHH! )
Ok, enough jibber jabber!
In honor of the interesting Summer I had, I want to share a recipe that represents everything Summer to me! Shrimp, basil, and tomatoes!
This recipe is both yummy AND light!
ENJOY!

Recipe: Shrimp, Tomatoes, and Orzo with Basil
• 3 Cups halved Grape Tomatoes, Halved
• 6 Garlic Cloves, Minced
• 2 Tablespoons Extra-Virgin Olive Oil
• 3/4 lb. Orzo
• 3 1/4 Cups Low-Sodium Chicken Broth
• 1 1/2 lbs. Large Shrimp, Peeled and Deveined
• 1 Cup Fresh Basil Leaves, Chopped
Directions:
• Preheat oven to 400 degrees. Position rack in the top position.
• In a large ovenproof skillet with a tight-fitting lid, heat 1 tablespoon plus 2 teaspoons oil over medium heat.
• Add garlic and cook until just beginning to brown, 1 minute. Increase heat to high and add tomatoes; season with salt and pepper. Cook, stirring occasionally, until softened, 6 minutes.
• Add orzo and broth, and bring to a simmer.
• Cover and bake until liquid is mostly absorbed, 10 to 12 minutes.
• Toss shrimp with remaining teaspoon oil and 1/4 teaspoon each salt and pepper. Remove skillet from oven, and place shimp on top of orzo.
• Heat broiler. Broil until shrimp are opaque throughout, 4 minutes.
• Sprinkle with basil and serve.

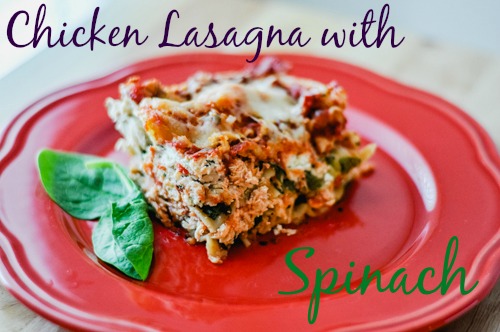
Chicken Lasagna with Spinach
So, lately for some reason, I have had great “ideas” that haven’t been good realities. (*Remember….. the chocolate cakes with ganache? LAWRD !!!! )
Well, I had to save those like I had to save this lasagna tonight. *Just keepin it real over here!*
Well, tonight’s dinner started out with the intent on being Chicken Lasagna Roll Ups. Then, it was dinner making time and I realized that I only had “oven ready” lasagna noodles. I had bought them before because they are magnificent! No boil, just layer those puppies in with the lasagna and you are good to go. I’m talkin STRAIGHT FROM THE BOX, PEOPLE!
Problem?
Well, I had never tried to actually boil them and because you need to boil the actual lasagna noodles in order to make them pliable enough to make the rolls, I was in deep doggy doo doo! *SIDE BAR: Anybody know whether or not you can actually boil these things? I only had enough for the actual lasagna with none to spare, so I was terrified to take that chance. Help a girl out, if ya know!
Instead, I decided to make my own version of Chicken Lasagna and prayed it turned out ok.
GUESS WHAT?
IT DID!
And now, because of my “almost possible maybe I might have had another EPIC FAIL”, I get to share that recipe with you! The people I love so much! 🙂
So, my loves, here you go:

RECIPE: Chicken Lasagna with Spinach
*TIP: I prepared this meal earlier in the day and just put it in the oven when I was ready!
Ingredients:
Sauce:
Lasagna/Filling:
• 1 (15 oz.) container part-skim ricotta cheese
• 1 1/2 cups reduced fat shredded mozzarella cheese, divided
• 1/2 cup grated parmesan cheese, divided
• 1/2 teaspoon salt
• 1/2 teaspoon dried oregano
• 1/8 teaspoon ground pepper
• 10 oz. fresh spinach
• 12 lasagna (OVEN READY) noodles, you may need more depending on how big noodles are. Make sure you make a layer each time.
• 2 cups shredded white meat chicken (*I used rotisserie)
Directions:
• To prepare sauce: Add first six ingredients to a medium size sauce pan. Season with the salt and pepper and bring to a slight boil on medium high heat. Reduce heat, cover and simmer for 30 minutes, stirring occasionally.
• Meanwhile, to prepare filling: Combine ricotta, 3/4 cup of mozzarella cheese, 1/4 cup of parmesan cheese, salt, pepper, and oregano in a bowl. Mix until well incorporated and set aside.
• Preheat oven to 350 degrees.
• In a 13 x9 in. pan, spread about 1 – 1 1/2 cup of sauce on bottom of pan. (just enough to really coat the bottom of pan). Then, top sauce with enough lasagna noodles to make a layer. *This could take 3-5 noodles depending on your noodles. I ended up using 5 on each layer.
• Top noodles with half of spinach.
• Crumble/Spread half of ricotta cheese mix over spinach.
• Spread half of shredded chicken on top of mixture.
• Repeat layers once more. *You may need to press down on layers as you go in case lasagna gets too full.
• End with one last layer of lasagna noodles on top.
• Spread remaining sauce over top of noodles.
• Sprinkle with remaining 3/4 cup of shredded mozzarella and 1/4 cup grated parmesan.
• Cover with aluminum foil that has been sprayed with non stick cooking spray (to prevent foil from sticking to lasagna).
• Bake, covered with the foil for 50 minutes.
• Remove foil, and bake for an additional 5-10 minutes until cheese is golden brown.
• Remove lasagna from oven and allow to cool and set for 5-10 minutes.
Enjoy!
XOXO, Esther

Thanksgiving Stuffing

That’s right, y’all!
Thanksgiving is NEXT WEEK!
Do you know what you are going to fix yet?
Did I just give you a mini heart attack?
If I did……..
I’m sorry!
Well, there is one thing that I know I am going to fix and it is good ole Stuffing!
I have a question though.
Do you fix Traditional Stuffing or do you fix Southern Dressing?
Well, I grew up with the Traditional style, while my husband grew up with the Southern Dressing. Though, I am not partial to either because I love both…….
You see, my mom would fix it the Traditional way and my Grandma would fix it the Dressing way.
So, I decided to fix each one and share the recipe!

First up is the Traditional Way. Rustic, large chunky bread and sausage, with celery and onions and LOTS of butter! 😉
I’m breaking the recipes up into two posts, but because I love you so much, I made a video. Make sure to check it out below and give it a “thumbs up” if you like it!
For the full written recipe, check it out below the video!
XOXO,
Esther

Recipe: Traditional Thanksgiving Stuffing
Ingredients:
• 8 Cups Cubed Bread (* 9 if omitting the Sausage)
• 16 oz. Sage Sausage (Regular is fine) * I used this to enhance the Sage flavor.
• 3/4 Cup Onion, Finely Chopped
• 1 1/2 Cup Celery, Chopped (with leaves)
• 1 3/4 Sticks Butter
• 1 1/2 Tsp. Dried Sage
• 1 Tsp. Dried Thyme
• 1/2 – 3/4 Cup Vegetable Stock , Unsalted (Use according to how dry you like)
• Salt and Pepper to taste
Directions:
• Preheat oven to 350 degrees.
• In a large skillet , melt butter on medium heat. Add celery and onions and saute’ until just softened.
• Stir in 1/3 of cubed bread and toss for a minute. Transfer mixture to a large bowl and set aside.
• In same skillet, add sausage and cook until completely brown.
• Add cooked sausage to vegetable and bread mixture.
• Add remaining bread and ingredients to bowl and toss until well combined.
• Add salt and pepper to your taste.
• Spray a 9 x 13 casserole dish with non-stick spray and transfer stuffing mixture to pan.
• Bake 30-40 minutes or until mixture is completely warmed through and top is golden brown and crispy.
NOTE: * Tossing mixture in the middle of cooking time, may help keep bread underneath from becoming too moist.

Cinnamon Twists

When I was growing up, both my mom and grandma took us to a grocery store called, The Fresh Market. To my knowledge, they are across the United States, so I’m sure you are probably familiar with it.
Apart from having organic food items, they had and still do have an AMAZING Bakery!
Well, it was considered AMAZING to a little child growing up.
We all had our favorite things we loved and pretty soon those things became something we couldn’t live without when we would go to there. At least that is what we would tell anyone who took us, in hopes we could sweet talk them into buying something for us.
We weren’t spoiled, right?
I remember my sister’s favorite were the Chocolate Eclairs. Mine were whatever Sugary Confection looked good that day…… (I never have met a baked good I didn’t like). AND…….My brother’s were the Cinnamon Twists! (Which also, eventually, became my favorite as well)
Well, when my brother and I moved away from Raleigh, we moved to an area that didn’t have a Fresh Market. Well, at least not initially.
Within a few years of living here, they actually, to our surprise, built one, not too far from our house! I was literally in heaven! Nothing will get this girl more excited than when a new awesome grocery store hits town! The first thing on my list to buy there were going to be……. you guessed it,
CINNAMON TWISTS!
However, that wouldn’t happen. 🙁
I went to the store and didn’t see them. After asking an employee where they were, he told me that I must have been a Fresh Market customer for a LONG time, because they stopped making them years ago.??????????
WHAT?!?!?! , I thought?
I guess I hadn’t gone that often when I still lived in Raleigh, because I reckon I would have known this!?!?
They had some “other version ” of them now. But Y’all!!!! Let me just tell you…….
“Other Versions” just don’t cut it when you want the REAL VERSION of something. Not when you grew up having One Version of it and One Version only. Uh uh!
So, long story short….. (TOO LATE!)
I decided to make my “OWN VERSION”!
So, I hope you like them.
Here is what I did:

I took one sheet of Puff Pastry. I used Pepperidge Farm’s, but use whatever brand you like. I only had one sheet, so the recipe will be based off that. If using 2 sheets, and I definitely recommend doing that, because you will want MORE!……. just double the rest of the ingredients.

Lightly dust a counter surface with flour so that you can work with the pastry sheet and it will not stick to the counter. *You honestly don’t need much.

Mine came lined with sheets of parchment paper, so I thought it would be a great idea to use this as a “ruler” of some sort or at least something that would give me a straight edge to cut the strips with. Using a pizza cutter,

I cut several strips of the puff pastry. Make sure to cut an even amount, as you will twist two together. *NOTE: I would go back and cut the strips thinner next time. They don’t have to bake as long when they are thinner. However, these did just fine and tasted great!

Then, I took a very small amount of milk and brushed it lightly on the strips to act as a “glue” for the cinnamon and sugar.

I mixed together 1 teaspoon of cinnamon with a 1/4 cup of sugar.

I heavily sprinkled the cinnamon and sugar mixture over all of the strips. Then, I turned them over and did the exact same thing to the other sides.

Time to TWIST! Take two strips and cross them at the top, pinching together. Taking both strips, I twisted them all the way down and pinched them again at the bottom to seal.

This is what they look like when twisted. Then, I cut them in half and made sure all the ends were pinched together as well.

Smaller cut strips getting ready to go into the oven on 400 degrees for 12-15 minutes. (*Thinner ones will be less)

And VOILA! Make sure to let them cool completely. As they cool, they will become stiffer and will in turn have this “crunch” to them that is simply DIVINE! That is exactly the way they used to be at The Fresh Market too! 🙂
I have to say that I was proud of myself. I surprised my brother with a few and I really hope he liked them! If he didn’t he can give them back because I know a few peeps around these parts that will gobble them up!
When the kids came home from school, they devoured them. Even my oldest, who is not a big sweet person (not sure she is really my kid……) LOVED THEM!
Then, both her and her sister decided that they would go best with Apple Cider. If you haven’t seen my Cider Recipe, you can check it out here.
Until next time…….
XOXO,
Esther
Recipe: Cinnamon Twists
– Flour for dusting
– 1 Frozen Puff Pastry Sheet, thawed
– 1 Teaspoon Cinnamon
– 1/4 Cup Granulated Sugar
– Small amount of milk for brushing Pastry
Directions:
– Take a small amount of Flour and lightly dust a counter or cutting board surface. Take Puff Pastry sheet, and lie flat on lightly dusted surface.
– Using a pizza cutter or knife and straight edge, cut strips in puff pastry sheet, remembering to do an even number for twisting purposes. Cutting thinner strips may work better. However, wider ones work just as well. Line strips on working surface.
– Meanwhile, in a small bowl, combine the Cinnamon and Sugar.
– Using a pastry brush, lightly brush surface of pastry sheets with milk.
– Heavily dust each strip with Cinnamon/Sugar mixture. Flip strips over and repeat on other side.
– Carefully, take two strips and criss-cross strips on one edge. Proceed to wrap strips around each other and secure other end just like the beginning.
– Lay strip down on cut in half, remembering to pinch the cut edges together so that they will hold their shapes. Repeat steps with remaining strips.
– Lay strips on a baking sheet and bake for 12-15 minutes until puffy and golden brown. Sprinkle with additional Cinnamon/Sugar mixture if you wish.
– Allow the strips to cool completely. *If you do this, they will become crispier and fantastic! If you eat them to soon, they will not be as crispy!

 |
 |
|
 |

You must be logged in to post a comment.