
Mason Jars
DIY Spice Holder

It’s widely understood around these parts that I like Mason Jars. Ok, maybe more like LOVE them.
I even make layered cakes in them. If you missed that post, you can see it here.
Well, the other day, while going into my pantry to pull out things for dinner, I noticed my stash was overflowing. I can never bring myself to part with a mason jar, so I thought of something I could use them for. Then it dawned on me! I have been trying to clean out my lazy susan in the kitchen.
Since I didn’t want to spend any money doing that, I decided to make my own version of a “spice rack”/holder thingamajig.
SO! This is what I did:
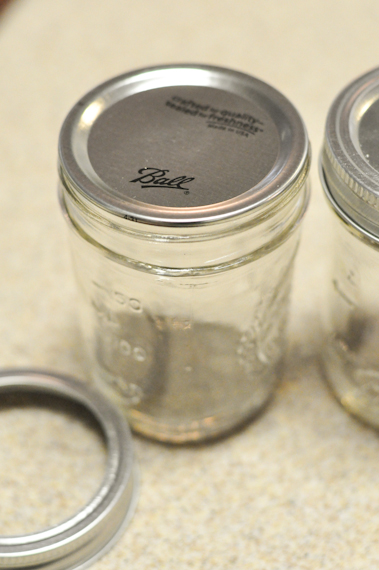
First, I took the mason jar…

Then, I hopped online and searched free circular printables and found these. They were perfect size for the seals on the small jars I was using. My computer allowed me to size them this size and also slightly bigger.

If you notice, I chose to put them on a slightly yellow tinted paper compared to white because I wanted the labels to have a vintage appearance on them. You could use any color you like though.

After cutting out the labels for the seals, I took my label maker and made each spice name I wanted to use. I decided to cut the ends in a banner like point to give it some flair.

This was the end result.
But then, I needed something to put them in…….

I had this metal thing I bought from Homegoods a while back and was planning on trying to sell it in a yard sale. I say thing because while I thought it was a good idea to buy it at the time, I just couldn’t find a permanent home for it. It held a few papers once, then was a shoe holder for my little man, and then just went into the yard sale pile.
So, I decided to give it one more try. Unfortunately, it just wasn’t a contender in it’s original state.

So, I laid it down and deconstructed it, a bit.

Ending up with this. I call it RUSTIC FLAIR! LOL!

So, in the spices went.
Now, there are a few spices I use more of, so I thought it would be good to make their jars a little bit larger. Unfortunately, the labels in the original size were too small for their lids, so I doubled them up.

This was the end result.

Now, I realize that one side of the basket, basically being the bottom of the holder, is a different color than the rest of the holder. Then you have the opening on the side of the holder that was originally the top, but I had a solution for that. Hee! Hee!

The opened side went up against the fridge (so you can’t see it, unless I point it out), and the other end just looks brown.

Yup! I’m just lazy like that. Of course, I could paint the brown side, but I kinda like it. If I end up not liking it in the future, I’ll probably paint it.

So there you have it. It really has been a nice addition to my kitchen. I thought about using the piece I cut off and piecing it on the opened side. However, you DO remember I said the word lazy, right?
Happy Weekend, Everyone!
XOXO,
Esther

Simple Thanksgiving Table Setting

I am beyond excited for Thanksgiving this year!
I thought I would share some of my ideas with you all in hopes that you may get a few ideas of your own. You know, in case you are in the same kind of tizzy. 🙂 (That IS a word, right?)

I am definitely a color person and I have been getting bored with my regular old white plates as of lately. I decided to go to Homegoods and “look” around.
However, I had a Starbucks in my hand and I can never just “look” when I have a Starbucks in my hand. All I will say is stores who have Starbucks in their stores know what they are doing. It’s like having waitresses serve you drinks when you are gambling in Vegas. The more you drink, the more you spend. It’s NO DIFFERENT with coffee. You are high on caffeine and BUY BUY BUY! Well, at least I do. LOL!

I fell in love with this blue and really built the color palette around this one plate. All the plates were $4.99 ea. at Homegoods.

Now, my centerpiece will be a little different come Turkey Day. I plan on lining mason jars down the center. Some with flowers and some with candles. I just didn’t have any flowers or candles on hand, so I thought this would look better than empty mason jars.

These Turkey salt and pepper shakers might get lucky enough to stay though……
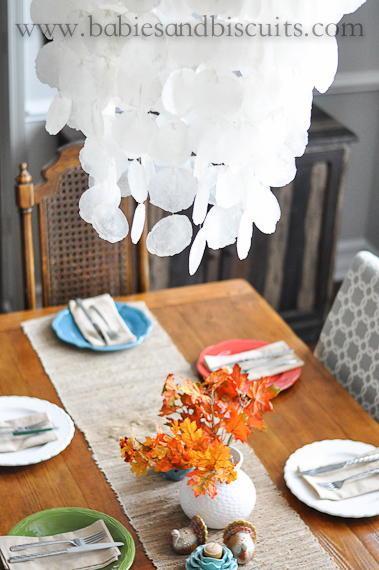
I definitely have quite an eclectic taste, as you can see. I still get all googly eyed when I look at my new chandelier.

I firmly believe in using lots of natural looking elements like Burlap. I found this Burlap Runner at Target a while back for about $17.00. I love it because it is so versatile. It usually stays on the Coffee Center, but I’m going to use it here for the dinner.
I know you are probably thinking to yourself by now, where are the glasses? The answer to that is I haven’t figured that part out yet. If I don’t by the actual day, then I guess we will be drinking out of Solo Cups. 😉
Or, I guess I could just toss the flowers out of the mason jars and use them instead…….. RIGHT?

So, what kind of table setting are you doing this year? I would love to know!
XOXO,
Esther
Mason Jar Birthday Cake !!!

Don’t you just love Mason Jars????
Well, I do. I must have a million of them. Between all the empty ones from canned goods I’ve used, to all the ones I decorate with, I might have to change that number to a BILLION!
They are pretty much a staple here in the South, mostly because they are so versatile.
Well, the other day was no exception!
Em turned a Big Ole’ 8 over the weekend and decided she wanted a slumber party. Yes, I still have all my hair…… BARELY!
I thought it would be fun to change up her Birthday cake. So, instead of doing one big cake, I did several smaller mason jars for all the girls.
First, I made a boxed chocolate cake (Em’s favorite).

Then I took one of my biscuit cutters that I knew would fit into the mason jar and cut holes out ….

The cake was a little thick, so I cut those in half and layered them in the bottom of 1/2 pint mason jars.

Then, I took the buttercream icing I made. (* I used this homemade recipe here , but store bought is fine. I mean, come on…. I used a boxed cake mix. )

Added a swirl of it to the top of the cake.

Then topped with some rainbow sprinkles.

Yummmmmmm.

Now, at this point, I realized that with the amount of buttercream icing I made and the amount of mason jars I still had to do, I would never have enough to keep going at the thickness I originally cut the cake. So, I decided to keep the cake as thick as the biscuit cutter cut it this time. If you do less jars than I did, you can always keep the thickness of the cake the same.

Then, I repeated with the buttercream and topped off with more sprinkles. Once I was finished, I felt like they looked like little milkshakes, so I stuck these cute blue and white polka dotted paper straws in them I found at Target.
TIP: Stick them in the fridge for 5 minutes and serve. There is something about giving them a slight little chill that makes them better in my opinion. 😉


My favorite part of the whole thing was that Em decided she wanted everyone to be able to make a wish that night, not just her. So, every girl got their own mason jar with their own candle to blow out!
I love her sweet heart!
Just a little side note: I had a lot of leftover cake. If you do not want to waste the cake, it would be great to break up the remaining cake and either freeze for later or use it within a day or so in a trifle.
Everything is better in a Mason Jar! These would be great for entertaining a large crowd too. Not to mention, they could be technically considered portion control, right?
XOXO,
Esther
Pumpkin Bread in a Mason Jar
Happy Thanksgiving Week!
What are y’all doing right now?
Planning your menus, planning your diet and exercise regime for after your menus?
Maybe doing lunges or stretching out your muscles to prepare for the Black Friday Madness?
Well, I am making bread. That’s right!
Bread!
But not just any kind of bread. Pumpkin Bread!

This is a great Southern Recipe!
We are going to be on the road this Holiday and we always end up stopping along the way for breakfast. This usually consists of Bojangles.
Now, any good Eastern Southerner typically knows about “Bojangles”. The good ole Fried Chicken Restaurant.
I have decided this time will be something better. Pumpkin Bread!
I made them in Mason Jars, so the “Babies” can just eat their bread with a spoon in the car.
Hopefully, this means less clean up for Z and myself. I guess we will see.

The best thing ever is Fresh Canned Pumpkin. Store bought is completely fine too. I just happened to have a jar in my pantry that my mom had given me.

You can make this in a loaf pan, muffins, or even little mini poppers. I thought the mason jars gave it a fun twist. I sprayed the inside so that they wouldn’t stick.

Make sure you wipe off the rim of the jar afterwards so that the lids will seal.

A funnel is a great tool to use to keep batter off the rim.

I filled the mason jars about half way full and set on top of a cookie sheet.

I baked them at 350 degrees for 35 minutes, until a toothpick came out clean. Then I sprinkled additional finely chopped walnuts on top.

And sprinkled each one with a little powdered sugar!

While they were still hot, I topped each one with a lid/seal. They will actually seal on their own after a few minutes, just like the canning process.
Did you know they will last up to 6 months sealed ! ? !
However, these won’t make it past the morning!

When ready to serve, you can either run a knife down and around all the sides of the jar, and tapping the bottom a bit, it will come out as a “log”. Simply slice it and serve.
OR!
You can do my personal favorite and what we will be doing tomorrow morning.
AND…..
Taking a spoon…..
Sit down……
Open the lid/seal……
and go to town! Yum!

HAPPY THANKSGIVING!
Recipe: Pumpkin Bread
Ingredients:
– 1 3/4 cup All Purpose Flour
– 1 1/2 cup Sugar
– 3/4 tsp. Salt
– 1 tsp. Baking Soda
– 1/2 tsp. Cinnamon
– 1/2 tsp. Nutmeg
– 1 tsp. Vanilla Extract
– 1/2 cup Vegetable Oil
– 2 large Eggs
– 1/3 cup Water
– 1 cup Fresh Pumpkin or Store Bought
– 1/2 cup Chopped Walnuts, plus more finely chopped Walnuts for Garnish (Optional)
– Powdered Sugar
Directions:
– Preheat oven to 350 degrees.
– Combine all dry ingredients (except powdered sugar and walnuts). Mix well.
– In another bowl, conbine pumpkin, water, eggs, vanilla, and oil. Mix well.
– Add dry ingredients to mixture and beat thoroughly.
– Stir in nuts and pour batter into greased loaf pan or 1/2 way up greased mason jars.
– If using a loaf pan, bake 75-80 minutes. If using mason jars, bake 35 minutes or until toothpick inserted into middle, comes clean.
– Cool 15 minutes in loaf pan and then sprinkle with powdered sugar. If using mason jars, sprinkle with finely chopped walnuts, powdered sugar and carefully put lids/seals on top and twist to tighten. *Jars are HOT! Be careful!

 |
 |
|
 |

You must be logged in to post a comment.