
Easy
Christmas Wall Decor: Reindeer String Art Tutorial

Hope everyone is recovering nicely from their big ole’ Thanksgiving meal! We had a great time visiting with friends and family in our hometown.
I have a little confession to make. Since I knew that we would be going out of town for Thanksgiving, I wanted to make sure we wouldn’t be so overwhelmed with getting all the decorations out and putting up the tree and doing the outdoor lights and …….. well, you get the idea.
So! I decided to start decorating a week or so in advance. Before you go, “girl is crazy!”……
Don’t worry! I only started messing around with the inside. 😉
Since this was a new house and I wasn’t sure where I wanted everything, I wanted to take my time and figure it out. Also, don’t forget the most important part of me being able to change up the theme this year. Only took me 5 years to convince the hubster, but still, finally got my way this year.
I really wanted some wall art for the house, but I couldn’t find what I really wanted and I knew that it was also going to cost me a bit because I had so much room to fill over the breakfast nook. Remember how big Penelope and Bessie are?

They are 36 x 36 and I love how they fill the space without making the wall look too cluttered with pictures.
I am going with more of a Rustic Theme this year and I have really been drawn to reindeers for some reason. I started looking everywhere, but I just couldn’t find what I really wanted.
So, I knew I was going to have to make it. LORD, HELP ME!

First things first.
I sort of had in my head what I wanted the background to look like. I wanted it to look rustic and I thought I was going to have to stain the wood to look that way, but the hubster and I happened to go by Home Depot and found these boards already made to have the appearance of EXACTLY what I was going to do to the unfinished wood I planned on using.
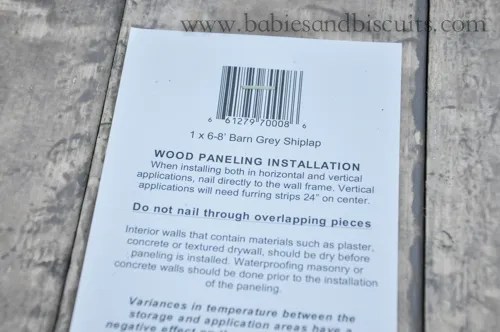
The boards were originally 1 x 6 x 8 ft. so we had to cut them down to the size I wanted. Since the pictures I was replacing were 36×36, I wanted the Christmas ones to be as close as possible to them. In the end, I ended up getting 3 projects out of all the boards we purchased. P.S. Look for a video tutorial to follow on the second String Art project we did to go with this one.
We purchased 7 of the Shiplap Boards, total. Then, we cut the pieces down to 33.75 in. each. Now lets do some math: we took each board, cut it down and got 2 boards in 33.75in. length with scrap left over of 27.5in. So, in the end, I am getting wall projects for the breakfast nook and 1 project for the outside because I just can’ t let that “scrap” go to waste.
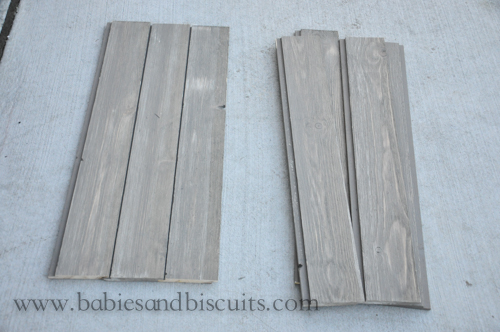
The boards are tongue and groove so when we assembled them next to each other, they fit nicely and tight.
Might I add that the back of the wood has a pretty interesting finish to it? It almost looks like water droplets coming down, so if you were looking to be more artistic with it, that is something to think about. Using the back instead of the front.

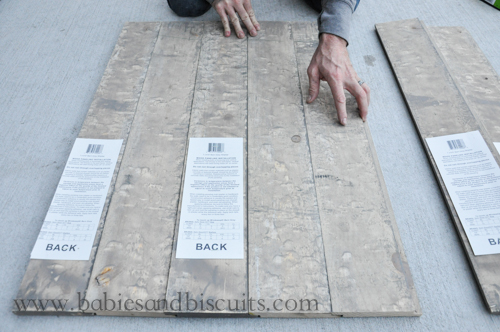
We also purchased (2) 1 x 3 x 8ft. pieces of plain white wood for the back supports seen here.

After placing all the boards side by side and into the tongue and groove area, we placed the white boards, which we cut down to 32 in. each to fit the space and laid them across the shiplap boards. Each 8ft space gave us 3 boards, with no left over scrap. This means that when I go to make my third piece, I will have to buy another 8ft. piece of wood. No worries though, because each 8ft. piece was only $ 1.48 !!!! That’s right! Cheap, y’all!

One more thing I wanted to mention before moving forward is this. Each piece of the shiplap board is tongue and groove, like I mentioned before. So, naturally, at some point, you are going to have an end piece that has an extra piece of wood sticking out. Now, you can either keep that, which would look just fine OR you can rip it down and get rid of it. We happened to have the tools to do this, but a great thing that your local home improvement store offers if cutting your boards for you!
That’s right, y’all!
They will cut them for you. I believe it is a small fee, if any and that way, you don’t have to say you can’t do a project like this because you don’t happen to have these tools at the house. With the company that we have, we just happened to have what we needed. Otherwise, I would have completely used that service at the store.
So, back to ripping the board down.

Z was feeling very helpful that day and offered to do it for me so I wouldn’t lose my thumbs, or fingers, or arm or……….
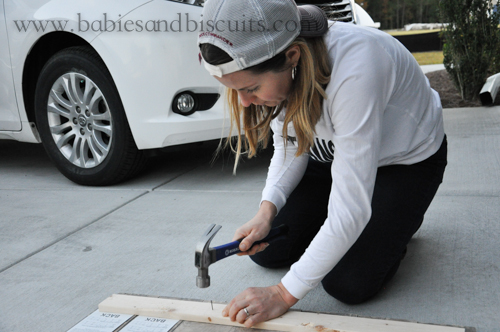
Back to attaching the boards. To make sure they were secure, we hammered a finishing nail into each board .

I just left the tags on the back of the shiplap because, well, that’s just how I roll. Yup. That’s it.

Here are the finishing nails we used for the back and also for the front for the string art. 1 box did it for this one, but I will probably have to purchase another for the second piece just to make sure I have enough. (It is a little more detailed)
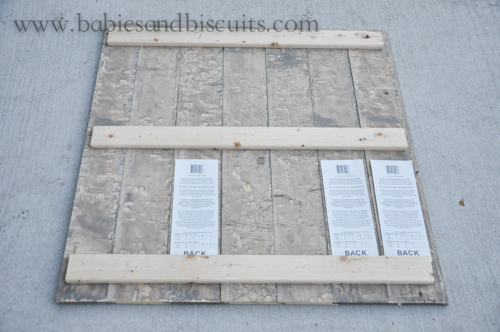
This is all three pieces of white wood attached.

Love how it turned out.

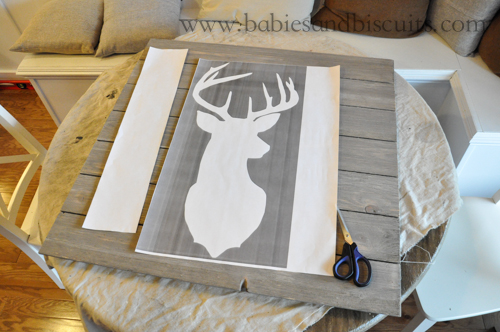
I found a reindeer silhouette that I really liked, but there was no way for me to enlarge it on my own computer to the size I needed, so I had Fedex enlarge it for me. I ended up going with a size of 18x24in. print.
I trimmed the piece and centered it the best I could.
Next,
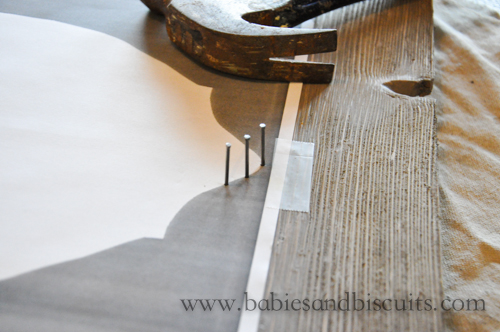
I secured it with a small piece of tape and started nailing away. You hammer the finishing nails in by tracing the outline of the silhouette.

Try to keep them spaced as evenly as possible. I started to angle the ones that were in the corners so that when I applied the string, I could create softer edges for the face.

Almost done. I have to admit that this can be a little time consuming. However, things go much faster when you have two people hammering. 🙂

Nails are all in!

And here is a closeup.

Remove tape and pull paper silhouette off. It should come off pretty easily, but may leave behind a few small papers around the nail heads. If this happens, you can simply remove with tweezers.

I had this jute twine already, but you can pick this up at your local craft store for about $5.00. *Use your 50% off coupon and get it for less!

You really can’t mess it up, but one thing I will suggest is to do something I didn’t, especially when doing the antlers because when you are looking at a bunch of nails, you can forget the pattern. When doing my second project, I will definitely outline the picture FIRST with the twine! I went back afterwards and did it so it would stick out more, but that made it more difficult during the process. I saved the original image of the silhouette and just looked at that on my laptop for guidance, but if I did it to begin with, which is probably the way you are SUPPOSED TO DO String Art, it would have been easier. LOL! Oh well!

Getting there!
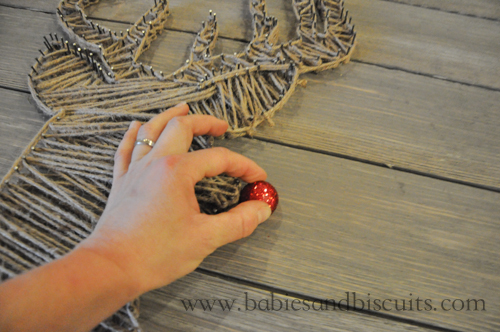
Now, you could simply let the reindeer be a reindeer, but since I was doing this for Christmas, my reindeer couldn’t just be any reindeer. No sir.
Mine had to be the one with the red nose……. The sparkly red nose in this case.

We attached these large picture hangers to the back for extra support because this big boy is quite heavy.

This was what the originally finished project looked like and

there really isn’t anything wrong with it.
BUT!
The more I looked at it, the more I felt like it started to look more like a “reindeer MUMMY” instead of a “rudolph, the red nosed reindeer”.
SO, my OCD made me go back over it and smooth out the lines a little more.

I like this version a lot more.
In fact, I like it so much, that I decided to do another one. But different. Not a reindeer. But Christmas. ANYWAY!
Really quickly, here is the price breakdown in case you want to try this for yourself:
Remember though, I made more than one project out of this! If you are only making the one, I will do my best to adjust:
- 1 x 6 x 8 shiplap boards from Home Depot: $ 11.97 per board (Need 7 Boards total to make more than one project. However, if only making one project, you would only need 4 Boards!)
- 1 x 3 x 8 white wood strips for back supports $ 1.48 ea.
- 1 1/4in. box of finishing nails (Shiny ones) $ 3.47
- Enlarged Reindeer head Silhouette $ 2.25
- Jute twine $ 5.99 (*Use 50% off coupon at AC Moore or Michaels to make $ 2.99)
- Picture Hangers $ 2.39
*All wood material was purchased from Home Depot for reference, including picture hangers.
Stay tuned! and
Season’s Greetings, y’all!
XOXO,
Esther

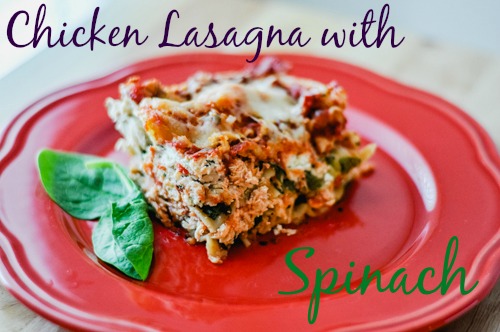
Chicken Lasagna with Spinach
So, lately for some reason, I have had great “ideas” that haven’t been good realities. (*Remember….. the chocolate cakes with ganache? LAWRD !!!! )
Well, I had to save those like I had to save this lasagna tonight. *Just keepin it real over here!*
Well, tonight’s dinner started out with the intent on being Chicken Lasagna Roll Ups. Then, it was dinner making time and I realized that I only had “oven ready” lasagna noodles. I had bought them before because they are magnificent! No boil, just layer those puppies in with the lasagna and you are good to go. I’m talkin STRAIGHT FROM THE BOX, PEOPLE!
Problem?
Well, I had never tried to actually boil them and because you need to boil the actual lasagna noodles in order to make them pliable enough to make the rolls, I was in deep doggy doo doo! *SIDE BAR: Anybody know whether or not you can actually boil these things? I only had enough for the actual lasagna with none to spare, so I was terrified to take that chance. Help a girl out, if ya know!
Instead, I decided to make my own version of Chicken Lasagna and prayed it turned out ok.
GUESS WHAT?
IT DID!
And now, because of my “almost possible maybe I might have had another EPIC FAIL”, I get to share that recipe with you! The people I love so much! 🙂
So, my loves, here you go:

RECIPE: Chicken Lasagna with Spinach
*TIP: I prepared this meal earlier in the day and just put it in the oven when I was ready!
Ingredients:
Sauce:
Lasagna/Filling:
• 1 (15 oz.) container part-skim ricotta cheese
• 1 1/2 cups reduced fat shredded mozzarella cheese, divided
• 1/2 cup grated parmesan cheese, divided
• 1/2 teaspoon salt
• 1/2 teaspoon dried oregano
• 1/8 teaspoon ground pepper
• 10 oz. fresh spinach
• 12 lasagna (OVEN READY) noodles, you may need more depending on how big noodles are. Make sure you make a layer each time.
• 2 cups shredded white meat chicken (*I used rotisserie)
Directions:
• To prepare sauce: Add first six ingredients to a medium size sauce pan. Season with the salt and pepper and bring to a slight boil on medium high heat. Reduce heat, cover and simmer for 30 minutes, stirring occasionally.
• Meanwhile, to prepare filling: Combine ricotta, 3/4 cup of mozzarella cheese, 1/4 cup of parmesan cheese, salt, pepper, and oregano in a bowl. Mix until well incorporated and set aside.
• Preheat oven to 350 degrees.
• In a 13 x9 in. pan, spread about 1 – 1 1/2 cup of sauce on bottom of pan. (just enough to really coat the bottom of pan). Then, top sauce with enough lasagna noodles to make a layer. *This could take 3-5 noodles depending on your noodles. I ended up using 5 on each layer.
• Top noodles with half of spinach.
• Crumble/Spread half of ricotta cheese mix over spinach.
• Spread half of shredded chicken on top of mixture.
• Repeat layers once more. *You may need to press down on layers as you go in case lasagna gets too full.
• End with one last layer of lasagna noodles on top.
• Spread remaining sauce over top of noodles.
• Sprinkle with remaining 3/4 cup of shredded mozzarella and 1/4 cup grated parmesan.
• Cover with aluminum foil that has been sprayed with non stick cooking spray (to prevent foil from sticking to lasagna).
• Bake, covered with the foil for 50 minutes.
• Remove foil, and bake for an additional 5-10 minutes until cheese is golden brown.
• Remove lasagna from oven and allow to cool and set for 5-10 minutes.
Enjoy!
XOXO, Esther

Lee’s Lemon Cupcakes

So, my oldest turned 11 today……………… 11 , y’all!
It breaks my heart………….. mostly because it means I’m getting old.
However,
It doesn’t break my heart to share the cupcake recipe I made for her birthday.
A little while back, I shared a recipe of a cake that was my cake version of this very cupcake. Confusing? Hopefully not.
We bought some cupcakes that were called “Lemon Bliss” Cupcakes at Sam’s Club. They were instantly a HIT! Problem is, they are a seasonal item and you can’t get them all the time. One of my favorite things is to try to recreate foods that I have tried and put my own twist on them in the process. The cake was awesome and we had it for her birthday last year. You can check that post out here.
This year, we decided to do the actual cupcake version so we made a few adjustments.

With the cake I made, I used whipped cream as the “icing”. This time, I decided to go with buttercream and lemon pudding in the middle and also filled the inside of the cupcake with the pudding like a hostess cupcake.
The result was pure AWESOMENESS! The great thing is this cupcake is not heavy at all! I didn’t say it was’t fattening, just not heavy. So, I guess you might want to be careful since you could probably eat a few without blinking an eye. 😉

Have fun and let me know how your’s turn out!
Recipe: Lee’s Lemon Cupcakes
NOTE: It may be helpful to read entire recipe before starting.
Makes 24 Cupcakes (filled half way) or 20 Cupcakes filled 2/3 way high
Ingredients:
– 1 Boxed Lemon Cake , plus additional items needed for cake such as eggs, oil, water (etc.)
– 1 Box Instant Lemon Pudding, plus 2 cups milk needed for Pudding instructions.
– Lemon Buttercream Frosting (Recipe Follows)
– Cupcake Liners
– 1 Cupcake filler tip
– 1 Tip for Buttercream Frosting
– 2 Large Freezer Ziplock Bags
Lemon Butter Cream Frosting:
– 2 Sticks room temperature softened unsalted butter
– 6 Cups Confectioners Sugar
– 1/2 Cup Milk (I use Skim)
– 1 1/2 Teaspoons Lemon Extract
Directions:
– Line Muffin Pan with liners and mix and bake cupcakes according to cake instructions. Allow to cool completely.
– Meanwhile, make Lemon Pudding according to package instructions and put in fridge for 15 minutes to allow to “set up”.
– Make Buttercream frosting by beating 2 sticks butter with a hand mixer until smooth (about 2 minutes). Slowly add confectioners sugar and alternate between milk and confectioners sugar until all has been used. Add lemon extract and beat until completely smooth and all lumps from sugar are gone.
– Once cupcakes have completely cooled, take a large ziplock bag, snip one corner of bag at an angle and insert large long decorating tip for cupcake filling into bag. Fill bag with Lemon Pudding Filling. Seal bag and set aside.
– Take other large ziplock bag and snip a corner of bag at angle and insert another large decorating tip of your choosing for Butter Cream frosting. Fill bag with Butter Cream Frosting and set aside.
– Take cooled cupcakes and inserting the tip of the Lemon Pudding bag into center of cupcake, gently squeeze bag until you can see the lemon pudding filling come out of top. Finish filling remainder of cupcakes. You should have left over. Do not throw away! We will use at end.
– Take Butter Cream Frosting back and make a swirl around top outer edge of cupcake twice, allowing for a “circle” to remain on center of cupcake. Finish frosting remainder of cupcakes.
– Take remaining lemon pudding filling bag and fill remaining center “circle” on cupcake until pudding is level with butter cream frosting.
– Your done! Enjoy!

Banana Bread Muffins

So, I’m literally obsessed and have an addiction to these Banana Bread Muffins.
In fact, I think it is safe to say that my whole family does.
I made these yesterday. The recipe made 48 mini muffins and today, at 6:00pm. They are literally all gone.
My poor family…… We have no self control.

These are actually a great after school treat, but unfortunately, my kids do not understand the idea of moderation. Else they would have had these several days after school. Maybe we need to work on that concept.
Anyhoo…….
These are really great as a traveling alternative to grabbing fast food. We tend to go out of town early in the morning and this involves us buying breakfast on the way a lot.
With the Holidays coming up quickly and people going out of town, why not make these the day before and pack them to go?

I promise they will go FAST!
Check out the video below that I made for these yummy little muffins!
Happy Baking!
XOXO,
Esther

 |
 |
|
 |

You must be logged in to post a comment.