
Benjamin Moore
Office Makeover

You know those days when you fly away to an exotic destination and forget the mess that you call an office?
Or better yet…… Snap your fingers and it’s clean, organized, and redecorated?????
Then you ACTUALLY WAKE UP and realize that it was all one mean dream? That you aren’t actually about to board a plane to your dream vacation. That you don’t possess magical powers that allow you to snap your fingers and things just fix themselves. No! The reality is that you have to go through every cluttered box you own and piece by piece, organize it!
BLAH!

Well, luckily……… that’s not how I role.
I love looking at organized stuff and my things may have some rhyme or reason to why they are all grouped in one general location, but I am definitely NOT a self professed organizer.
Oh yes, I have very ambitious thoughts from time to time, but then I get distracted by more important things…… like ice cream and chocolate.
I am, however, VERY happy with the way it turned out!

The lighting was hideous the day I tried to take these pics, thanks to all the rain we have gotten.
It’s not completely finished yet. I still have a few things left to do, but for the most part it’s complete.

I wanted more of an open concept than the one I had before. Before, the desk on the right was in the middle of the office, which really cut off the room visually.
I’m still brainstorming with ideas for that open wall above the desk, but nothing concrete yet. I’ll update once I’ve decided.
Also, as you will notice, my lovely hubby still needs to go and finish painting the baseboards. (I’ll do a post soon on how to build up your baseboards for practically nothing!)

I am notorious for painting my ceilings. It gives the room such a custom look. Plus, when you have high ceilings, the height can make your room seem too empty. Painting your ceilings can either give you the illusion of higher ceilings or lower, depending on the color you choose. Painting the ceiling a neutral tan color in this room, really “cozied” it up for me.
Paint colors:
Benjamin Moore’s At Sea – Walls
Benjamin Moore’s Bleeker Beige – Ceiling
High Gloss White – Trim

On the left side of the room is where all the organizational stuff is. I decided to not have any closed storage. This kept things open for me to just grab when I needed. Instead, I chose to go to Target and Homegoods for all my containers and idea boards.
I found the 3 shelf bookcases at Walmart for only $17 each. When it came to the idea boards on top, I almost splurged on Pottery Barn. The thought of spending over $700 on boards that I was going to hang on the wall, made me sick to my stomach, so instead, I went to my trusty ole’ Homegoods store to see what I could find first. I’m so happy I did! Not only did I find something, in my opinion, prettier……… They were far CHEAPER! I only spent $40 on the big one in the middle, and $20 each for the ones on the sides! Woot! Woot!

I felt like the colors were perfect. Lighter is what I was going for. So, when I start to put my ideas on the board, they will really POP!

I am so happy that most stores in general are really starting to amp up their office storage. All the designs are so nice these days. You can find cute stuff everywhere! AND CHEAP!
I got the brown storage boxes and multi colored file box from Target.
The cream colored baskets (set of 3), grey woven boxes (set of 2) from Homegoods.
The black boxes from Walmart.
Pattern file folders from Office Max.

This table was a MUST have! I could see in my mind what I wanted and how I wanted the office to turn out. I just couldn’t find a white pedestal table to go in the middle…….. that I could ACTUALLY afford!
I found plenty online! But they were all a small fortune and I just didn’t want to spend it.
Then, one night when I was searching Target’s website, I found it! Their new line Threshold, had the perfect one. It was so late and I was literally about to go to bed. So, when I saw that it was only $120, I thought my eyes were playing tricks on me! It happened to be on sale because I think it is normally around $150. Plus, if you use your Target red card, which is the Debit card, you get free shipping even if it isn’t supposed to be. Not to mention you get the 5% discount.
I’m in love with it! The great thing is that it is a dining table, so it can double duty as extra eating space if you ever have people over! 🙂

This chandelier was originally meant for the girl’s room at our previous house. I had just bought it when we decided that we were going to sell our home. So, I held onto it hoping that I could find a nice spot for it here. So happy that it worked out for the office. I think it gives it an unexpected chic feel.

I have big plans for these two pieces if I can sweet talk the hubby into it. Two words……. MILK…… PAINT!
I want all the furniture to maintain a lighter look, so that black is driving me crazy………. (PATIENCE ESTHER!)

I picked these cute knobs up at a local gift shop in Pawley’s Island.

I have to say, I REALLY enjoy drinking my coffee in my office now.

Apparently, I’m not the only one! 😉
Happy Saturday Y’all!
XOXOXO!
-Esther

Superhero Themed Boy’s Room

(*Lighting was not on my side this day for picture taking, but oh well…..)
Little Boys! Ahh….. I just love it!
You know, when we were starting to have our Babies, with the first being a girl, then the next being a girl……..
We basically got into a mindset that we were just meant to have little girls, and we were fine with that. In fact, we got to the point where we thought it would just be odd if we DID end up having a boy.
Flash forward a few more years and SURPRISE! Esther! You have a baby boy! He is 4 yrs. old and a big ole pot of CRAZY!
His loves are first and foremost, his MOMMA! Then his blankie, and then SUPERHEROES!

I have to admit that I absolutely love this! His room is very Superheros meets Andy’s Room from Toy Story.

When deciding on a color scheme, I felt that it had to be no other than blue and red, with touches of green.

We had to have a section for his ball caps too! By the way, his collection is very much influenced by his Daddy……….. hence the Yankees caps! 😀

No Superhero room would be complete without a BOOM! sign. I couldn’t find a POW! one, so I have a sweet friend that is going to paint one for me instead.
The wall’s paint color is called November Skies, by Benjamin Moore.

I’m sure by the time we are finished, we will have a huge wall full of Superheroes to watch over my sleeping baby boy at night.

Thankfully, the toys haven’t gotten out of control just yet. I found that cool metal cage at Homegoods and attached it to the wall for shoe storage.

I really heart that little boy! He truly is “OuR LiTTle SuPeRHeRo!”
Sources for items in the room:
Boat Picture over bed – Homegoods
BOOM! Sign – Homegoods
Our Little Superhero – Homegoods
Batman Lunchbox – Old Navy
Red Curtains – Target
Red and Blue Toy Boxes with Chalkboard Fronts – Homegoods
*If there is anything I missed in the room and you would like to know where it was bought, leave a comment and I’ll let you know! 🙂
Happy Decorating!
XOXO,
Esther
Kitchen Cabinets (Makeover)
It was funny.
A couple of weeks ago,
a couple of women came to my home for the first time.
I remember we were talking about where I had gotten things I decorated the room with and what had been done to the house since we had bought it and moved in.
Then, we came to the cabinets in the kitchen.
One of the women had commented on how much she liked the original deep color of the cabinets.
I started to discuss how we had just bought the paint to start my next project, which would be painting the cabinets.
It’s funny because everyone looks at you when you say the dreaded words……
PAINT THE CABINETS!…. duh duh duhhhhhhhhh!
I, myself, was even guilty of this as recently as a few years back.
In fact, my husband, THE PAINTER was even guilty of this as recently as….. oh, I dont know…. a few MONTHS ago.
We had painted ….. attempted to paint our previous home’s cabinets several years ago.
It didn’t turn out so well. (Shhhh! Don’t tell my painter I said that.)
Back then, even though Z was a painter, he wasn’t up to speed with new products and he liked to “wing it” a lot. (too much)
Now that I have bashed my hubby for a few minutes (Sorry sweetie!)…
let me take a second to praise him.
He has since become awesome! The most awesomest, cutest painter I know.
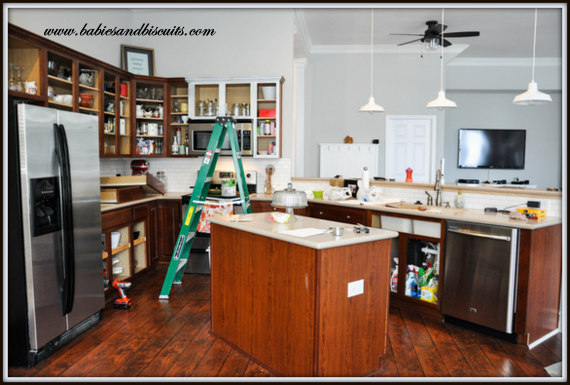
This is what our cabinets looked like before. Since we had installed the flooring in the house, everything was starting to look like one continuous color in the kitchen.
That sometimes works, but considering everything was that same brown, it was taking away from the floors moment to shine.
I really felt like if we just painted them, it would take care of it.

BUT! Then, I would have moments like this. Where I would look at it from a little distance and would think,”Now that doesn’t look so bad.”
Then I would have my “Clueless moment”. Not the mental one. The movie one.
You know, the part in the movie where Cher says, “It’s like a Monet!”
“It looks fine from a distance, but up close…………..

It’s a BIG OLE STINKIN MESS!”
I may or may not have added a few words there…..
So!
Since I only get things painted around my house when it rains…..
I got started.
It only took me 2 Rain Dances before the Rain Gods answered my request with some Wet Weather.
So, WE got started.

First we removed the doors and hardware. Then we took an electric sander and roughed them up.
Here is one like the one we used.
This is a very important step because you want to give the coating something to stick to.
If you just try to paint right over the cabinets, it will still work, but for the longevity of it, you should rough them up prior to application. Otherwise, it may start to peel a little down the road.
You can use sandpaper grit between 150 – 220 for this. For the power sander, they come in discs for this.

Then start painting! I’m going to tell you a secret…..
The paint we used for the cabinets doesn’t even need a primer prior to application!
SAY WHAT!?!
Yup! No primer! In fact, it is specially designed for cabinets and it is called Cabinet Coating.
It is a product carried by our local paint store, Spectrum Paints.
Others may carry it, but I haven’t checked. It is kind of pricey per gallon at $55/ea.
However, when you consider the fact that we only had to get 1 gallon for the base cabinets and 1 gallon for the upper cabinets AND still have left over, it is a pretty good deal.
We used a 4 in. wide Mohair Roller brush and a regular Paint brush for application.

Another great thing about this product is that it is “self leveling”, which means that when it dries, it levels out any brush strokes and looks like you sprayed it on or better yet… like you bought them that way.
We chose Benjamin Moore colors for the cabinets.
I also decided to do a “two toned” color palette.
It simply means that you go with one color for the base cabinets and a different one for the uppers.
The color for the base cabinets is Fieldstone.
The color for the upper cabinets is Vanilla Milkshake.

AND VOILA!
Now, I know what you are saying….. Ummmm. That’s a lot of gray!
Well, my camera was having a hissy fit that day and for some reason, everything looked very much the same color.
(It’s not though.)

Here is a little better idea of what it looks like. I know it is hard to believe, but the base color is actually darker than it appears in the picture.
I just love the way they turned out.

The floors finally have their moment to shine and do not have to compete with the cabinets any longer.

It’s like a breath of fresh air now coming into the kitchen. It’s so light and airy and somewhat beachy without being “cheesy beachy”???

The wineglasses finally have a home of their own.

The crystal knobs make me smile. FYI: Lowes and Home Depot have them for $3.97 ea.

Z hung my pot rack that I stole off of Joss and Main for $102.00, which might sound like a lot, but when you consider the fact that it has even a small amount of copper in it, it is an awesome price!
So, now I have more room in my cabinets.

I know I have shown shots of my little “conversation area” a million times, but I have added a light over the end table, so I had to share.
Probably won’t be the last time I throw a pic of this spot up here either.

See! Told ya! (Here is a closer look at the light)

I have been wanting this phrase for a while and saw it at a friend’s vinyl letter party, so I bought it right away. If you like it, email me and I can give you the name of the rep that I bought it from.
(Now, if I can only get Z to paint the crown…….)

I used to be that person who hung plates ALLLLL around her house. I have since toned it down a little, but when my mom bought this set for me for Christmas, I knew exactly where it was going to go.
The words are from “Patty Cake, Baker’s Man”, which my mom used to sing with me all the time when I was a baby, and I have with my own babies.
(Made me cry when I opened it.)

I let the light be darker in this picture, so it could really pick up on the green in the base cabinets.

I have wanted a set of measuring spoons like this ever since I saw Paula Deen’s on her show. Her’s were real pewter and I wasn’t about to spend that kind of money on something that I was going to get dirty all the time. LOL!
So, while Christmas shopping, my mom and I stumbled upon these at a cute shop in Myrtle Beach for $24.95. They have the same look of pewter without the price tag!!!!
I have since seen them all over, so if you do not plan on traveling to Myrtle Beach anytime soon, you could still find them.
*I just wanted to drop a little note. While I like to think I know a lot about painting, the truth is ……. I don’t. (I only know a little)
The other truth is…. Z DOES!
It’s his job and passion and has been for years.
I usually type my posts while he isn’t here. Then, he usually comes home and says, “Why did you tell everyone to buy that type of paint?!!?” Ooops!
Then, I go back on my site and correct what I wrote wrong! YIKES! LOL!
SO!
If you should have any questions at all, please feel free to email me and let me know and I will ask the EXPERT!
Then! I’ll even write you back with the answer! 😉
*I also wanted to add that the reps at Spectrum Paint said that while they can pretty much do any color in the Cabinet Coating, the best results are with “Pastel” colors. Apparently, the darker the color, the softer it makes the Coating.
The lighter colors do not break down the Coating and allow it to harden as it dries, yielding better results!
Hope you found some inspiration with the kitchen cabinets. I will probably do an update soon. We plan on painting the ceiling…..
Happy Thursday!
-Esther
Master Bedroom
I have been wanting to do a post for a while about my Master Bedroom.
It took a little while longer than I wanted to complete it and I really shouldn’t even call it complete yet.
I still need to get my curtains up, but I just couldn’t wait any longer.
The reason for this is because I went totally different than I normally would with the paint color.

I wanted something “Sultry” for the Master.
Z told me that if I said that word one more time, he was going to Puke!
Hey! Can’t a girl dream?
It’s always nice to know his Flame still burns for me????…..
Anyway, I know it’s not complete yet.
I haven’t put anything on the walls besides the TV. (Had to have the TV!)
The light coming through the windows is actually lightening up the color in the picture above.
It’s actually darker than the picture really shows.

We painted the wall, crown, and ceiling all different colors.
A lot of times, people forget about “the fifth wall”. (That is what they call the ceiling)
What most do not realize is how much it can do for a room when you choose to paint the ceiling.
It can either cozy up really high ceilings or it can just make such a bold statement.
You can either use a flat paint which will cover easier, or you can go with an Eggshell.
Eggshell will reflect the light really well on a sunny day, but it is harder to work with and will show any flaws you have in the ceiling.
For a DIYer, it’s best to go with flat.

I thought it best to give the man of the house the masculine dresser and just to make sure he knows which one is his,
I marked it with his initial.
You can never be too careful about these things.

Ahhhhh! Refreshing white is mine.
I love that dresser!

One always needs a fan humming at night to block out the snores of their mate and pooch!

I loooooove these pillows I picked up at Homegoods.
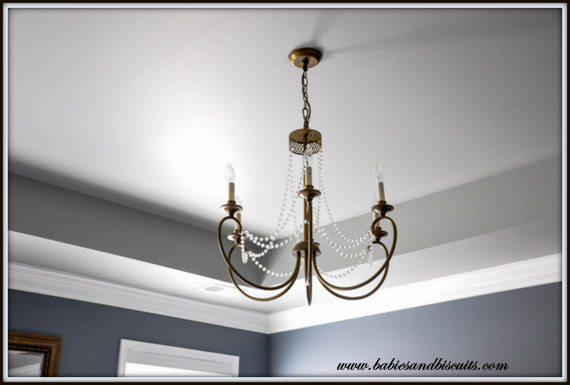
This is my beloved Chandelier. I drooled over this one for months before I actually pulled the trigger on it.
It is considered a “Champagne Bronze” and has glass pearls cascading down it, which I bought at The Home Depot.
I’m really excited because I just picked up the matching flush mount and the mini versions of it
for my Master Bath and Closet. ( I’ll show in a later post)

Here is another angle of it in the mirror’s reflection. I bought the mirror at Homegoods also a little while ago for only $29.

Here is another angle of the wall colors. It gives a little more accurate idea of the shade.

I will ALWAYS display my boots because I wuv them so much .

This is the view from the Master Bath, which should really be called “The Community Bath” instead.
I mean, let’s be honest here…..
Not until my children move out, will it ever truely be a Master Bath for just us.
Here is a link to the Wall Colors so you can check them out for your self:
*Keep in mind, that not all colors look the same online as they would on a wall.*
Wall – Wolf Gray by Benjamin Moore
Ceiling – Metropolitan by Benjamin Moore
Crown – Bright White (High Gloss) *Ask your paint salesman for a true Bright White (Most paint stores have a tendency to “gray” their whites)
*We used an Eggshell Paint which Z prefers to use for interiors.
If you have any questions regarding which paint to purchase for you next home project, email me and I will be more than happy to answer any questions you might have.
I’ll even ask “the expert”. ( Z )
Until Next Time…..
-Esther
 |
 |
|
 |

You must be logged in to post a comment.