
Recipes
Salmon Chowder

I know that you can eat fish pretty much any time of the year, but let’s be honest, it’s the best during the Summertime, right? When I think of fish in general, I think of the ocean and that usually leads me to thinking of the beach and that ultimately is the goal for most of us during the Summer!
If you love Salmon as much as I do, YOU MUST TRY THIS RECIPE! This might not seem like it would be very “kid friendly”, but I swear….. my little BABIES eat this up!
Maybe they are just weird or maybe they just can’t taste the salmon, or ……. yeah, maybe they are just weird………. 😉
Regardless the case, they really do love this one!
Salmon is probably one of the healthiest kinds of fish out there. The best part is that this meal is very light too!

Check out the Recipe below!
Recipe: Salmon Chowder
• 1 lb. fresh skinless Salmon
• 1 – 2 Tbsp. of Olive Oil
• 2 cups Shredded Carrots
• 1 cup Chopped Onions
• 1/2 cup Thinly Sliced Celery
• 2 1/2 cups Cubed Red- Skinned Potatoes
• 4 cups Reduced-Sodium Chicken Broth
• 1 (16 oz.) package Frozen Corn
• 1 Tsp. Fresh Chopped Dill Weed , plus more for Garnish (Optional)
• 1/4 Tsp. Salt
• 2 Cups Milk (I used Skim)
• 2 Tablespoons Cornstarch (for thickening)
• Water for Poaching Salmon
Directions:
• Rinse Salmon and pat dry. Set aside.
• In large pot, heat the olive oil on medium high heat. Cook and stir carrots , celery, and onion in hot oil about 10-12 minutes, or until the vegetables are tender, stirring occasionally.
• Meanwhile, in another large pot, bring water (about 2 cups) to a boil. Add salmon. Return to a boil. Reduce heat to low and simmer, covered, for 6 to 8 minutes or until the salmon flakes easily with a fork. Remove salmon, flake into 1 inch size pieces and set aside. Discard water.
• Stir the broth, potatoes, corn, dill, and salt into cooked veggies. Bring to a boil.
• Reduce heat to medium low heat . Cook, covered, for 15-20 minutes or until the potatoes are tender, stirring occasionally.
• Stir together 1/2 cup of the milk and cornstarch. Add milk mixture to pot.
• Stir in remaining 1 1/2 cups milk to pot.
• Cook and stir over medium heat until thickened and slightly bubbly. ( about 5-6 minutes)
• Gently stir in poached salmon and heat through.
• Serve in bowls and top with additional fresh dill.
• Goes GREAT with Jalapeno Cheddar Cornbread!
ENJOY!
XOXO,
Esther

When life hands you lemons…. (Make a Ridiculously Good Lemon Cake)

It’s been a while since I did a blog post. I have been buried waist deep in these awful things called taxes. Have you ever heard of them? Oh my word, they are awful! I’ll have to tell you about them sometime……. maybe some OTHER time…..
The important thing today is cake! Not just any cake. The kind of cake that makes you wanna slap your momma! *Sorry momma! I never liked that saying. At least not until after I became a momma!! 😉
You know, I have to say, I really surprised myself on this one. Even though it was the easiest of cakes to make (more on that in a minute), it didn’t taste like it was.
It all started with my oldest turning 10 at the beginning of the month. We usually make whoever’s birthday it is, their favorite meal and their favorite cake or one of their choosing. I had just bought these premade “lemon bliss” cupcakes, or so they were called from Sam’s Club. Lee absolutely fell in love with them…. and so did everyone else.
It was decided that she wanted a cake version of the cupcakes. Now, if I were really organized and thinking ahead for this blog post, I would have taken a picture of them. But that just wouldn’t be me. 😉
So instead, picture a lemon cupcake with a dollop of lemon pudding on top with a thin ring of buttercream icing around it.

Oh, how I love lemon!!!!
While I didn’t decide to use buttercream….. only because I felt it would have been just too much for the entire cake. I decided to go the whipped cream route instead.
This is what I did:

I took a lemon boxed cake (yes, boxed) and 2 packages of instant lemon pudding.

I did my best to evenly distribute the cake mix into two pans so that the layers would be as even as possible.

Now, here comes the stacking. However, what this picture doesn’t show is that right after this, I decided to put wax paper under the first layer to allow for spills with the whipped cream icing.

I took half of the lemon pudding and spread on top of the first layer. Then, I topped it with the second layer and spread the remaining pudding on top.

I spread it out to the edge as far as possible without dripping over.

Now, time for the whipped cream. I used my tried and true whipped cream recipe. It’s the same one I used for my Mixed Berry Tartlets. You can see it here. However, I added a teaspoon of lemon extract to amp up the lemon taste for this recipe.

Then, I just dumped it all ( a little at a time) because, well, WHY NOT?

I love whipped cream because it spreads so much easier than buttercream. I actually looked like I knew what I was doing in this pic.

Then, I just sprinkled some lemon zest on top and voila! I carefully pulled the sheets of overlapped wax paper out from under the cake and it made it look very clean.
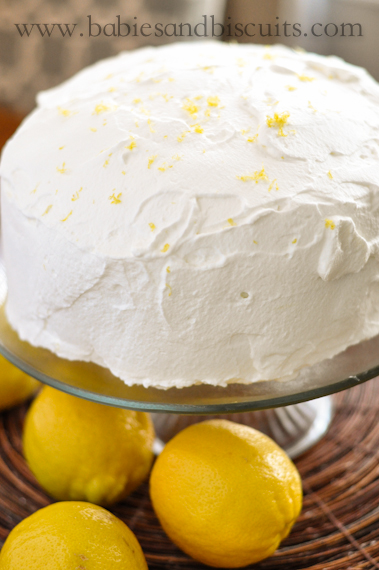
I was so happy with how it turned out! It wasn’t just pretty, it was RIDICULOUSLY GOOD ! This recipe would be great all year long. It is light enough for Summer, even though I fixed it in the Winter.

If you fix this, I would love to know what you think !
Here is the Recipe:
Recipe: Ridiculously Good Lemon Cake
– 1 Lemon Flavored Box Cake ( I used the Very Moist Version) *You will also need oil, eggs, and water according to cake mix.
– 2 Boxes Lemon Instant Flavored Pudding
– 1 1/2 Cups Skim Milk
– 1 Pint Heavy Whipping Cream
– 2 Tablespoons Granulated Sugar
– 1 Teaspoon Lemon Extract
– Lemon Zest (Optional)
Directions:
– Prepare cakes according to directions. Allow to cool completely.
– When cakes are completely cooled, prepare lemon pudding by mixing together 2 packages pudding mix with milk. Whisk for 1- 2 minutes or until pudding becomes thick.
– Prepare whipped cream icing by mixing heavy whipping cream with sugar and lemon extract with an electric mixer until it forms stiff peaks.
– Start layering cakes by first, laying wax paper pieces in an overlapping patter on top of a cake plate. Put first cake layer on top of the sheets.
– Spread half of the prepared pudding on top of first layer.
– Top with second cake layer and gently press on top, allowing the pudding between layers to spread slightly.
– Spread prepared whipped cream over top and sides of cake.
– Sprinkle with (optional) lemon zest.
*For best results, refrigerate for 1 hour prior to serving.
Spiced Apple Cider

Oh! How I loooooooove Apple Cider. I’ll drink it cold or hot, but there is just something about a cool crisp Fall day and a cup of Warm Spiced Apple Cider.
I think I’m getting a little excited for Downton Abbey to come back on because I thought to myself, “Why not fancy it up a bit and put it in a tea cup?”
I know I know! Downton Abbey isn’t coming back on for quite a while still, but a girl can dream, right?
Well, if you fancy yourself some fancied up Warm Spiced Apple Cider, why not have a go at this easy recipe? When I say easy, I mean SUPER easy!
Here is what you need to do:

Take a teaspoon of pre-packaged mulling spices and add it to a saucepan. A new Fresh Market opened up here the other day (Insert: Angels Singing). I bought it there, but you can easily pick this up at any grocery store.

That is also where I picked up the Apple Cider, but again, you can get Apple Cider anywhere.

Add 1 cup of the cider to the mulling spices and wisk together.
Simmer the cider on low in the saucepan for 10 – 15 minutes.

Take any cup and add a cinnamon stick to it.

Add warm cider to cup and enjoy!
NOTE: This recipe is good for an individual cup of cider. However, lots of mulling spice packages (including the one I bought) have directions for making larger quantities.
This would be great for any day, but especially good on those chilly ones! Also great for little sore throats……… or BIG ones for that matter! 😉
XOXO,
Esther
Mason Jar Birthday Cake !!!

Don’t you just love Mason Jars????
Well, I do. I must have a million of them. Between all the empty ones from canned goods I’ve used, to all the ones I decorate with, I might have to change that number to a BILLION!
They are pretty much a staple here in the South, mostly because they are so versatile.
Well, the other day was no exception!
Em turned a Big Ole’ 8 over the weekend and decided she wanted a slumber party. Yes, I still have all my hair…… BARELY!
I thought it would be fun to change up her Birthday cake. So, instead of doing one big cake, I did several smaller mason jars for all the girls.
First, I made a boxed chocolate cake (Em’s favorite).

Then I took one of my biscuit cutters that I knew would fit into the mason jar and cut holes out ….

The cake was a little thick, so I cut those in half and layered them in the bottom of 1/2 pint mason jars.

Then, I took the buttercream icing I made. (* I used this homemade recipe here , but store bought is fine. I mean, come on…. I used a boxed cake mix. )

Added a swirl of it to the top of the cake.

Then topped with some rainbow sprinkles.

Yummmmmmm.

Now, at this point, I realized that with the amount of buttercream icing I made and the amount of mason jars I still had to do, I would never have enough to keep going at the thickness I originally cut the cake. So, I decided to keep the cake as thick as the biscuit cutter cut it this time. If you do less jars than I did, you can always keep the thickness of the cake the same.

Then, I repeated with the buttercream and topped off with more sprinkles. Once I was finished, I felt like they looked like little milkshakes, so I stuck these cute blue and white polka dotted paper straws in them I found at Target.
TIP: Stick them in the fridge for 5 minutes and serve. There is something about giving them a slight little chill that makes them better in my opinion. 😉


My favorite part of the whole thing was that Em decided she wanted everyone to be able to make a wish that night, not just her. So, every girl got their own mason jar with their own candle to blow out!
I love her sweet heart!
Just a little side note: I had a lot of leftover cake. If you do not want to waste the cake, it would be great to break up the remaining cake and either freeze for later or use it within a day or so in a trifle.
Everything is better in a Mason Jar! These would be great for entertaining a large crowd too. Not to mention, they could be technically considered portion control, right?
XOXO,
Esther
 |
 |
|
 |

You must be logged in to post a comment.