
Entertaining
Chocolate Trifle w/ Raspberry Buttercream Frosting

This is the sweet I made for my sweets today.
This was also not what I had intended to make for them. On Valentine’s Day, we tend to make it more about the kids than ourselves anymore. So, the plan this year was to do steak, potatoes, asparagus, and a great dessert. We thought it would be fun to watch the movie, Alexander and the Terrible, Horrible, No Good, Very Bad Day. (Did I Say that right? I never do……..)
Little did I know how much that movie would impact my dessert making skills.
I had this great idea to fix these individual chocolate cakes with this great ganache topping with little Wilton sugar flowers on top.
Everything was going great until I got to here:

I was all like, “Oh yeah! I got this! Came up with this on my own. Going to rock this and my family is going to think I’m a rockstar!”
Yeahhhhhhhhhh……. not so good after that. Everything went wrong!

First, this happened………………
Then,

this………………………

Thank goodness I still had this. FYI: I used a boxed cake mix.

I heart boxed cake mixes.
Not a stinkin thing wrong with boxed cake mixes.
Just sayin……….. When people say, “oh my goodness! This is the best cake I have EVER had!”
You simply say, “Awe! Thank you!” And leave it at that. 😉

So, I went with Plan B. Start stuffing wine glasses and make a trifle.

I stuffed with left over cake and fresh raspberries, with some of the raspberry buttercream icing I made earlier for the cakes.
Wanna know how I made the frosting?
This is what I did:

I took two sticks of softened unsalted butter and using a hand mixer, beat for 2 minutes until light and fluffy. Then, I slowly added 6 cups of powdered sugar, alternating between 1/8 cup of skim milk in between when the mixture got too dry.
Then,

I added a 1/4 cup of raspberry puree to the frosting, which I made by first…………

taking a pint of fresh raspberries and 1 tablespoon of granulated sugar and pulsing in a blender until it was

smooth. Since I had little left over (approx. 1/4 cup) , I used it again later in assembling the trifle.

It made the BEST tasting Raspberry Buttercream Frosting. I often use fresh berries to flavor and turn icing a pink color instead of using red food dye b/c I have an allergy to it myself. Needless to say, I have never had Red Velvet Cake and I often dream of how it may taste. But alas, I shall never know. Oh well.
Anyway, back to the trifle!

Like I mentioned earlier, after layering in no particular order, the cake, fresh raspberries, and the frosting…….. I added a dollop of raspberry puree and then some more cake and frosting.

Then, I added some more frosting ( I know! Enough already with the frosting!) and berries and finally, the Wilton sugar flowers.
It could have been a Terrible, Horrible, No Good, Very Bad Day with the catastrophe that was my cake making skills, but a very wise Pastor once told me, “Never compare your Behind the Scenes to someone else’s Highlight Real”!
So, here I am. Melted cakes and all,
telling you that you can turn a mess into something beautiful and tasty afterall.

I wish y’all a Happy and Sweet Valentine’s Day, from my
HEART
to
YOURS!
XOXO,
Esther

Rustic Apple Pie

A lot has been happening around here lately. For starters………………..
MY BABY BROTHER GOT MARRIED!
We are so so so happy for him and his new wife. We gained a sister, friend, and an entire new family that we deeply care for and love!
Now they just need to start having babies and my life will be complete. No pressure, right? LOL!
Well, Mom and Dad were here as well and one of the last nights they were here, we had everyone over for Sunday dinner and mom made Apple Pie! I have made it before, but when Mom is in town, it’s best to just leave things like this to the “professionals”. 😉
I LOOOOOOOVE HER APPLE PIE!
It always has this Rustic quality to it and I love that she never tries to make it too “fake looking”. Everything is from scratch, including the crust.
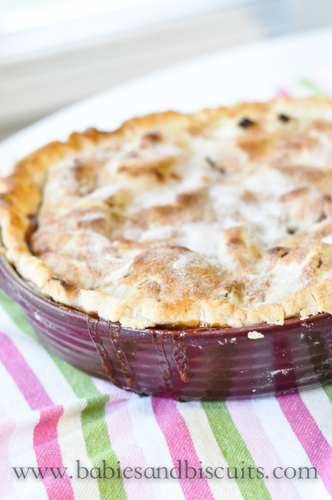
Just let me set the stage for you. It’s a crisp cool day in Fall. The aroma from the kitchen is taking over the house as the cinnamon and sugar fills the air. As you bring your fork to your mouth filled with that bite of perfection…….. um YEAH! That happened here that day! The crust was slightly crunchy, while the filling was a thick cinnamon apple yumminess!
Come on y’all, it’s FALL!!!
Why not get in the kitchen and bake you up some Apple Pie?

You know you want too! And just in case, because I love you so much……..Here is Mom’s recipe!
Recipe: Rustic Apple Pie
– 2 Homemade or Prepared Deep Dish Pie Crusts (*You will need 2 crusts, one for the bottom and one for the top. *NOTE: Crusts perform better when refrigerated well. If frozen, make sure to thaw completely and chill in fridge until you need it.)
– 15 Granny Smith Apples, Peeled, Cored and Sliced (*NOTE: Slice no larger than a 1/2 inch in thickness or apples will not cook properly)
– 1 Heaping Tbsp. Cinnamon
– 2 Cups Sugar
– 1 Tbsp. Cornstarch
– 4 Tbsp. Unsalted Butter
– 2 Tbsp. Milk
– Small amount of additional cinnamon and sugar for dusting the top of pie.
Directions:
– Preheat oven to 400 degrees.
– Take a 9in. pie plate and spread first crust evenly over bottom. Refrigerate.
– Place apple slices into a large mixing bowl.
– In a separate bowl, combine cinnamon and sugar and cornstarch.
– Add Cinnamon mixture to apples and mix well using hands, making sure all apples are coated well.
– Remove pie plate from fridge and add apple slice mixture. *NOTE: Apples will mound up in dish. This is normal and makes for a great pie!
– Cut 4 Tbsp. Butter in half and dot over apple mixture evenly.
– Top apples with remaining pie crust. Pinch all around edges of pie to “seal” crusts together. *NOTE: This can be done by using a fork or by index finger and thumb method all the way around.
– Brush top of pie with 2 Tbsp. Milk.
– Lightly dust top of pie with additional cinnamon and sugar.
-Cut 2-3 slits (1 in. long) in top of pie crust for steam to escape during baking.
– Bake pie in oven for 15 minutes.
– Turn temperature down to 350 degrees and continue baking pie for an additional 45 minutes.
– If at end of baking, pie is not golden brown, turn temperature back to 400 degrees and watch closely for 5 minutes. *That should do the trick! 😉
*APPLE PIE ALWAYS TASTES BETTER WITH VANILLA ICE CREAM! ……….. just sayin !
I hope you enjoy the recipe!
XOXO,
Esther

Teacher Appreciation Luncheon
A couple of months ago, I was asked to throw the end of year Teacher Appreciation Luncheon at my son’s preschool. I love being hospitable to others. In fact, I’m pretty sure that has turned out to be my calling in life. I really hope that statement doesn’t come across as boastful. In fact, I mean it to be anything but that.
You see, back when I was in school, I felt like everyone knew what they wanted to “be when they grew up”………… EXCEPT ME!
When asked that question, I think I came up with something original, like…… an actress! I even convinced myself that I REALLY wanted to do that and even got as far as auditioning for the Raleigh Christmas Carol, which happens to be ran by no other than Ira David Wood, which happens to be the father of Evan Rachel Wood, (the hollywood actress). (I realize I just gave you ENTIRELY TOO MUCH information!)
Anyway, I had to sing for my audition and as it got closer and closer to my turn, I realized VERY QUICKLY that I did NOT want to be an actress afterall !!! Well, God must have heard my plea to make something happen that would allow me to crawl out of the building prior to my turn because literally 3 turns before my own ( I know this because I was counting as I sweat profusely) , they announced they would be taking a quick break.
I QUICKLY seized the opportunity to turn to my mom and let her know my thoughts and after seeing the shear TERROR in my eyes, she lovingly abliged my departure. (*THANK GOODNESS!)
Honestly, I cannot believe I just told you that! Oh well, I guess it isn’t a secret anymore………. The point is, I’m glad that I have found something I love to do for others and that I have turned out to be at least decent at and others appreciate.
BACK TO THE HOSPITABLE PART!….. 😉
I had a great group of ladies jump in to help me. We decided to go with a “Super Hero Theme”.

Now, I cannot claim ALL these ideas. I searched Pinterest (the Holy Grail of Ideas) and put our own spin on them.
The picture above is an IKEA picture frame that cost a whopping $. 99 ! That’s right, 99 cents!
Then, I just found a picture of Wonder Woman and sized it to 4×6 and printed on regular computer paper. The picture frame is double sided, so I printed 2 per frame ( I had 3, so I did 6 total) and lined them down the banquet table.

The table cloth is a simple deep blue also purchased from the Dollar store as well as red paper plates and gold napkins secured with red ribbon.

We did a candy bar and used jars from IKEA ( I had just gone a trip so they all really came in handy) .

I made the labels using glitter foam sheets found at the craft store. They are sticky back so you can play around with them how you like. I used a circle punch to make the white circle and then stuck them to the clothes pins. The clothes pins simply clip on to whatever container you choose. The small scoops were purchased at The Party Store for $.89 each.

I found the cutest Galvanized Container at Sams Club and layered chocolate chip cookies and specialty cupcakes from a local cupcake shop.

What candy bar would be complete without goody bags to put them in?

The goody bags are simply brown paper bags purchased at the Dollar Store and cut to fit (my best interpretation of The Captain America logo) sticky back glitter foam sheets left over from the candy labels.

Did you know that local establishments will graciously donate items to functions like this? All you have to do is ASK! Of course, it would be very courteous to give them adequate notice and NEVER FORGET to send them a “thank you” note to let them know just how much you appreciate their kindness. We were very lucky to have wonderful people in our community from a few different restaurants graciously donate to our function. The result was AMAZING!

These cool dispensers were picked up at Sam’s Club for $29.99 for the pair! Chalkboard necklaces let the teachers know which drink is which. Simple decorations that the volunteers found in their children’s rooms decorate the table. 🙂

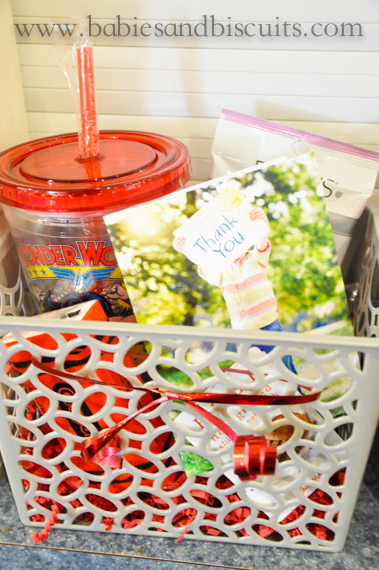
We made gift baskets for each of the teachers as well. I found the coolest drink cups (even though you can’t see them very well) at Michael’s. They had Wonder Woman on them and they were PERFECT! Paired with girly items from the Target dollar bins, they made a cute little gift for the teachers to take home.
I have to admit, when I was first asked to do this, I kind of PANICKED! What did I know about Teacher Luncheons??????
Well, after it was all said and done, I’m so glad that I had the opportunity to do it and the response from the teachers was worth it.
If you are planning or have been asked to help throw a Teacher’s Luncheon, I hope this may have given you some great ideas!
Have you thrown a Teacher Luncheon? If so, what was your theme? I would love to know!
Until next time…….
XOXO,
Esther

Mason Jar Birthday Cake !!!

Don’t you just love Mason Jars????
Well, I do. I must have a million of them. Between all the empty ones from canned goods I’ve used, to all the ones I decorate with, I might have to change that number to a BILLION!
They are pretty much a staple here in the South, mostly because they are so versatile.
Well, the other day was no exception!
Em turned a Big Ole’ 8 over the weekend and decided she wanted a slumber party. Yes, I still have all my hair…… BARELY!
I thought it would be fun to change up her Birthday cake. So, instead of doing one big cake, I did several smaller mason jars for all the girls.
First, I made a boxed chocolate cake (Em’s favorite).

Then I took one of my biscuit cutters that I knew would fit into the mason jar and cut holes out ….

The cake was a little thick, so I cut those in half and layered them in the bottom of 1/2 pint mason jars.

Then, I took the buttercream icing I made. (* I used this homemade recipe here , but store bought is fine. I mean, come on…. I used a boxed cake mix. )

Added a swirl of it to the top of the cake.

Then topped with some rainbow sprinkles.

Yummmmmmm.

Now, at this point, I realized that with the amount of buttercream icing I made and the amount of mason jars I still had to do, I would never have enough to keep going at the thickness I originally cut the cake. So, I decided to keep the cake as thick as the biscuit cutter cut it this time. If you do less jars than I did, you can always keep the thickness of the cake the same.

Then, I repeated with the buttercream and topped off with more sprinkles. Once I was finished, I felt like they looked like little milkshakes, so I stuck these cute blue and white polka dotted paper straws in them I found at Target.
TIP: Stick them in the fridge for 5 minutes and serve. There is something about giving them a slight little chill that makes them better in my opinion. 😉


My favorite part of the whole thing was that Em decided she wanted everyone to be able to make a wish that night, not just her. So, every girl got their own mason jar with their own candle to blow out!
I love her sweet heart!
Just a little side note: I had a lot of leftover cake. If you do not want to waste the cake, it would be great to break up the remaining cake and either freeze for later or use it within a day or so in a trifle.
Everything is better in a Mason Jar! These would be great for entertaining a large crowd too. Not to mention, they could be technically considered portion control, right?
XOXO,
Esther
 |
 |
|
 |

You must be logged in to post a comment.